In the following series of blog posts I’m going to shift some attention to server-side development in so much as it can complement a Codename One client application. In this post I’ll demonstrate how you can combine a MySQL database, a web-service layer, and a Codename One client to produce a “Contacts” app. I’m going to steal the Contacts code from the Kitchen Sink demo for the UI, but I’ll implement a different datasource that loads the contacts from a remote MySQL database instead of from the phone’s internal contacts.
Requirements
I’ll be using Xataface (which is built with PHP) for the web service, and MySQL for the database, so I’ll need to have a LAMP stack installed on my server with PHP 5 or higher, and MySQL 5 or higher. For development, I am going to use XAMPP because it provides everything with a simple installer – and it works on both Mac and Windows. If you’re on Linux, then it’s arguably easier – but I won’t cover it here. I’m using a Mac OS X development machine.
| __ | While I am using a PHP-based solution for the web service, this tutorial doesn’t require you to have any knowledge of PHP, and, in fact, doesn’t involve a single line of PHP code. |
|---|
The Database
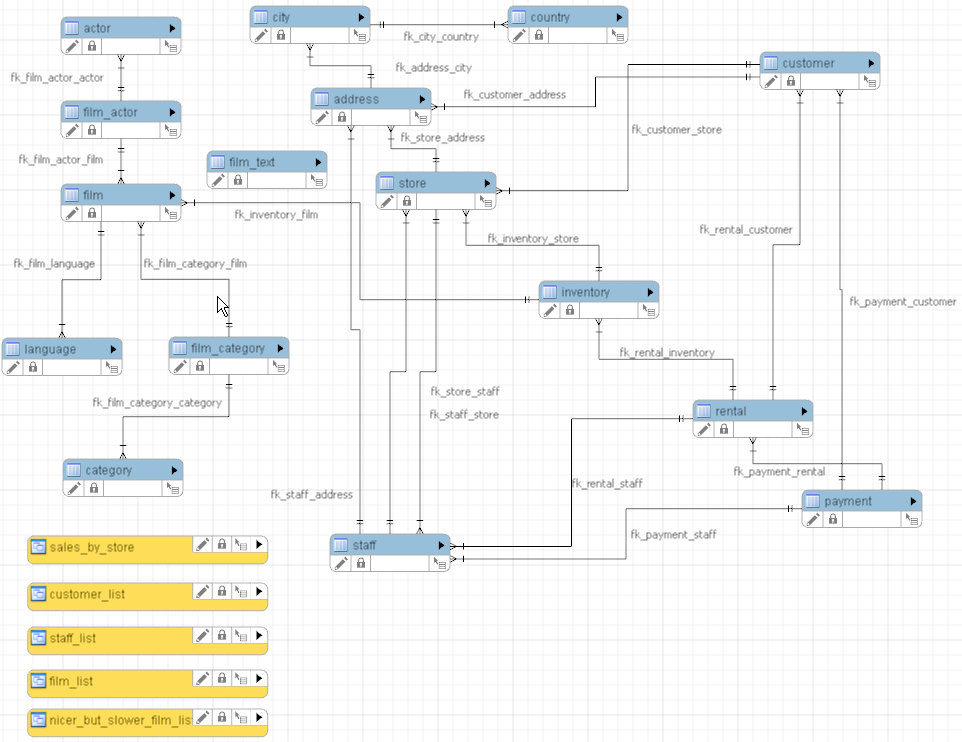
For my database I’m going to use the Sakila sample database provided by MySQL. This database models a video rental store, including such aspects as customer information, staff info, film info, and actor info. The schema is as follows (schema taken from here):
As you can see, this database includes much more than contact information, but our app will focus only on contact info. This is actually quite a typical scenario for a mobile app. I frequently create ad-hoc mobile apps that consume specific parts from the data source in order to help with testing of the main app. Mobile apps, in my experience, work quite well when they are focused on doing one task well, rather than doing a whole bunch of tasks as you would expect in a desktop application.
So in this case, you can imagine that the store owners might want an app to help keep track of the contacts in the system. That is the app we will build here.
Installing the Database
I’ll be using the mysql command-line client that is installed at /Applications/XAMPP/bin/mysql on my development machine. If yours is installed elsewhere then you’ll adjust your commands accordingly.
First, download the Sakila database from here. (Link obtained from this page in case the direct link becomes broken later for some reason).
When you extract the archive, you’ll find two SQL files:
sakila-schema.sql – This contains the database schema.
sakila-data.sql – This contains the sample data
We’ll install both into our database with the following commands.
$ mysql -u root -p < sakila-schema.sql
$ mysql -u root -p < sakila-data.sql
Once these have executed, you should be able to log into mysql and see the tables listed:
$mysql -u root -p


USE sakila;
Database changed
SHOW TABLES;
+----------------------------+
| Tables_in_sakila           |
+----------------------------+
| actor                      |
| address                    |
| category                   |
| city                       |
| country                    |
| customer                   |
| customer_list              |
| film                       |
| film_actor                 |
| film_category              |
| film_list                  |
| film_text                  |
| inventory                  |
| language                   |
| nicer_but_slower_film_list |
| payment                    |
| rental                     |
| sales_by_film_category     |
| sales_by_store             |
| staff                      |
| staff_list                 |
| store                      |
+----------------------------+
22 rows in set (0.00 sec)
SELECT COUNT(*) FROM film;
+----------+
| COUNT(*) |
+----------+
| 1000     |
+----------+
1 row in set (0.02 sec)
SELECT COUNT(*) FROM film_text;
+----------+
| COUNT(*) |
+----------+
| 1000     |
+----------+
1 row in set (0.00 sec)
The Web Service
For the web service layer, I’m going to use Xataface because it requires about the least amount of configuration necessary for us to connect to a MySQL data source over HTTP.
DISCLAIMER: I am the creator of Xataface. I developed and released the original version in 2005, and have used it on countless apps since that time. It is useful setting up an administration interface for a MySQL database quickly.
There are a few different ways to set up a Xataface application. The fastest, easiest way is using the Xataface Yeoman generator.
| __ | You’ll need to have NodeJS and Yeoman installed on your development machine to use the Yeoman generator. Don’t worry, they will probably be the most painless installs you ever have to do. |
|---|
Setting up the Xataface App
Open a command prompt and navigate to a web-accessible directory. In my case, I’m using XAMPP which stores the web documents in /Applications/XAMPP/htdocs, so that is where I will go:
$ cd /Applications/XAMPP/htdocs
At the prompt type:
$ yo xataface sakila
| __ | If your mysql binary is not in your environment PATH you’ll need to provide it via that --mysql option. Similarly if git is not in your environment path you’ll need to provide the --git option. |
|---|
The above command basically says “create a Xataface application in the directory named ‘sakila’”.
Now, follow the prompts:
First it will ask you for some database connection information.
? MySQL Hostname localhost
? App Database Name sakila
? App Database Username sakila
? App Database Password ********
In our case the database host is localhost, the database name is “sakila”, and we are going to generate a user for this application named “sakila” with password “password” that has full access to the “sakila” database.
Next it will ask us which tables to include in the main menu. This is only used by the web interface for the app, which is beyond the scope of this tutorial. We are merely using Xataface as a thin web-service layer to enable our Codename One app to query the database. Nonetheless, we need to include at least one table here, so we’ll add the “customer” table to the main menu.
? List the tables that should be included in the main menu in the form: table1=L
abel1,table2=Label2, etc... customer=Customers
Next it will ask us about our authentication and permission preferences. Xataface provides a rich multi-user authentication and permissions system that will allow you to decide exactly who can access what. This generator will setup the default table-based authentication and add a “users” table to the database if you choose (and we will choose to do so). By default there are 3 levels of user accounts:
ADMIN
USER
<NONE>(i.e. not logged in).
By default, ADMIN users can access everything, regular users can access everything, but in a read-only fashion, and the public (i.e. not logged in) can access nothing.
Default settings authentication are as follows:
Table-based authentication with Users table definition:
create table if not exists `users` (
    `username` VARCHAR(100) NOT NULL PRIMARY KEY,
    `password` VARCHAR(64) NOT NULL,
    `role` ENUM('USER','ADMIN') DEFAULT 'USER',
    `email` VARCHAR(255) NOT NULL,
    UNIQUE KEY (`email`));

 With sha1 encryption on the password field.
ADMIN users are granted ALL permissions, logged in users are granted READ ONLY permissions, and the public (i.e. not logged-in users) are granted NO ACCESS.

? Would you like to use these default authentication settings? Yes
At this point it will create the “sakila” directory and set up some of the scaffold file structure for the application.
Cloning xataface into /Applications/XAMPP/xamppfiles/htdocs/sakila
Cloning into '/Applications/XAMPP/xamppfiles/htdocs/sakila/xataface'...
remote: Counting objects: 11025, done.
remote: Compressing objects: 100% (46/46), done.
remote: Total 11025 (delta 23), reused 0 (delta 0), pack-reused 10979
Receiving objects: 100% (11025/11025), 16.87 MiB | 5.01 MiB/s, done.
Resolving deltas: 100% (6630/6630), done.
Checking connectivity... done.
Checking out files: 100% (2458/2458), done.
Copying .htaccess file
Copying .htaccess file to templates_c
Now it will ask us about modifications that need to be made to the database.
? Create the database sakila now? No
? Create the user sakila now? Yes
? Grant permissions to sakila now? Yes
This generator needs to execute some SQL commands that require MySQL root permissions.  This may include things like creating a database for the app, creating a MySQL user for the app to access the database or granting permissions to a MySQL user for the app to access the database.
 This username will not be used by the app itself and will not be stored anywhere.  It is just for the purpose of setting up the app initially.

? Root MySQL Username root
? Create the table users now? Yes
We told the generator to create a “users” table to store user accounts, but we haven’t added any user accounts yet. Next, the generator will allow us to enter a first “admin” account.
? Insert Admin user in users table? Yes
? Admin username admin
? Admin password ********
? Admin Email Address [[email protected]](/cdn-cgi/l/email-protection)
Now, after running some SQL commands, the application should be set up.
The app has been successfully created at /Applications/XAMPP/xamppfiles/htdocs/sakila
To verify that the app was set up correctly, we’ll point our web browser to the application. In my case the application is located at http://localhost/sakila
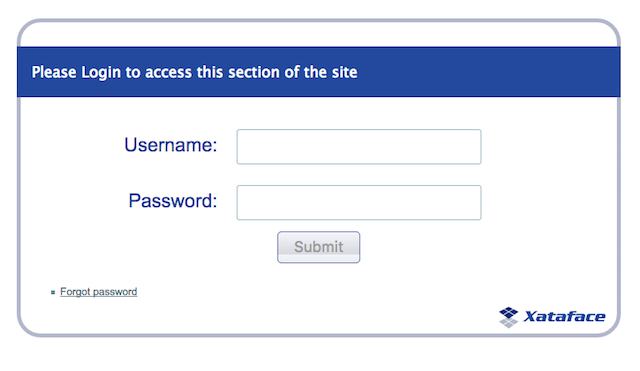
If all went well you should see a login form similar to the image below:
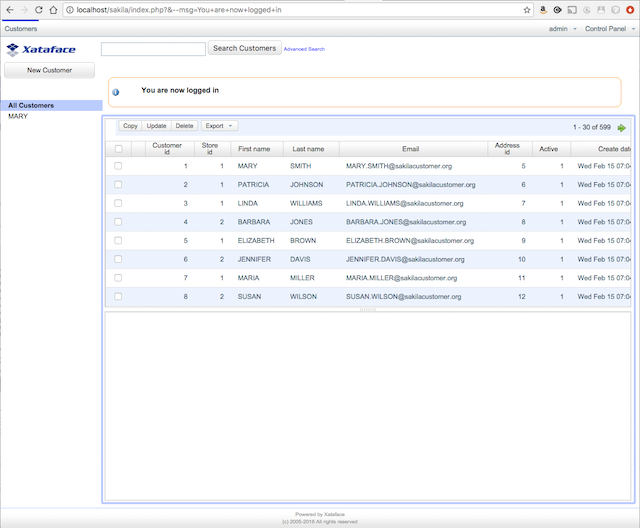
You should also verify that your admin user was set up correctly, but trying to log in on this form. You should see a list of customers:
The Client App
On the client side, I’m going to use the CN1Xataface library to connect to the Xataface-powered web service that we just set up. Here is a redacted program listing of the entire app:
package com.mycompany.myapp;
// ... redacted imports ...
import com.xataface.query.XFClient;
import com.xataface.query.XFQuery;
import com.xataface.query.XFRecord;
import com.xataface.query.XFRowSet;

// ... redacted imports
/**
 * This file was generated by <a href="https://www.codenameone.com/">Codename One</a> for the purpose
 * of building native mobile applications using Java.
 */
public class MySQLContactsDemo {

    private Form current;
    private Resources theme;

    // redacted member declarations

    // Database Connection Properties
    private XFClient client;

    // ... redacted Style utility methods

    // Lifecycle Methods -------------------------------------------------------
    public void init(Object context) {

        // redacted boilerplate init stuff ...

        client = new XFClient("http://localhost/sakila/index.php"); __**(1)**

    }

    public void start() {
        if(current != null){
            current.show();
            return;
        }
        Form hi = new Form("Contacts");
        hi.setLayout(new BorderLayout());

        hi.show();

        // Wrap loading of contacts in callSerially so that it happens after the form
        // is shown....
        Display.getInstance().callSerially(()->{
            loadContacts(rowset->{  __**(2)**
                hi.addComponent(BorderLayout.CENTER, createContactsList(hi, rowset));
            });
        });
    }

    public void stop() {
        // redacted boilerplate ...
    }

    public void destroy() {
    }

    // Web Service Methods -----------------------------------------------------

    /**
     * Loads all of the contacts from the database asynchronously.  On complete
     * the callback will be called with the resulting rowset as a parameter, or
     * null if there was an error.
     * @param callback Callback to handle the received rowset.
     */
    private void loadContacts(SuccessCallback<XFRowSet> callback) {  __**(3)**
        XFQuery q = new XFQuery("customer")
                .sort(XFQuery.SortOrder.ASCENDING, "last_name")
                .select("first_name", "last_name", "email")
                .findAll();
        client.find(q, callback);
    }

    /**
     * Convert a record from the "contact" table into a Contact object.
     * @param record A record from the "contact" table.
     * @return A Contact object
     */
    private static Contact createContact(XFRecord record) {  __**(4)**
        Contact c = new Contact();
        c.setFirstName(record.getString("first_name"));
        c.setFamilyName(record.getString("last_name"));
        c.setPrimaryEmail(record.getString("email"));
        return c;
    }

    /**
     * Convert a rowset (from the contact table) into an array of Contact
     * objects
     * @param rowset A rowset from the contact table.
     * @return An array of Contact records.
     */
    private static Contact[] rowsetToContactsArray(XFRowSet rowset) {  __**(5)**
        List<Contact> lst = new ArrayList<Contact>();
        for (XFRecord record : rowset) {
            lst.add(createContact(record));
        }
        return lst.toArray(new Contact[lst.size()]);
    }

    // View Factory Methods ----------------------------------------------------

    /**
     * Creates a list of contacts included in the specified rowset.
     * @param parentForm The parent form
     * @param rowset The rowset to encapsulate (from the "contact" table)
     * @return A container to be added to the form.
     */
    private Container createContactsList(Form parentForm, XFRowSet rowset) {
        Contact[] contacts = rowsetToContactsArray(rowset);

        // redacted image generation code ...

        // Create the parent container
        final Container contactsDemo = new Container(BoxLayout.y());
        contactsDemo.setScrollableY(true);

        // Add all of the rows to the container
        for(Contact c : contacts) {
            Container row = createContactRow(c, contactsDemo);
            if (row != null) {
                contactsDemo.add(row);
            }
        }
        contactsDemo.revalidate();
        finishedLoading = true;

        // XFClient won’t load the whole set all at once because that would be a waste of
        // network traffic.  Default batch size is 30.  We use InfiniteScrollAdapter
        // to load more of the result set as the user scrolls down the list.

        // Store reference to the last loaded rowset.  We can use this
        // to obtain the "next" rowset, the next time the infinite scroll adapter
        // is fired.
        XFRowSet[] lastSet = new XFRowSet[]{rowset};
        InfiniteScrollAdapter.createInfiniteScroll(contactsDemo, () -> {

            // Check if we have have already loaded all of the records in the found set.
            if (lastSet[0].getFound() > lastSet[0].getLast()) {

                // Use the previous rowset to get the query to obtain the next result set.
                XFQuery nextQuery = lastSet[0].getQuery().getNextQuery();  __**(6)**

                // Pass the query to the client to load the next result set asynchronously
                client.find(nextQuery, newResult -> {
                    if (newResult == null) {
                        return;
                    }
                    List<Component> toAdd = new ArrayList<Component>();
                    for (XFRecord row : newResult) {
                        Container cntRow = createContactRow(createContact(row), contactsDemo);
                        if (cntRow != null) {
                            toAdd.add(cntRow);
                        }
                    }
                    InfiniteScrollAdapter.addMoreComponents(contactsDemo, toAdd.toArray(new Component[toAdd.size()]), newResult.getLast() < newResult.getFound());

                    // Make sure to store this new result set as lastSet so that the next time
                    // we load records we continue where we left off
                    lastSet[0] = newResult;
                    contactsDemo.revalidate();
                });
            }
        });

        return contactsDemo;
    }

    /**
     * Creates a single row for the contact list that encapsulates the provided
     * contact.
     * @param c The contact to represent with this row.
     * @param parent The parent container to which the row is to be added.  This method doesn’t actually add the
     * row to the parent, but it does need to reference it for some of the listeners that are added to the row.  The caller
     * should add the resulting row to the parent after calling this method.
     * @return A container encapsulating the row, or null if the contact didn’t have a name.
     */
    private Container createContactRow(Contact c, Container parent) {
        // redacted... no Database-specific code here.
    }

}
| __1 | Initialize the client |
|---|---|
| __2 | Load the contacts from Xataface Asynchronously |
| __3 | The method that loads the contacts. Simply wraps an XFQuery that is submitted to the client. |
| __4 | Utility method to convert an XFRecord into a Contact object |
| __5 | Utility method to convert XFRowSet into an array of Contact objects. |
| __6 | Use the getNextQuery() method to easily load the next batch of records. |
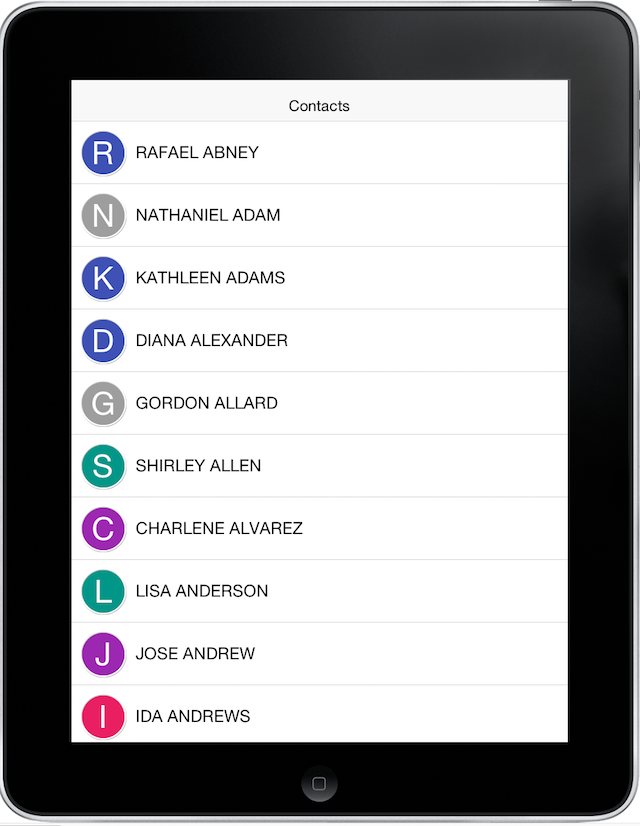
If you run the app in the Codename One simulator, it will look something like this:
The full program listing can be found here.
In redacting non-database-related sections from this program listing, I’m hoping to highlight just how easy it is to integrate data from our MySQL database into our Codename One app. All database requests are handled by the XFClient class which includes your basic CRUD methods:
// Perform async query on db to retrieve rowset
public void find(
     XFQuery query,
     SuccessCallback<XFRowSet> callback
);

// Save record asynchronously
public void save(
    XFRecord record,
    SuccessCallback<XFRecord> callback
);


// Delete record asynchronously
public void delete(
    XFRecord record,
    SuccessCallback<Boolean> callback
);
In our app we created a new client inside the init() method:
client = new XFClient("http://localhost/sakila/index.php");
| __ | We used the localhost address to the Xataface app, which will only work when we are running in the simulator on the same machine as the server. If you want to test on device, you’ll need to use an address that is reachable from the device. You should be able to check your computer’s network settings to see what your machine’s LAN address is (e.g. “192.0.0.8”, or “steves-imac.local”). And ultimately when you deploy your app to production, you’ll use the “real” server address that should be accessible over the entire internet. |
|---|
Authentication
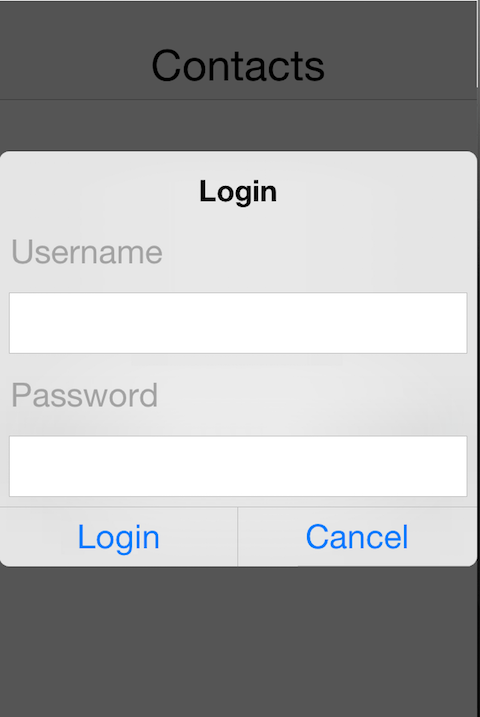
Notice that we didn’t include any username or password information in our client. The XFClient class does include setUsername() and setPassword() methods, but we’ve omitted them here to allow the end user to enter their own account. The first time we run our app, it will prompt the user with a login dialog:
The nice thing about allowing the user to log in, is it allows you to customize the permissions on a per-user basis on the server side. For my demo, I only created a single ADMIN account, but you are also able to add more limited accounts that only have access to certain tables, fields, or rows from certain tables.
Building the Queries
Database queries are encapsulated by the XFQuery class. Queries are always targeted on a single table. You can provide many types of filters on the results including, but not limited to:
Exact matches
Partial matches
Range matches (less than, greater than, less than or equal, greater than or equal, or in a range)
Full-text, multi-column matches.
In our app the query that we used was:
XFQuery q = new XFQuery("customer")  __**(1)**
        .sort(XFQuery.SortOrder.ASCENDING, "last_name") __**(2)**
        .select("first_name", "last_name", "email") __**(3)**
        .findAll(); __**(4)**
        client.find(q, callback);
| __1 | Specifies query on the customer table |
|---|---|
| __2 | Sort results ascending by last name. |
| __3 | Include only the first_name, last_name, and email fields in the results. |
| __4 | Find all matches (as opposed to findOne() which will only fetch the first match. |
If we omit the select() call, it will just include all of the columns of the table in our result set. But this is a waste of bandwidth since we only need those 3 fields. It is also worth noting that we are only sorting on one column (last_name) here but we could chain multiple sort() calls into the query in order to sort on multiple fields.
Let’s take a look at a few examples of how we could customize our query to get different results:
Filter on last_name
Only include results with last name “Smith”
q.matches("last_name", "Smith");
This would match “Smith” but not “Smithers”
If you want to match “Smith” or “Smithers” we could do:
q.contains("last_name", "Smith");
This would match “Smith”, “Smithers”, or “Sexsmith”. If we wanted to exclude “Sexsmith” we could do something like:
q.like("last_name", "Smith%");
Or something a little more commonly practical, if we wanted only those contacts whose last name begins with “S”:
q.like("last_name", "S%");
| __ | We could achieve the same effect with q.in("S", "SZZZZZZ") |
|---|
Filter on Dates
Suppose we were only interested in customers that had been modified in the past day:
Calendar cal = Calendar.getInstance();
cal.add(Calendar.DATE, -1);
q.greaterThan("modified", cal.getTime());
Xataface supports many querying features not listed here. For more detailed information see the cn1-xataface docs.
Using MySQL Views
One limitation of the XFQuery class is that queries are always only performed on a single table. What if you need to perform a more complex query that spans across multiple tables, as is a common requirement of datbase applications. The easiest solution is to create a view in your database that contains all of the data you need, and then query that. For example, in our application we used the customer table which included only the customer name and email address. However, the database stores quite a bit of information about the customer in other tables. Of interest are the customer’s address and phone number for an app like this, and the database designers provided a nice view that includes all of this information:
CREATE VIEW `customer_list` AS select
    `cu`.`customer_id` AS `ID`,
    concat(`cu`.`first_name`,_utf8' ',`cu`.`last_name`) AS `name`,
    `a`.`address` AS `address`,
    `a`.`postal_code` AS `zip code`,
    `a`.`phone` AS `phone`,
    `city`.`city` AS `city`,
    `country`.`country` AS `country`,
    if(`cu`.`active`,_utf8'active',_utf8'') AS `notes`,
    `cu`.`store_id` AS `SID`
    from ((
        (`customer` `cu`
         join `address` `a` on((`cu`.`address_id` = `a`.`address_id`)))
         join `city` on((`a`.`city_id` = `city`.`city_id`)))
         join `country` on((`city`.`country_id` = `country`.`country_id`)
     ))
Xataface will allow you to query a view just as if it were a regular table, except that you need to add a tiny bit of configuration to let it know what the primary key of the view is.
Just to get you started down this path, let’s open the terminal and navigate to the sakila directory that we created for our app:
$ cd /Applications/XAMPP/htdocs/sakila
Now we’ll create a “fields.ini” file for the “customer_list” table (er view) at tables/customer_list/fields.ini.
$ mkdir tables/customer_list
$ touch tables/customer_list/fields.ini
And inside the fields.ini file we place:
[ID]
    Key=PRI
This configuration marks the ID field as the primary key of the customer_list view.
Now we can use the customer_list view from our Codename One app as if it were a regular table.
Try out the App
For your convenience, I have published the app on a development server so that you can try it out yourself. I have removed the “admin” user and added a read-only account. You should log in with:
Username: demo, Password: demo (case sensitive)
Contacts Demo (The Codename One app built using the Javascript port).
Download the .war file of the JS version and install/run it in your own servlet container.
Resources
Archived Comments
This post was automatically migrated from the legacy Codename One blog. The original comments are preserved below for historical context. New discussion happens in the Discussion section.
Toby Mundy — December 1, 2016 at 10:02 pm (permalink)
I followed the tutorial but could not get the server setup properly. All appeared to go well but when I pointed the web browser at http://localhost/sakila to test the server setup I just got the following error in the browser:
Warning: mysqli_connect(): (HY000/1045): Access denied for user ‘sakila’@’localhost’ (using password: YES) in C:xampphtdocssakilaxatafacexfdbdriversmysqli.php on line 4
Warning: mysqli_error() expects exactly 1 parameter, 0 given in C:xampphtdocssakilaxatafacexfdbdriversmysqli.php on line 17
Fatal error: Uncaught exception ‘Exception’ with message ‘Error connecting to the database: ‘ in C:xampphtdocssakilaxatafaceDatafaceApplication.php:608 Stack trace: #0 C:xampphtdocssakilaxatafaceDatafaceApplication.php(1081): Dataface_Application->Dataface_Application(NULL) #1 C:xampphtdocssakilaxatafacepublic-api.php(58): Dataface_Application::getInstance(NULL) #2 C:xampphtdocssakilaindex.php(4): df_init(‘C:\xampp\htdocs…’, ‘xataface’) #3 {main} thrown in C:xampphtdocssakilaxatafaceDatafaceApplication.php on line 608
shannah78 — December 2, 2016 at 4:23 am (permalink)
It appears that the database user wasn’t created properly. Check the conf.db.ini file. It should list the username and password that it is trying to connect with. Then ensure that mysql has that user.
If you need to add the user “username” with password “password” in mysql you can do it with:
create user ‘username’@localhost identied by ‘password’;
grant all privileges to on sakila.* to username@localhost;
flush privileges;
Toby Mundy — December 2, 2016 at 1:11 pm (permalink)
Thanks, I had not added mysql to environment PATH.
Rudy Lemaitre — February 8, 2017 at 3:18 pm (permalink)
Hi all,
i have juste a question for the lib.
I have copy / past the lib cn1-xtaface.cn1lib in my lib folder in eclipse project, i build the path.
After i create importe the lib and create the private XFClient client, but eclipse note know the lib and methode.
Can you help me ?
thanks for your helpsorry for my english
thanks
shannah78 — February 8, 2017 at 4:43 pm (permalink)
Did you refresh cn1libs in your project after adding the cn1-xataface.cn1lib? Note: You can also install it via Codename One settings (in extensions). But you’d still need to to the refresh cn1libs step after that.
Rudy Lemaitre — February 8, 2017 at 6:14 pm (permalink)
Rudy Lemaitre says:
Hi restart Eclipse, it’s the same ?
I try refresh tomorrow, thanks
Rudy Lemaitre — February 9, 2017 at 8:30 am (permalink)
Rudy Lemaitre says:
hello,
i refresh but it’s the same https://uploads.disquscdn.c…
Rudy Lemaitre — February 9, 2017 at 10:44 am (permalink)
Rudy Lemaitre says:
it"s ok now
i make a new install of eclispe and works now 🙂
thanks 😉
Chris — April 10, 2017 at 8:10 pm (permalink)
Chris says:
I’m new to this – do I need to install Xataface on my web server, or just as part of the app?
shannah78 — April 11, 2017 at 3:58 pm (permalink)
shannah78 says:
Xataface goes on your web server.
Chris — April 11, 2017 at 4:09 pm (permalink)
Chris says:
Thanks – I use webspace from x10hosting, so presumably I can’t install Xataface on there? Or is it possible to do it when you are renting webspace?
shannah78 — April 12, 2017 at 4:40 pm (permalink)
shannah78 says:
Yes. You can use Xataface on any host that has PHP and MySQL. The instructions in this article assume you have your own server (or have shell access and server has npm installed). But you can also just upload xataface manually to your webspace. Here are some manual install instructions: http://xataface.com/wiki/Ho…
Brutus — April 27, 2017 at 1:17 pm (permalink)
Brutus says:
Hi steve can you please also give an example of how to upload a file thanks!
Shai Almog — April 28, 2017 at 5:24 am (permalink)
Shai Almog says:
Pawan Jain — September 13, 2020 at 8:01 pm (permalink)
Pawan Jain says:
Hi,
I am trying to create this project. I have successfully created and configured on server side and able to login and connect to Sakila database and fetch customers.
However, I am facing issues when trying to set up codename one client in Eclipse (Oxygen). I have set up the project correctly, and also copied the cn1-xataface.cn1lib in lib folder and refreshed lib. I still continue to see errors – the following import statements continue to fail:
import com.xataface.query.XFClient;
import com.xataface.query.XFQuery;
import com.xataface.query.XFRecord;
import com.xataface.query.XFRowSet;Also tried reboot my PC but still the same issue.
My codename one setup is correct that I can create simple demo Apps and run.Any suggestions please?
Thanks, Pawan
Steve Hannah — September 16, 2020 at 9:52 pm (permalink)
Steve Hannah says:
It sounds like it is having issues refreshing the xataface cn1lib. Try again, going through the cycle of “Codename One” > “Refresh Cn1libs”. Then a clean build. Check the “lib/impl/cls” directory (which is where the cn1lib classes get extracted to when they are installed), and ensure that the specified classes are there.
Discussion
Join the conversation via GitHub Discussions.