This is the third and final instalment in a series on integrating 3rd party native SDKs in your Codename One application. If you missed the first two chapters, I recommend you begin with part one before reading this tutorial, as it provides much needed context for the procedures described here.
Part 2: Implementing the iOS Native Code
Part 1 of this tutorial focused on the Android native integration. Now we’ll shift our focus to the iOS implementation.
After selecting “Generate Native Interfaces” for our “MobihelpNative” class, you’ll find a native/ios directory in your project with the following files:
These files contain stub implementations corresponding to our MobihelpNative class.
We make use of the API docs to see how the native SDK needs to be wrapped. The method names aren’t the same. E.g. instead of a method showFeedback(), it has a message -presentFeedback:
We more-or-less just follow the iOS integration guide for wrapping the API. Some key points include:
Remember to import the
Mobihelp.hfile in your header file:#import "Mobihelp.h"Similar to our use of
runOnUiThread()in Android, we will wrap all of our API calls in eitherdispatch_async()ordispatch_sync()calls to ensure that we are interacting with the Mobihelp API on the app’s main thread rather than the Codename One EDT.Some methods/messages in the Mobihelp SDK require us to pass a
UIViewControlleras a parameter. In Codename One, the entire application uses a single UIViewController:CodenameOne_GLViewController. You can obtain a reference to this using the[CodenameOne_GLViewController instance]message. We need to import its header file:#import "CodenameOne_GLViewController.h"
As an example, let’s look at the showFeedback() method:
     -(void)showFeedback{

         dispatch_async(dispatch_get_main_queue(), ^{
             [[Mobihelp sharedInstance] presentFeedback:[CodenameOne_GLViewController instance]];
         });
     }
Using the MobihelpNativeCallback
We described earlier how we created a static method on the MobihelpNativeCallback class so that native code could easily fire a callback method. Now let’s take a look at how this looks from the iOS side of the fence. Here is the implementation of getUnreadCountAsync():
-(void)getUnreadCountAsync:(int)param{
    dispatch_async(dispatch_get_main_queue(), ^{
        [[Mobihelp sharedInstance] unreadCountWithCompletion:^(NSInteger count){
            com_codename1_freshdesk_MobihelpNativeCallback_fireUnreadUpdatesCallback___int_int_int(CN1_THREAD_GET_STATE_PASS_ARG param, 3 /*SUCCESS*/, count);
        }];
    });
}
In our case the iOS SDK version of this method is +unreadCountWithCompletion: which takes a block (which is like an anonymous function) as a parameter.
The callback to our Codename One function occurs on this line:
com_codename1_freshdesk_MobihelpNativeCallback_fireUnreadUpdatesCallback___int_int_int(CN1_THREAD_GET_STATE_PASS_ARG param, 3 /*SUCCESS*/, count);
Some things worth mentioning here:
The method name is the result of taking the FQN (
com.codename1.freshdesk.MobihelpNativeCallback.fireUpdateUnreadUpdatesCallback(int, int, int)) and replacing all.characters with underscores, suffixing two underscores after the end of the method name, then appending_intonce for each of theintarguments.We also need to import the header file for this class:
#import "com_codename1_freshdesk_MobihelpNativeCallback.h"
Bundling Native iOS SDK
Now that we have implemented our iOS native interface, we need to bundle the Mobihelp iOS SDK into our project. There are a few different scenarios you may face when looking to include a native SDK:
The SDK includes
.bundleresource files. In this case, just copy the.bundlefile(s) into yournative/iosdirectory.The SDK includes
.hheader files. In this case, just copy the.hfile(s) into yournative/iosdirectory.The SDK includes
.afiles. In this case, just copy the.afile(s) into yournative/iosdirectory.The SDK includes
.frameworkfiles. This is a bit trickier as Codename One doesn’t support simply copying the.frameworkfiles inside your project. In this case you need to perform the following:Right click on the
.frameworkfile (if you are using OS X) and select “Show Package Contents”.Find the “binary” file within the framework, and copy it into your
native/iosdirectory – but rename itlibXXX.a(where XXX is the name of the binary).Copy all
.hfiles from the framework into yournative/iosdirectory.Update all
#importstatements in the headers from#import <FrameworkName/FileName.h>format to simply#import "FileName.h"
The FreshDesk SDK doesn’t include any .framework files, so we don’t need to worry about that last scenario. We simply download the iOS SDK, copy the libFDMobihelpSDK.a, Mobihelp.h, MHModel.bundle, MHResources.bundle, and MHLocalization/en.proj/MHLocalizable.strings into native/ios.
Troubleshooting iOS
If you run into problems with the build, you can select “Include Sources” in the build server to download the resulting Xcode Project. You can then debug the Xcode project locally, make changes to your iOS native implementation files, and copy them back into your project once it is building properly.
Adding Required Core Libraries and Frameworks
The iOS integration guide for the FreshDesk SDK lists the following core frameworks as dependencies:
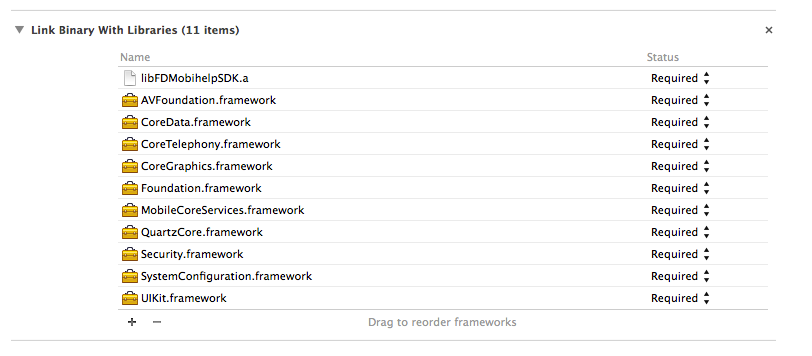
We can add these dependencies to our project using the ios.add_libs build hint. E.g.

I.e. we just list the framework names separated by semicolons. Notice that my list in the above image doesn’t include all of the frameworks that they list because many of the frameworks are already included by default (I obtained the default list by simply building the project with “include sources” checked, then looked at the frameworks that were included).
Part 3 : Packaging as a .cn1lib
During the initial development, I generally find it easier to use a regular Codename One project so that I can run and test as I go. But once it is stabilized, and I want to distribute the library to other developers, I will transfer it over to a Codename One library project. This general process involves:
Create a Codename One Library project.
Copy the .java files from my original project into the library project.
Copy the
nativedirectory from the original project into the library project.Copy the relevant build hints from the original project’s
codenameone_settings.propertiesfile into the library project’scodenameone_library_appended.propertiesfile.
In the case of the FreshDesk .cn1lib, I modified the original project’s build script to generate and build a library project automatically. But that is beyond the scope of this tutorial.
Summary
After walking through this tutorial, you should have all the required knowledge to wrap native SDKs into your own codename one libraries. Wrapping native SDKs is a really easy way to extend the capabilities of the Codename One platform. If you plan to create such a library, I encourage you to blog about it and post your experiences to the Codename One google group. We’re always interested in hearing how the community is using Codename One, and we’re especially interested in hearing about the creative ways that you are extending it.
Discussion
Join the conversation via GitHub Discussions.