Codename One is a general purpose UI toolkit, but it ships with a package built
specifically for games: com.codename1.gaming.
It gives you the things games need — a tight update loop, sprite primitives,
pollable input, low latency sound effects and rigid body physics — and renders on
the GPU through the com.codename1.gpu package.
Everything written here runs unchanged on every Codename One target, including iOS.
Component`s and letting the
layout system render them — the techniques in the Animations chapter are
often a better fit. Reach for `com.codename1.gaming
when you want a frame driven
loop and GPU sprite rendering.Sample games
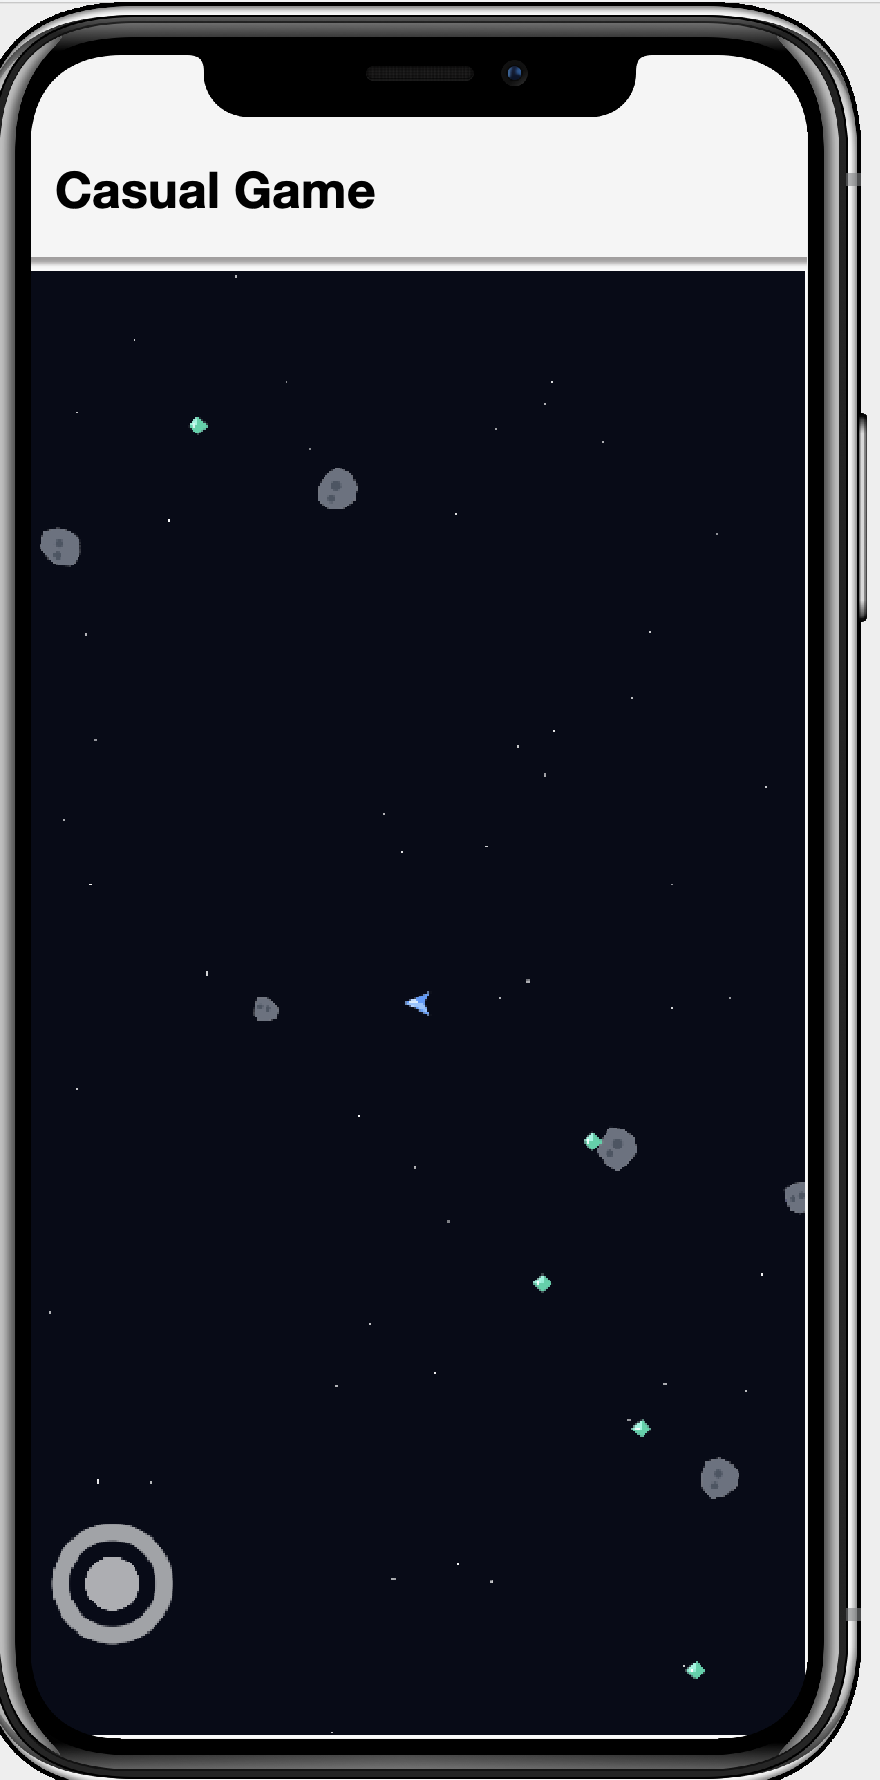
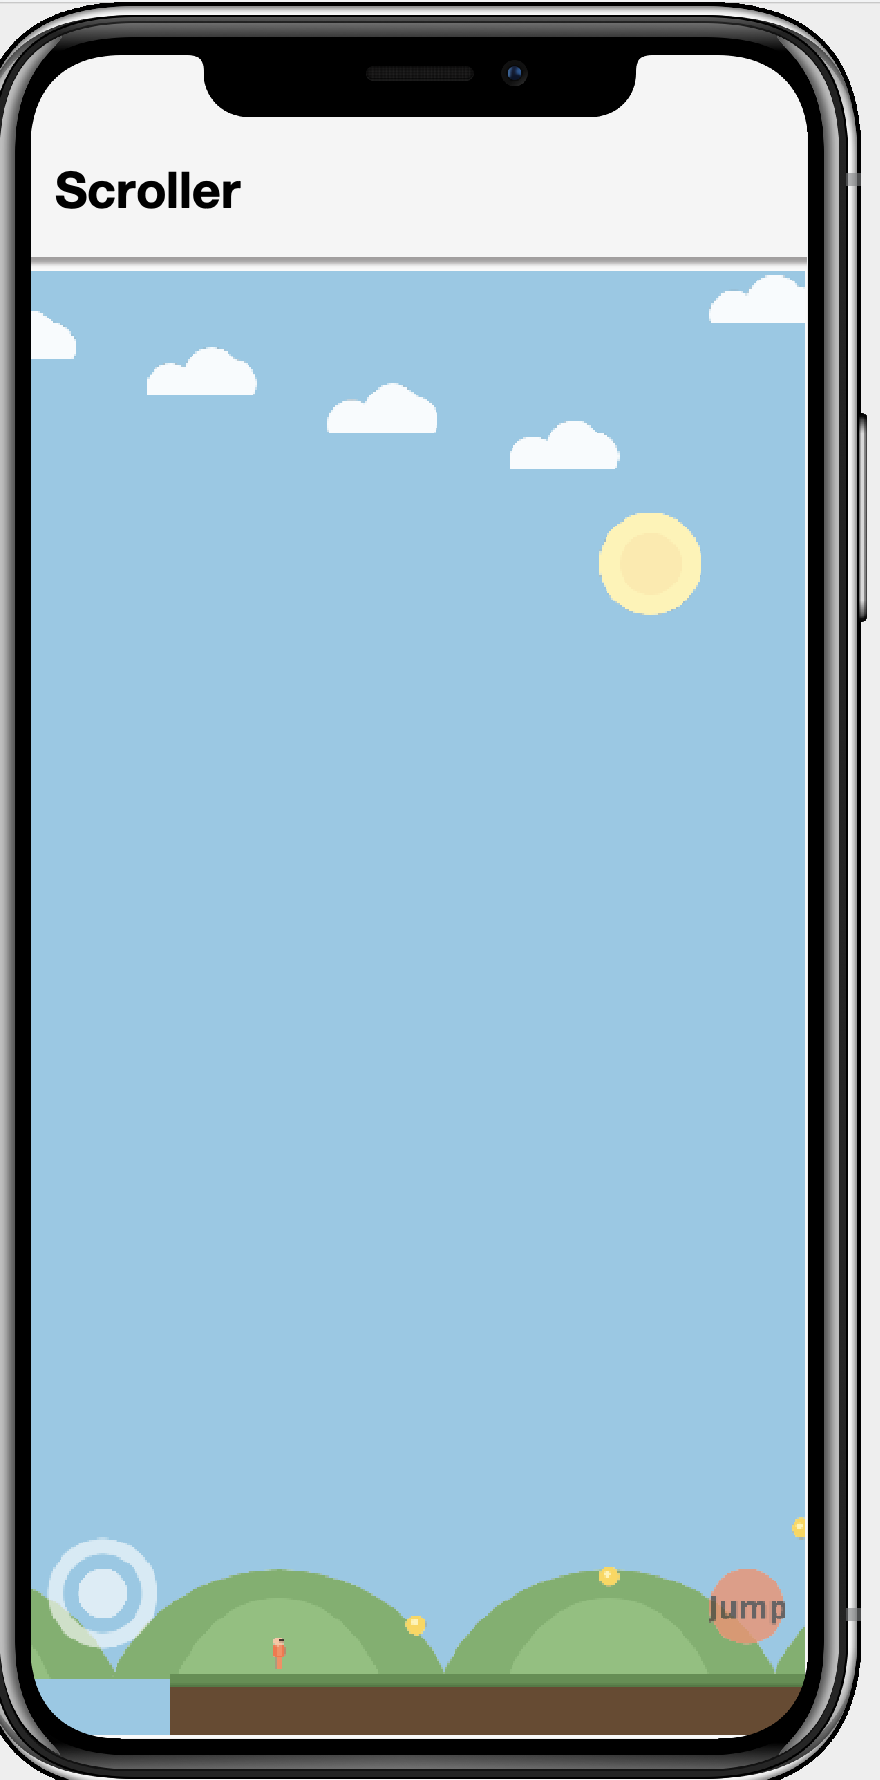
The samples project ships several runnable starting points. Each is a single file built entirely from art generated at runtime — no asset files — so you can copy one and start changing it immediately. The rest of this chapter draws on them to show how the pieces fit together.
 |  |  |
|
|
|
Two more samples show how far the same 2D primitives stretch — one flat, one faked into 3D:
CardGameSample— a 2D Memory (Concentration) match. Each card is aSpritein a grid; flipping one animates its horizontal scale through zero and swaps the image at the thin point, and taps are hit-tested against sprite bounds throughGameInput. A compact illustration of flat 2D play with no camera tricks at all. Dissected in Case study: The card game (flat 2D).BoardGameSample— faux-3D checkers on an isometric board. Every tile and piece is still a flatSprite, but laying them out in an isometric (2:1 diamond) projection and raising the pieces off their tiles with a drop shadow gives a convincing 3D look without any GPU 3D, perspective camera or models. The screen pixel-to-board-cell mapping (and its inverse, for picking) is the same math behind any isometric strategy or tycoon game; it also implements the full move/jump/chain /crown rules and a small AI so you can play it solo. Dissected in Case study: Faux-3D checkers (isometric projection).
The action samples are driven by the joystick and buttons in On-screen touch controls, so they’re equally playable on a touch device and in the desktop simulator (where the arrow keys and mouse stand in for the stick); the card and board games are pure tap.
The game loop: GameView
GameView
is the heart of the package. It’s a GPU surface (a
RenderView)
that runs the frame loop for you — a display link on device, the dependency-free
software rasterizer in the simulator — so there’s no EDT busy loop and no frame
rate to manage. You build your world by adding Sprite`s to its `Scene, advance
the game in update(double), and the view draws the scene every frame.
The dt passed to update is the wall clock time since the previous frame.
Multiplying movement by it keeps the game running at the same speed regardless of
the actual frame rate ("delta timing"). Notice there’s no draw method — positioning
sprites is all you do; the GPU renderer handles the rest (see Sprites).
Lifecycle
start() begins continuous rendering, stop() halts it, and pause()/resume()
suspend update while the view keeps drawing the last frame. start() is safe to
call before or after the form is shown.
setClearColor(int argb) sets the background the view is cleared to each frame.
Fixed timestep and interpolation
Variable time steps are simple but make physics nondeterministic. Call
setFixedTimestep(seconds) to have update invoked at a fixed interval instead;
the loop accumulates real time and may call update several times in one frame to
catch up (capped to avoid a "spiral of death" after a long pause). The leftover
fraction is available from getInterpolationAlpha() (0 to 1) so you can interpolate
rendered positions between physics states:
game.setFixedTimestep(1.0 / 120.0); // step physics at a steady 120Hz
Threading
update(double) runs on the render thread, together with drawing. Keep it
non-blocking — offload asset loading, networking or other long work to a background
thread and hand the result back with
CN.callSerially.
Input: GameInput
Games usually want to ask "is the left key down right now?" rather than handle a
stream of events. GameInput,
obtained from GameView.getInput(), captures the view’s key and pointer events
and exposes them as state. There are two flavors:
Level state, true for as long as the input is held:
isKeyDown(int),isGameKeyDown(int gameAction),isPointerDown().Edge state, true only during the single frame the transition happened:
wasKeyPressed(int),wasKeyReleased(int),wasPointerPressed(),wasPointerReleased(). Edges are cleared at the end of each frame, afterupdatehas run.
isGameKeyDown works with the device independent game actions Display.GAME_UP,
GAME_DOWN, GAME_LEFT, GAME_RIGHT and GAME_FIRE, so directional input works
the same across keyboards and devices. Pointer coordinates are reported relative
to the `GameView’s top left.
On-screen touch controls
A keyboard is fine in the simulator, but a phone has no arrow keys. Every
GameView comes with a TouchControls
(from getControls()) that draws an on-screen virtual joystick and buttons and
feeds them into the same GameInput — so the input code you already wrote for
the keyboard works untouched on touch devices.
The joystick reports analog direction through
GameInput#getAxisX()/getAxisY()(each -1 to 1), and at the same time presses the digital game actionsGAME_LEFT/GAME_RIGHT/GAME_UP/GAME_DOWNonce it crosses its dead zone, soisGameKeyDown(…)keeps working.A button holds down a key code while it’s pressed, so
isKeyDown(int)andwasKeyPressed(int)report it exactly like a hardware key. Map it to a game action withDisplay.getInstance().getKeyCode(Display.GAME_FIRE), or to any key code of your own.
Anchor controls to a corner of the view’s safe area with the alignment constants
(TouchControls.LEFT / CENTER / RIGHT and TOP / CENTER / BOTTOM) and a
margin. The framework keeps them clear of notches and home indicators and
repositions them automatically when the view resizes or the device rotates — you
never recompute coordinates:
TouchControls c = getControls();

// analog stick, bottom-left, 80px radius, 24px in from the safe-area edges
c.addJoystick(80, TouchControls.LEFT, TouchControls.BOTTOM, 24);

// a JUMP button, bottom-right, mapped to GAME_FIRE
int jumpKey = Display.getInstance().getKeyCode(Display.GAME_FIRE);
c.addButton(jumpKey, 55, TouchControls.RIGHT, TouchControls.BOTTOM, 30)
        .setLabel("Jump").setColor(0xc0ff7043);

// then read input exactly as you would for a keyboard:
float ax = getInput().getAxisX();                 // analog steering
boolean jump = getInput().wasKeyPressed(jumpKey);  // or GAME_UP, etc.
The joystick (bottom-left) and JUMP button (bottom-right) are visible in the
sample screenshots above. There are also absolutely
positioned overloads (addJoystick(centerX, centerY, radius)), and
setVisible(false) hides the overlay — handy when a real keyboard is attached.
Multi-touch is supported, so the player can steer and press a button at once.
Sprites
A Sprite
is a lightweight data holder: an image plus position, rotation, scale, a normalized
anchor and an ARGB tint. It describes what and where; a
SpriteRenderer
turns it into a GPU textured quad each frame using the com.codename1.gpu package — an orthographic camera mapping one world unit to one pixel, a
com.codename1.gpu.Material.Type#SPRITE material and alpha blending. Because a
sprite never touches the GPU directly you create one with just an
com.codename1.ui.Image; the renderer uploads and caches the matching texture on
demand.
getX()/getY() is the location of the anchor point (the image center by
default), and rotation and scale pivot around that anchor.
getBounds() returns the axis aligned bounding box and intersects(Sprite) does a
quick box overlap test, handy for broad phase collision before you involve physics.
Scenes
A Scene is a
z-ordered collection of sprites with an optional camera offset, drawn for you by
the renderer. Sprites are drawn from lowest to highest zOrder, so higher z-order
sprites appear on top; the camera offset (setCamera(int, int)) scrolls the whole
scene. GameView.getScene() is the scene the view draws.
You don’t need a GameView to render sprites: a SpriteRenderer is itself a
com.codename1.gpu.Renderer, so you can host one in a plain RenderView.
Sprite sheets and animation
SpriteSheet
slices one atlas image into a grid of equally sized frames, cutting and caching
each frame on first use (cutting a sub image copies pixels, so caching matters).
AnimatedSprite
is a Sprite that cycles through a sequence of frames over time; the scene advances
it every frame, so adding it to the scene is all you need.

A sprite sheet is just a strip (or grid) of frames like the run cycle above: the
arms and legs swing a little further each frame, and playing them in sequence reads
as motion. AnimatedSprite also accepts a plain com.codename1.ui.Image[] when you
build the frames yourself, which is what `ScrollerGameSample’s runner does:
AnimatedSprite hero = new AnimatedSprite(runFrames, 0.09);   // Image[6], 90ms each
hero.play();
getScene().add(hero);

// in update(double dt):
if (moving) {
    hero.play();
    hero.setScale(facing, 1);     // facing is -1 (left) or 1 (right)
} else {
    hero.pause();
    hero.setCurrentFrame(0);      // standing pose
}
Setting a negative scale flips the sprite horizontally, so a single set of frames
faces both ways — no mirrored art needed (sprites are drawn double-sided for
exactly this reason). play(), pause(), stop(), setLooping(boolean) and
setCurrentFrame(int) control playback.
Case study: The card game (flat 2D)
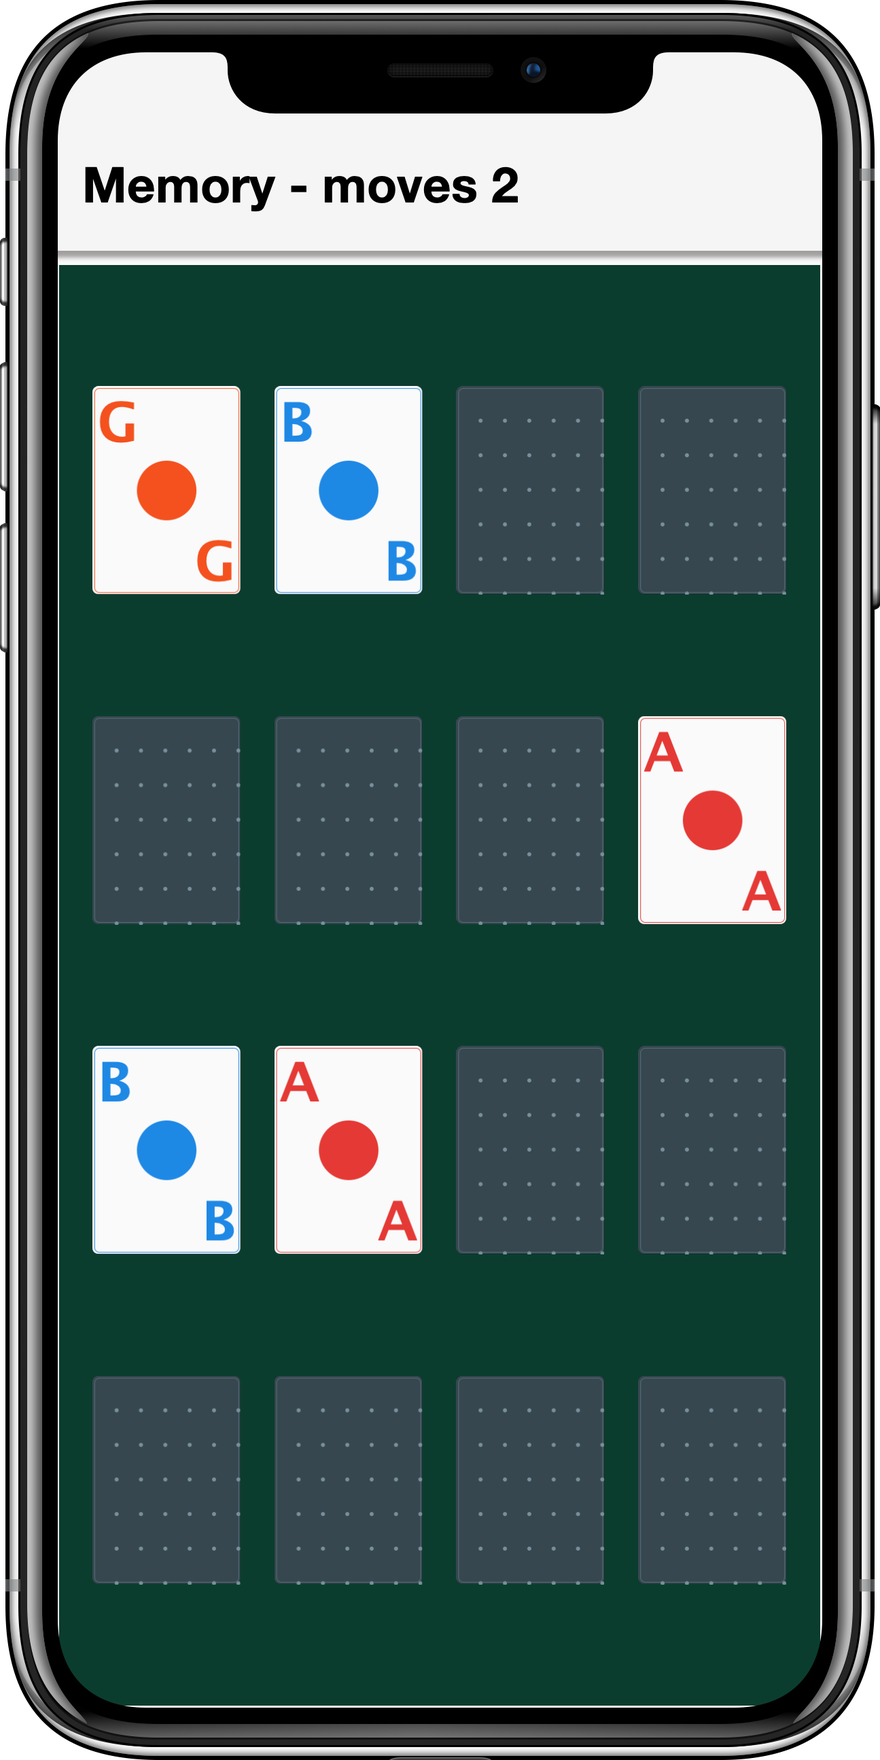
CardGameSample is Memory (Concentration): sixteen face-down cards in a four-by-four
grid, tap two and they stay up when they match, flip back when they don’t. It’s
the smallest complete example of turn-based 2D play with com.codename1.gaming — no joystick, no physics, no camera — which makes the three techniques it does
use easy to see in isolation.
One sprite per card. Each card is a Sprite positioned at its grid slot. There
are exactly two images at any moment: the shared card-back image and the card’s
own face (all generated at runtime with Image.createImage and Graphics calls,
so the sample needs no assets). Changing what a card shows is just
sprite.setImage(…).
A flip you can fake with scale. A real card flip is a 3D rotation, but squeezing the sprite’s horizontal scale through zero and swapping the image at the thin point reads exactly the same to the eye:
// in the card's per-frame animation; flip runs 0 -> 1 over ~0.4s
flip += dt * 5;
if (flip >= 1) {
    // Finish the animation: snap back to full width and stop. Without
    // this, abs(1 - 2 * flip) keeps climbing past 1 and the card grows
    // wider on every later frame instead of settling.
    sprite.setImage(face);
    sprite.setScale(1f, 1f);
    return;
}
float sx = Math.abs(1f - 2f * (float) flip);   // 1 -> 0 -> 1
if (flip >= 0.5 && !showingFace) {
    showingFace = true;
    sprite.setImage(face);     // swap sides while the card is edge-on
}
sprite.setScale(Math.max(0.05f, sx), 1f);
This is the same negative/positive scale trick the scroller uses to flip its runner, driven over time to play as an animation.
Polled taps against sprite bounds. There are no buttons to wire up;
update(double) polls the GameInput edge state and hit-tests the tap against
each card’s bounding box:
protected void update(double dt) {
    // ... advance flip animations, count down the mismatch timer ...
    if (getInput().wasPointerPressed()) {
        int px = getInput().getPointerX();
        int py = getInput().getPointerY();
        for (int i = 0; i < cards.length; i++) {
            Rectangle b = cards[i].sprite.getBounds();
            if (b.contains(px, py)) {
                flipUp(cards[i]);
                break;
            }
        }
    }
}
The rest of the sample is a small state machine living in plain fields: the
first and second face-up cards, a mismatchTimer that counts down in update
before flipping a failed pair back, and a moves counter surfaced through the
form title. Note the timer: in a game loop you don’t schedule callbacks, you
subtract dt from a countdown field each frame and act when it crosses zero.
Case study: Faux-3D checkers (isometric projection)
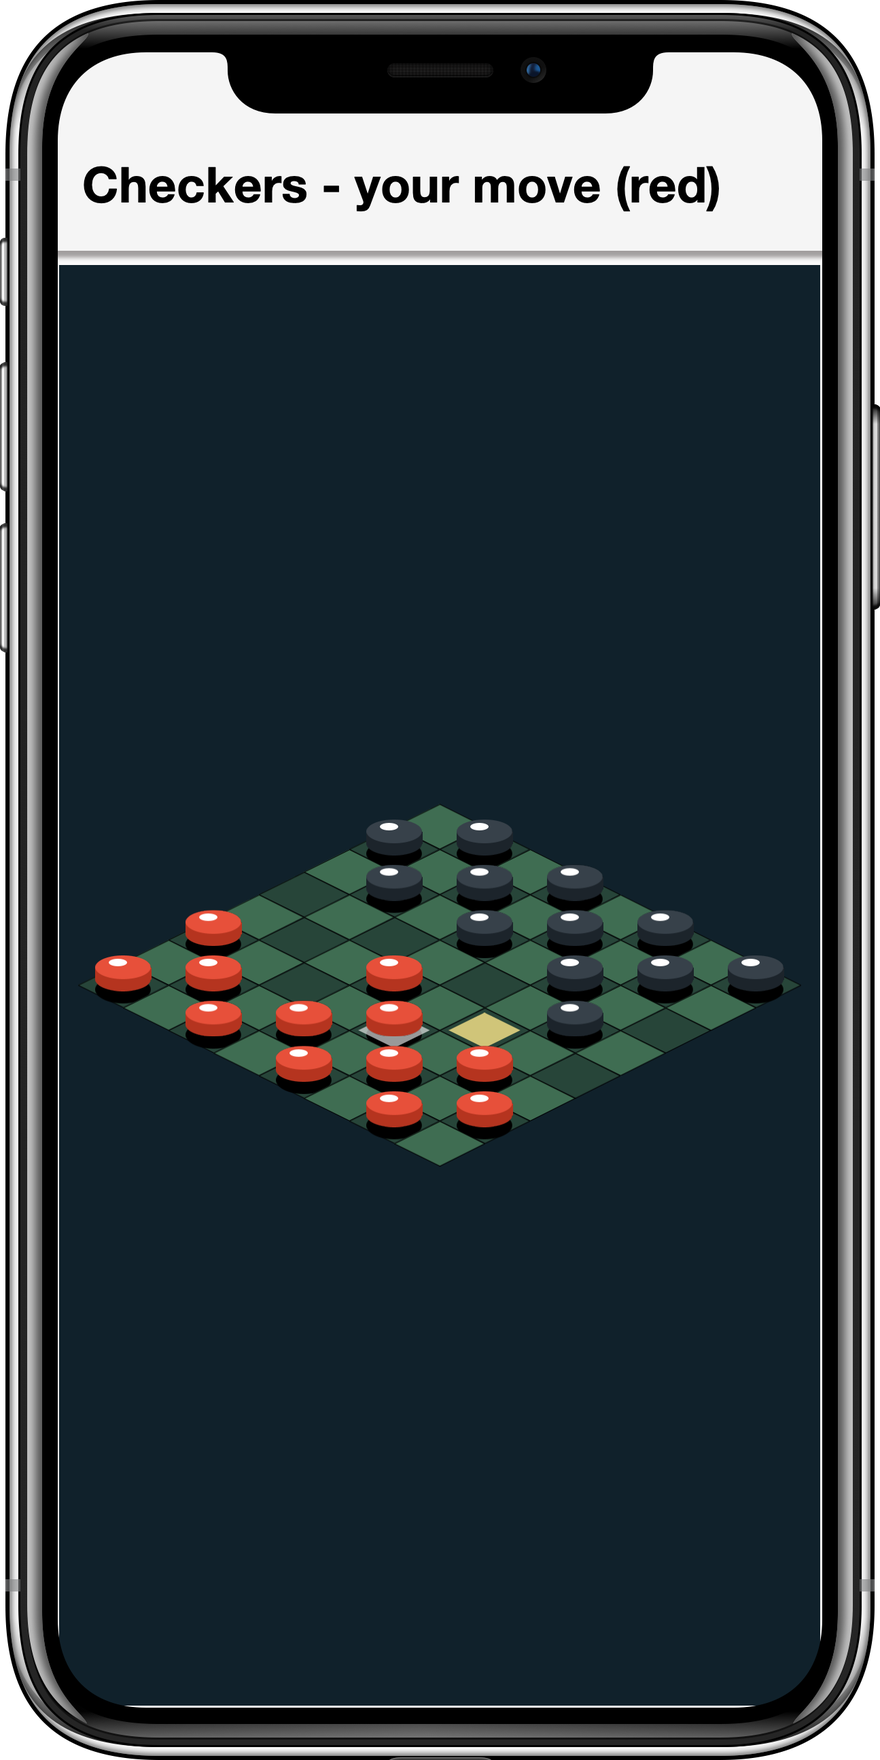
BoardGameSample plays a full game of checkers — moves, forced captures, chained
jumps, crowning, and a small AI opponent — on a board that looks convincingly 3D — yet there is no perspective camera and no Model anywhere: every tile and piece
is a flat Sprite. The 3D impression comes entirely from where the flat art is
placed, a technique (isometric or "2.5D" projection) that powered decades of
strategy and tycoon games and still works just as well on a GPU sprite pipeline.
The projection. Board cell (r, c) maps to screen pixels by laying the grid out
as 2:1 diamonds — columns step right-and-down, rows step left-and-down:
private float tileCenterX(int r, int c) {
    return originX + (c - r) * (tileW / 2f);
}

private float tileCenterY(int r, int c) {
    return originY + (c + r) * (tileH / 2f);   // tileH = tileW / 2
}
Picking is the inverse. Because the mapping is linear it inverts with two divisions, turning a tap back into a board cell — no per-tile hit testing required:
private int[] pick(int px, int py) {
    float a = (px - originX) / (tileW / 2f);   // = c - r
    float b = (py - originY) / (tileH / 2f);   // = c + r
    int c = Math.round((a + b) / 2f);
    int r = Math.round((b - a) / 2f);
    if (r < 0 || r >= N || c < 0 || c >= N) {
        return null;                            // tap missed the board
    }
    return new int[]{r, c};
}
Depth from z-order. Cells further down the screen must draw over the cells
behind them, and within one cell the stacking is tile, then shadow, then
selection/move markers, then the piece. Both rules collapse into a single
number — (r + c) strides the cells from back to front, and a small offset
layers the sprites within a cell:
// shadow sits flat on the tile, the piece floats above it
addDynamic(shadow, cx, cy + tileH * 0.10f, (r + c) * 4 + 1, 0.5, 0.5);
addDynamic(piece,  cx, cy - tileH * 0.30f, (r + c) * 4 + 3, 0.5, 0.62);
That pair of lines is also the whole "3D height" illusion: the piece is drawn
raised off its tile while its shadow stays put, and the eye reads the gap as
elevation. The piece art helps — an elliptical top face over a darker side rim,
again just fillArc calls on a runtime-generated image.
Rebuild, don’t mutate. After every move the sample throws away all its dynamic
sprites (pieces, shadows, markers) and recreates them from the board[][] array
in one syncPieces() pass. With a few dozen sprites this costs nothing, and it
keeps the scene a pure function of the game state — there is no way for the
display to drift out of sync with the rules, which eliminates the whole class of
"the board shows X but the game thinks Y" bugs. The game logic itself
(destinations, forced captures, chaining, crowning) never touches a sprite; it
reads and writes the int[][] board only.
When fake 3D stops being enough — you want the camera to move through the world rather than look at it — the next section covers the real thing.
3D and perspective
GameView renders on the GPU through the com.codename1.gpu
package, so the same scene can be shown in 3D. Every view has a
GameCamera
that starts in 2D mode; switching it to perspective turns flat sprites into
camera-facing billboards in a 3D world and lets you draw 3D meshes alongside them.
That’s the basis for deeper gameplay modes — an over-the-shoulder racer, an
isometric or top-down view with real depth, a 2.5D shooter.
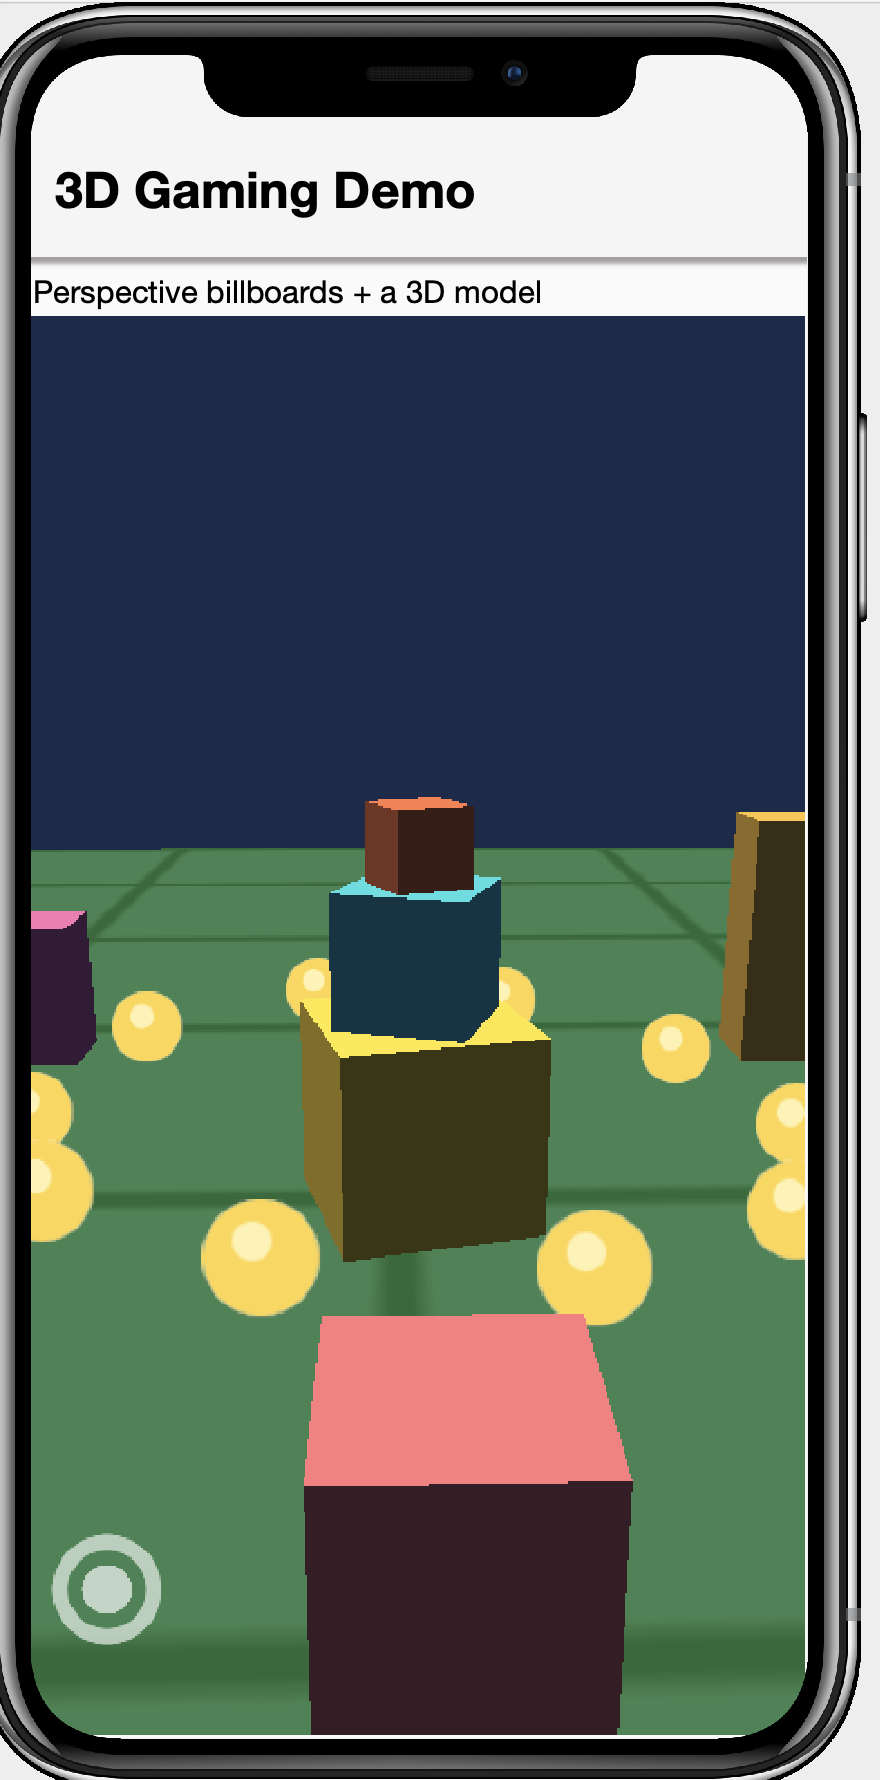
Gaming3DDemoSample (above) is built entirely from the primitives this section
describes — a textured ground plane, lit cube Model meshes, and billboarded
Sprite coins and trees, all orbited by a perspective camera.
Perspective camera and billboard sprites
Call GameCamera#setPerspective(float, float, float) and position the camera with
setPosition / setTarget. Once in perspective mode a Sprite is placed in world
space with Sprite#setPosition(double, double, double) and is drawn as a billboard
that always faces the camera, so your existing 2D art keeps working in 3D:
getCamera()
    .setPerspective(60, 0.1f, 500f)   // vertical FOV, near, far
    .setPosition(0, 6, 12)            // eye
    .setTarget(0, 0, 0);             // look-at

Sprite tree = new Sprite(treeImage);
tree.setPosition(0, 1, 0);            // world coordinates, y up
tree.setSize(2, 4);                   // size is now in world units, not pixels
getScene().add(tree);
World coordinates are right-handed with y up (the com.codename1.gpu convention),
and a sprite’s size is world units rather than pixels — use Sprite#setSize(float,
float) or Sprite#setScale(float) to pick a world-space size. Move the camera each
frame in update(double) to follow the player.
3D models
Model draws a
real 3D mesh — a com.codename1.gpu.Material plus a position, rotation, and scale.
Because GPU meshes need the com.codename1.gpu.GraphicsDevice, build them in
GameView#onSetup(com.codename1.gpu.GraphicsDevice), the render-thread hook that
runs once before the first frame:
protected void onSetup(GraphicsDevice device) {
    Mesh cubeMesh = Primitives.cube(device, 1f);
    Material gold = new Material(Material.Type.PHONG).setColor(0xffffcc33).setShininess(32);
    crate = new Model(cubeMesh, gold).setPosition(0, 0.5f, 0);
    addModel(crate);

    getLight().setDirection(-1, -1, -0.5f);   // shade the lit material
}

protected void update(double dt) {
    crate.setRotation(0, crate.getRotationY() + (float) (60 * dt), 0);  // spin
}
onSetup is also where you load real assets with com.codename1.gpu.GltfLoader
(glTF .glb/.gltf models). Models are drawn opaque and depth-written before the
alpha-blended billboards, and the billboards depth-test against them, so closer
geometry correctly hides what’s behind it. GameView#getLight() controls the
directional light that shades lit material types.
Meshes and textures
The built-in meshes are com.codename1.gpu.Primitives#cube(GraphicsDevice, float)
and Primitives#quad(GraphicsDevice, float); a quad rotated flat makes a ground or
a wall. Model#setScale(float, float, float) reshapes one cube mesh into crates,
pillars or buildings of any proportion, so a whole skyline can share a single mesh.
Lit materials multiply their base color by a texture, so you can detail a surface — a grid on the ground for depth, say — by drawing an com.codename1.ui.Image and
uploading it with com.codename1.gpu.GraphicsDevice#createTexture(com.codename1.ui.Image):
Mesh ground = Primitives.quad(device, 64f);
Texture grid = device.createTexture(makeGridImage());      // any Image you draw
Material mat = new Material(Material.Type.LAMBERT)
        .setColor(0xff3f7d4f).setTexture(grid);
Model floor = new Model(ground, mat).setRotation(-90, 0, 0); // lay the quad flat
addModel(floor);

// one cube mesh, scaled into buildings of varying height:
Model tower = new Model(cubeMesh, brick).setScale(1.5f, 4f, 1.5f).setPosition(9, 2, 0);
addModel(tower);
For richer geometry, load glTF (.glb/.gltf) assets with
com.codename1.gpu.GltfLoader from onSetup.
Low latency audio: SoundPool
Music and video use the regular MediaManager, but rapid overlapping sound
effects — gunshots, coins, footsteps — need a different tool.
SoundPool
loads short clips once and triggers them with minimal latency, mixing several at
the same time.
play returns a voice id (or -1 if the pool is momentarily exhausted — it never
blocks on the hot path). The parameters are: volume 0 to 1, pan -1 (left) to 1
(right), rate playback speed/pitch (1.0 is normal), and loop (0 once, -1
forever, n extra repeats). stop, pause, resume, stopAll, autoPause and
autoResume manage playback; release() frees the pool.
On platforms with a purpose built low latency audio engine — Android’s SoundPool,
iOS AVAudioEngine, the desktop javax.sound.sampled mixer and WebAudio in the
browser — the pool uses it directly with full volume/pan/pitch support. Where none
exists it falls back to a MediaManager based pool that still works everywhere but
has higher latency and ignores pan and rate. isNativeAccelerated() tells you which
path is active.
To react as a sound finishes — chaining clips, recycling a game object when its
effect ends — register a
VoiceListener.
It’s called on the EDT with the voice id as each voice completes. Not every native
engine can report completion, so guard with isVoiceCompletionSupported():
if (sfx.isVoiceCompletionSupported()) {
    sfx.setVoiceListener(new VoiceListener() {
        public void onComplete(int voiceId) {
            onEffectFinished(voiceId);
        }
    });
}
SoundPool.loadAsync(…) — and keep the SoundEffect references for the life of
the game. Decoding on the fly defeats the purpose.Physics
The com.codename1.gaming.physics
package adds 2D rigid body physics. It’s an idiomatic wrapper around a pure Java
port of the well known Box2D engine, so it runs on every platform — including
iOS, where it’s translated to C with no native code.
Units: Pixels, meters and the y-axis
Box2D is tuned for objects a few meters across, so the world works in meters
internally while exposing pixels to you. The conversion is governed by
setPixelsPerMeter(float) (default 30). The wrapper also flips the y-axis — Box2D
points y up, the screen points y down — so your code stays in screen coordinates.
The practical consequence: a positive gravity y pulls bodies down the screen.
Worlds and bodies
Create a PhysicsWorld,
populate it with PhysicsBody
objects, and step it once per frame from your update:
PhysicsWorld world = new PhysicsWorld(0, 900);   // gravity 900 px/s^2 downward

// a STATIC floor that never moves
world.createBox(160, 460, 320, 40, BodyType.STATIC);

// a DYNAMIC crate affected by gravity and collisions
PhysicsBody crate = world.createBox(160, 0, 32, 32, BodyType.DYNAMIC);
crate.setRestitution(0.4f);   // bounciness
crate.setFriction(0.5f);

// in update(double dt):
world.step((float) dt);
Bodies come in three kinds, the
BodyType
values: STATIC (immovable — ground, walls), KINEMATIC (moved by you via
velocity, unaffected by forces) and DYNAMIC (fully simulated). Bodies can be
boxes, circles or polygons (createBox, createCircle, createPolygon) and
respond to setLinearVelocity, applyForce, applyLinearImpulse, applyTorque,
setBullet (continuous collision for fast objects), setFixedRotation and more.
For an arbitrary outline, createShape(x, y, shape, type) takes a Codename One
com.codename1.ui.geom.Shape — typically the same com.codename1.ui.geom.GeneralPath
you would draw with — and builds the collision fixtures from it, flattening any
Bezier curves. Each subpath becomes a fixture (so a figure with several outlines is a
compound body); a closed convex subpath of up to eight points becomes a solid polygon
usable by any body type, while a concave, larger, or open subpath becomes a one-sided
edge chain (ideal for static terrain). This lets the hit-shape and the drawn shape
come from one piece of geometry:
GeneralPath ramp = new GeneralPath();
ramp.moveTo(0, 0);
ramp.lineTo(240, 0);
ramp.lineTo(240, 80);
ramp.closePath();
world.createShape(40, 380, ramp, BodyType.STATIC);   // collide with exactly what you draw
Driving sprites from physics
A body can drive a sprite directly. Sprite implements
PhysicsLinkable,
so linking the two means world.step(…) updates the sprite’s position and
rotation automatically (in pixels, screen space) — and the scene draws it there:
Sprite crateSprite = new Sprite(crateImage);
crate.setLinkedSprite(crateSprite);
getScene().add(crateSprite);

// in update(double dt):
world.step((float) dt);   // moves crate, which moves crateSprite, which the scene draws
Collisions
Register a ContactListener
to be told when bodies start and stop touching. Callbacks fire from inside
step(…) — on the game loop thread — so you can read and update game state
directly, but you must not create or destroy bodies during the callback; defer
that until after step returns.
If you need a feature the wrapper doesn’t expose, PhysicsWorld.getNativeWorld()
and PhysicsBody.getNativeBody() give you the underlying engine objects (which
work in meters, y up).
Joints
Joints constrain how two bodies move relative to each other — hinges, ropes, axles,
welds. PhysicsWorld creates them in pixel coordinates and returns a
PhysicsJoint
handle:
// a hinge the two bodies pivot around (anchor in pixels)
world.createRevoluteJoint(bodyA, bodyB, pivotXpx, pivotYpx);
// a fixed-length link, like a rod between two crates
world.createDistanceJoint(bodyA, bodyB, ax, ay, bx, by, 0f, 0f);
// drag a body toward the finger -- great for "pick up and throw"
PhysicsJoint drag = world.createMouseJoint(ground, body, px, py, 1000f);
// ... while the finger moves:
drag.setTarget(getInput().getPointerX(), getInput().getPointerY());
// ... on release:
drag.destroy();
createWeldJoint and createPrismaticJoint (a sliding axis) round out the set.
Debugging physics
When sprites and bodies drift apart it helps to see the raw simulation. Call
world.debugDraw(Graphics) to overlay every fixture, joint and contact straight onto
a Codename One Graphics — shapes, centers of mass and bounding boxes — in pixel
space, with the y-axis flip already applied. Choose what to show with
setDebugDrawFlags(shapes, joints, boundingBoxes), and soften the translucent shape
fill with setDebugFillAlpha(alpha). Because it draws to an ordinary Graphics you
can render it over a regular Codename One component, not only a GameView.
Putting it together: Anatomy of a game
Every sample follows the same shape, which is the recipe for your own game:
Subclass
GameViewand, in its constructor, create yourSpriteandAnimatedSpriteobjects and add them togetScene().Allocate GPU resources in
onSetup(GraphicsDevice)— meshes, textures and 3DModelobjects — because those need the device.Add controls (a joystick and buttons) once the view has a size.
Advance the world in
update(double dt): readgetInput(), move sprites or step aPhysicsWorld, scale all movement bydt, and triggerSoundPooleffects.Show it: add the view to a
Formand callstart().
The samples project has several runnable examples to copy from:
CasualGameSample— sprites, per-sprite animation, collision and particle bursts in a top-down arena (see Sample games).ScrollerGameSample— anAnimatedSpritewalk cycle, a parallax backdrop and a scrollingScenecamera.Gaming3DDemoSample— lit cubeModelobjects, a textured ground and billboarded sprites under a perspective camera.GamingDemoSample— the physics tour, built on aPhysicsWorldwith a floor and walls, tap-to-drop balls that bounce (eachSpritelinked to its body) and aSoundPoolblip whose pitch varies per drop.CardGameSample— a flat 2D Memory match: a grid of cardSpriteobjects with a flip animation and tap hit-testing.BoardGameSample— faux-3D checkers: flat sprites placed in an isometric projection, with screen-to-cell picking, full rules and a small AI.
Each is a single self-contained file that generates its art at runtime, so it needs no assets — a compact starting point you can copy and reshape.
Performance notes
Keep
updatenon-blocking — it runs on the render thread. Load assets off the render thread and hand them back withCN.callSerially.Reuse images: the renderer caches one GPU texture per
Image, so sharing an image across many sprites uploads it once. Cache cut sprite frames (useSpriteSheet, which does it for you) rather than re-slicing every frame.Load every
SoundEffectup front and reuse it.Tune
setPixelsPerMeterso your moving bodies are on the order of a meter (tens of pixels) in size; bodies far larger or smaller than that make the simulation unstable.
The physics engine in com.codename1.gaming.physics.box2d is a derived work of
JBox2D (a Java port of the Box2D engine), used under the BSD 2-Clause license;
see the project NOTICE file for attribution.