JAR resources
Resources packaged within the "JAR" don’t belong in this section of the developer guide, but they’re often confused with Storage and FileSystemStorage, so this is a good place to clarify them.
You can place arbitrary files within the src directory of a Codename One project. The file is packaged into the final distribution. In standard Java SE you can do something like:
InputStream i = getClass().getResourceAsStream("/myFile");
This isn’t guaranteed to work on all platforms and will probably fail on some. Instead, use something like:
InputStream i = Display.getInstance().getResourceAsStream(getClass(), "/myFile");
This isn’t the limitation. You can’t use hierarchies, so something like this fails:
InputStream i = Display.getInstance().getResourceAsStream(getClass(), "/res/myFile");
You can’t use relative paths either, so this also fails (notice the missing first slash):
InputStream i = Display.getInstance().getResourceAsStream(getClass(), "myFile");
Those limitations exist for portability. iOS and Android handle resources differently, so supporting the full Java SE semantics is unrealistic.
@ character or more than one . can cause problems (for example, file.ext.act).Just like in Java SE, the entries within the "JAR" are read and can’t be modified. You can access the stream, but not the actual file.
Storage
Codename One gives you four places to keep data, and picking the wrong one is the usual source of trouble later:
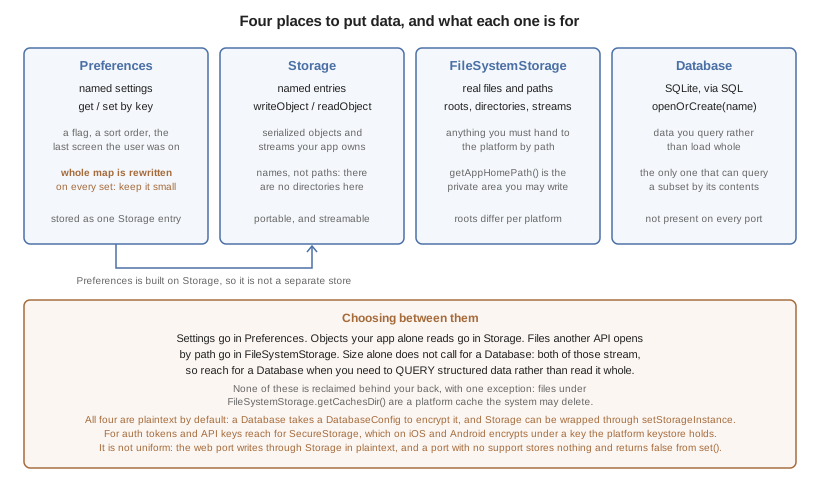
Storage is accessed through the Storage class. It’s a flat, filesystem-like interface that can list, delete, and write named storage entries.
The Storage API also provides convenient methods to write objects to Storage and read them back with readObject and writeObject.
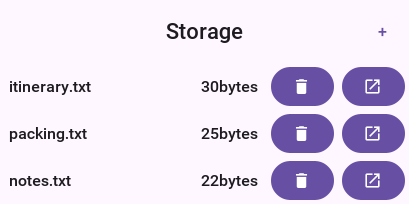
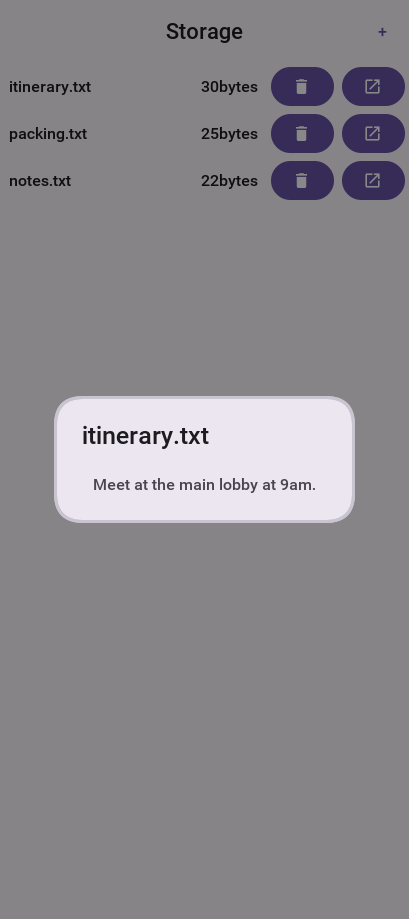
Storage are deleted when an app is uninstalled, but they’re retained between application updates. A notable exception is Android, which on some devices keeps objects in Storage after uninstalling an app. To force Android to remove them on uninstall, use the build hint android.allowBackup=false.The sample code below demonstrates listing storage content, adding and viewing entries, and deleting entries:
Toolbar.setGlobalToolbar(true);
Form hi = new Form("Storage", new BoxLayout(BoxLayout.Y_AXIS));
hi.getToolbar().addCommandToRightBar("+", null, e -> {
    TextField tf = new TextField("", "File Name", 20, TextField.ANY);
    TextArea body = new TextArea(5, 20);
    body.setHint("File Body");
    Command ok = new Command("OK");
    Command cancel = new Command("Cancel");
    Command result = Dialog.show("File Name", BorderLayout.north(tf).add(BorderLayout.CENTER, body), ok, cancel);
    if(ok == result) {
        String name = tf.getText();
        boolean isNew = !Arrays.asList(Storage.getInstance().listEntries()).contains(name);
        try(OutputStream os = Storage.getInstance().createOutputStream(name);) {
            os.write(body.getText().getBytes("UTF-8"));
        } catch(IOException err) {
            Log.e(err);
            return;
        }
        // entrySize() is only right once the stream is closed, and an
        // overwrite already has a row whose size label is now stale
        if(isNew) {
            createFileEntry(hi, name);
        } else {
            hi.removeAll();
            for(String file : Storage.getInstance().listEntries()) {
                createFileEntry(hi, file);
            }
        }
        hi.getContentPane().animateLayout(250);
    }
});
for(String file : Storage.getInstance().listEntries()) {
    createFileEntry(hi, file);
}
hi.show();
private void createFileEntry(Form hi, String file) {
   Label fileField = new Label(file);
   Button delete = new Button();
   Button view = new Button();
   FontImage.setMaterialIcon(delete, FontImage.MATERIAL_DELETE);
   FontImage.setMaterialIcon(view, FontImage.MATERIAL_OPEN_IN_NEW);
   Container content = BorderLayout.center(fileField);
   int size = Storage.getInstance().entrySize(file);
   content.add(BorderLayout.EAST, BoxLayout.encloseX(new Label(size + "bytes"), delete, view));
   delete.addActionListener(e -> {
       Storage.getInstance().deleteStorageFile(file);
       content.setY(hi.getWidth());
       hi.getContentPane().animateUnlayoutAndWait(150, 255);
       hi.removeComponent(content);
       hi.getContentPane().animateLayout(150);
   });
   view.addActionListener(e -> {
       try(InputStream is = Storage.getInstance().createInputStream(file);) {
           String s = Util.readToString(is, "UTF-8");
           Dialog.show(file, s, "OK", null);
       } catch(IOException err) {
           Log.e(err);
       }
   });
   hi.add(content);
}
The preferences API
Storage also offers a simple API in the form of the Preferences class. The Preferences class lets developers store simple variables, strings, numbers, booleans, and similar values without writing storage code. This is a common use case in applications. For example, you might need to store a server token:
Preferences.set("token", myToken);
You can then read the token like this:
String token = Preferences.get("token", null);
The backing store filename defaults to "codenameone.properties", but you can override it by calling Preferences.setPreferencesLocation(String) before your app touches the API. This is useful when you need separate preference namespaces per user or when you want to plug in an encrypted storage layer.
When you have a batch of updates, prefer the Preferences.set(Map<String,Object>) overload so that all values are persisted with a single disk write.
Preferences can also tell interested code when a key changes. Register a PreferenceListener with addPreferenceListener() to react to updates made in other parts of your code or triggered remotely through Codename One Push.
Remember to remove listeners you no longer need to avoid leaks.
Preferences.set("primitiveLongValue", myLongNumber) then invoke Preferences.get("primitiveLongValue", 0) you might get an exception!This would happen because the value is physically a
Long object but you’re trying to get an Integer. The workaround is to remain consistent and use code like this Preferences.get("primitiveLongValue", (long)0).File system
FileSystemStorage provides file system access. It maps to the underlying OS’s file system API providing most of the common operations expected from a file API somewhat in the vain of java.io.File & java.io.FileInputStream for example: opening, renaming, deleting etc.
Notice that the file system API is somewhat platform specific in its behavior. All paths used the API should be absolute otherwise they aren’t guaranteed to work.
The main reason java.io.File & java.io.FileInputStream weren’t supported directly has a lot to do with the richness of those two APIs. They effectively allow saving a file anywhere, but mobile devices are far more restrictive and don’t allow apps to see/change files that are owned by other apps.
File paths & app home
All paths in FileSystemStorage are absolute, this simplifies the issue of portability since the concept of relativity and current working directory aren’t portable.
All URLs use the / as their path separator you try to enforce this behavior even on Windows.
Directories end with the / character and thus can be distinguished by their name.
The FileSystemStorage API provides a getRoots() call to list the root directories of the file system (you can then "dig in" through the listFiles API). For example, this is confusing and unintuitive for developers.
To simplify the process of creating/reading files Codename One provides the getAppHomePath() method. This method allows you to get the path to a directory where files can be stored/read.
You can use this directory to place an image to share as you did in the share sample.
Native file chooser
Use Display.openFileChooser() or the shorter CN.openFileChooser() when the user needs to select a general document such as a PDF, text file, private key, or import file. This is different from Display.openGallery(), which is intended for photo and video library media.
The callback source is a String path that can be read with FileSystemStorage.openInputStream(). If the user cancels the picker the event source is null.
CN.openFileChooser(evt -> {
    if(evt == null || evt.getSource() == null) {
        return;
    }
    String path = (String)evt.getSource();
    try(InputStream in = FileSystemStorage.getInstance().openInputStream(path)) {
        String text = Util.readToString(in, "UTF-8");
        // import the selected file
    } catch(IOException err) {
        Log.e(err);
    }
}, "pdf,txt");
The second argument is a comma-separated accept list. It can contain filename extensions such as pdf,txt,p8, MIME types such as application/pdf, or null// for any file. JavaSE uses the native AWT file dialog. Android uses the system document picker and copies content URIs into an app-readable file path when needed. Ports without a native document picker fall back to a Codename One file tree.
No photo-library or media permissions are added by this API. On Android the system document picker grants read access to the selected document. On iOS this API should be implemented with a document picker, not the photo library; ios.NSPhotoLibraryUsageDescription is only needed for openGallery().
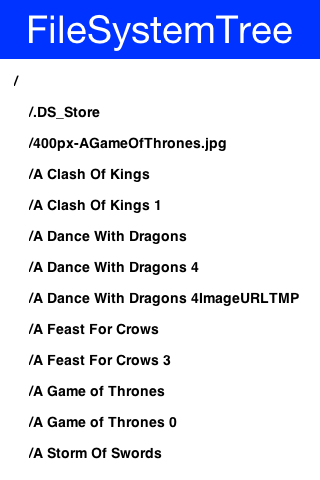
A more advanced usage of the FileSystemStorage API can be a FileSystemStorage Tree:
Form hi = new Form("FileSystemTree", new BorderLayout());
TreeModel tm = new TreeModel() {
    @Override
    public Vector getChildren(Object parent) {
        String[] files;
        if(parent == null) {
            files = FileSystemStorage.getInstance().getRoots();
            return new Vector<Object>(Arrays.asList(files));
        } else {
            try {
                files = FileSystemStorage.getInstance().listFiles((String)parent);
            } catch(IOException err) {
                Log.e(err);
                files = null;
            }
            if(files == null) {
                // the directory went away or cannot be read
                files = new String[0];
            }
        }
        String p = (String)parent;
        Vector result = new Vector();
        for(String s : files) {
            result.add(p + FileSystemStorage.getInstance().getFileSystemSeparator() + s);
        }
        return result;
    }

    @Override
    public boolean isLeaf(Object node) {
        return !FileSystemStorage.getInstance().isDirectory((String)node);
    }
};
Tree t = new Tree(tm) {
    @Override
    protected String childToDisplayLabel(Object child) {
        String n = (String)child;
        // the paths above are built with the platform separator, which is
        // a backslash on Windows
        char sep = FileSystemStorage.getInstance().getFileSystemSeparator();
        // roots arrive with a trailing separator
        while(n.length() > 1 && n.charAt(n.length() - 1) == sep) {
            n = n.substring(0, n.length() - 1);
        }
        int pos = n.lastIndexOf(sep);
        if(pos < 0 || pos == n.length() - 1) {
            return n; // a bare root has no basename to show
        }
        return n.substring(pos + 1);
    }
};
hi.add(BorderLayout.CENTER, t);
hi.show();
Storage vs. file system
The question of storage vs. file system is often confusing for novice mobile developers. This embeds two separate questions:
Why are there 2 APIs where one would have worked?
Which one should you pick?
The main reasons for the 2 APIs are technical. Many OSes provide 2 ways of accessing data specific to the app and this is reflected within the API. For example: on Android the FileSystemStorage maps to APIs such as java.io.FileInputStream whereas the Storage maps to Context.openFileInput().
The secondary reason for the two APIs is conceptual. FileSystemStorage is more powerful and in a sense provides more ways to fail, this is compounded by the complex on-device behavior of the API. Storage is designed to be friendlier to the uninitiated and more portable.
You should pick Storage unless you have a specific need that prevents it. Some APIs such as Capture expect a FileSystemStorage URI so in those cases this would also be a need.
Another case where FileSystemStorage is beneficial is the case of hierarchy or native API usage. If you need a directory structure or need to communicate with a native API the FileSystemStorage approach is easier.
FileSystemStorage API can find the content of the Storage API. As one is implemented on top of the other. This is undocumented behavior that can change at any moment!To summarize the differences between the 3 file storage options:
| Option | Storage | File System | JAR Resource |
|---|---|---|---|
Main Use Case | General application Data | low-level access | Ship data within the app |
Initial State | Blank | Blank | As defined by developer |
Modifiable | Yes | Yes | No |
Supports Hierarchies | No | Yes | No |
SQL
SQLite is a small SQL database designed for embedding into an application. Codename One exposes it
through com.codename1.db, an API similar in spirit to JDBC but much smaller, since the
abstractions JDBC needs for pluggable drivers make no sense for a local file.
Use it when you have tabular data, need to query it, or have enough of it that loading the lot into
memory is unreasonable. For a handful of values Storage is simpler.
The Database API opens a database by name:
void openDatabase() throws IOException {
    // A plain identifier is the portable form: it creates the file on first
    // use and every platform decides where it lands. Where
    // Database.isCustomPathSupported() answers true a "file://" path works
    // instead; where it does not, a name with a separator in it throws.
    //
    // Its own database, not the propertiesdemo.db the SQLMap walkthrough
    // later in this chapter creates -- SQLMap.createTable will not migrate
    // a Contact table this left behind with fewer columns.
    Database db = Database.openOrCreate("opendemo.db");
    try {
        // A fresh database is empty, so create before reading or writing.
        db.execute("CREATE TABLE IF NOT EXISTS Person ("
                + "id INTEGER PRIMARY KEY AUTOINCREMENT, name TEXT)");
        db.execute("INSERT INTO Person (name) VALUES (?)", new String[] { "Ada" });
    } finally {
        Util.cleanup(db);
    }
}
Some SQLite apps ship with a "ready made" database. You allow you to replace the DB file by using the code:
String path = Display.getInstance().getDatabasePath("databaseName");
You can then use the FileSystemStorage class to write the content of your DB file into the path. Notice that it must be a valid SQLite file!
getDatabasePath() returns the name within that pool and FileSystemStorage can’t open it.openOrCreate refuses to create a database whose name it finds there rather than handing you an
empty one, because an application that writes as it goes would overwrite the user’s data with an
empty state. Export what the old store holds from a build that still reads it, or set the
cn1.db.ignoreLegacyWebSql property to true to continue with a new empty database — nothing
removes the old store, so an application that has finished with it needs that property to move on.This is useful for applications that need to synchronize with a central server or applications that ship with a large database as part of their core product.
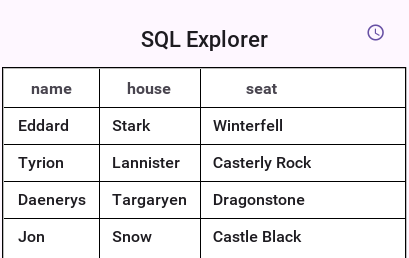
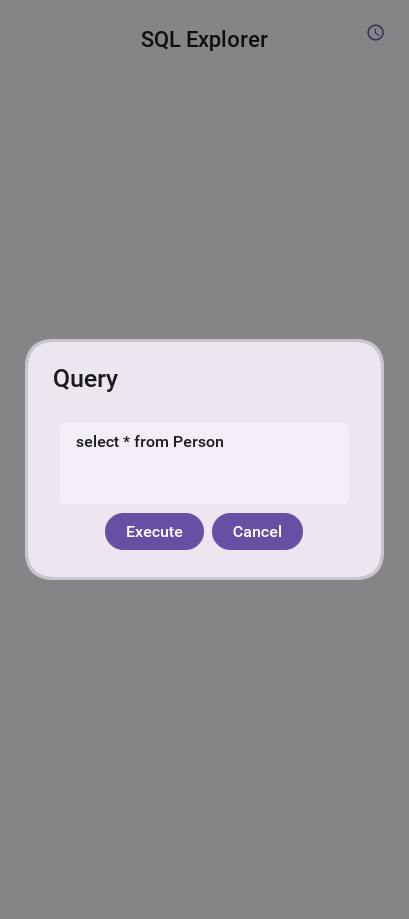
Working with a database is pretty trivial, the application logic below can send arbitrary queries to the database and present the results in a Table. You can probably integrate this code into your app as a debugging tool:
Toolbar.setGlobalToolbar(true);
Style s = UIManager.getInstance().getComponentStyle("TitleCommand");
FontImage icon = FontImage.createMaterial(FontImage.MATERIAL_QUERY_BUILDER, s);
Form hi = new Form("SQL Explorer", new BorderLayout());
hi.getToolbar().addCommandToRightBar("", icon, (e) -> {
    TextArea query = new TextArea(3, 80);
    Command ok = new Command("Execute");
    Command cancel = new Command("Cancel");
    if(Dialog.show("Query", query, ok, cancel) == ok) {
        Database db = null;
        Cursor cur = null;
        try {
            db = Display.getInstance().openOrCreate("MyDB.db");
            String sql = query.getText().trim().toLowerCase();
            // Deciding this properly means parsing the statement, which is a
            // long way outside a sample about Database and Cursor. These four
            // prefixes always return rows; a CTE can do either, so it goes to
            // execute() and a WITH that ends in a SELECT will report success
            // without a table.
            boolean returnsRows = sql.startsWith("select") ||
                    sql.startsWith("pragma") || sql.startsWith("explain") ||
                    sql.startsWith("values");
            if(returnsRows) {
                cur = db.executeQuery(query.getText());
                int columns = cur.getColumnCount();
                hi.removeAll();
                if(columns > 0) {
                    boolean next = cur.next();
                    if(next) {
                        ArrayList<String[]> data = new ArrayList<>();
                        String[] columnNames = new String[columns];
                        for(int iter = 0 ; iter < columns ; iter++) {
                            columnNames[iter] = cur.getColumnName(iter);
                        }
                        while(next) {
                            Row currentRow = cur.getRow();
                            String[] currentRowArray = new String[columns];
                            for(int iter = 0 ; iter < columns ; iter++) {
                                currentRowArray[iter] = currentRow.getString(iter);
                            }
                            data.add(currentRowArray);
                            next = cur.next();
                        }
                        Object[][] arr = new Object[data.size()][];
                        data.toArray(arr);
                        hi.add(BorderLayout.CENTER, new Table(new DefaultTableModel(columnNames, arr)));
                    } else {
                        hi.add(BorderLayout.CENTER, "Query returned no results");
                    }
                } else {
                    hi.add(BorderLayout.CENTER, "Query returned no results");
                }
            } else {
                db.execute(query.getText());
                hi.add(BorderLayout.CENTER, "Query completed successfully");
            }
            hi.revalidate();
        } catch(IOException err) {
            Log.e(err);
            hi.removeAll();
            hi.add(BorderLayout.CENTER, "Error: " + err);
            hi.revalidate();
        } finally {
            Util.cleanup(db);
            Util.cleanup(cur);
        }
    }
});
hi.show();
Encrypting a database
Pass a DatabaseConfig to encrypt a database at rest. Check that the platform can do it first:
if (Database.isEncryptionSupported()) {
    DatabaseConfig config = DatabaseConfig.managed();
    Database db = Database.openOrCreate("secure.db", config);
    config.wipe();
}
There are three ways to key a database.
DatabaseConfig.passphrase(String)The key is derived from a secret your application supplies, usually one the user typed. Nothing is stored on the device, so losing the passphrase loses the data.
DatabaseConfig.managed()A random key is generated on first use and kept in the platform key store, the Android Keystore or the iOS keychain. Your application never handles the key. This is the right default when there is nobody to prompt.
DatabaseConfig.rawKey(byte[])Thirty-two bytes of key material you already have, for instance issued by your server. No key derivation is applied, so the bytes must already be uniformly random.
managed(): a random key in
the platform key store beats a constant compiled into the binary.Encryption protects data at rest, and nothing else. It’s no defense against a rooted or jailbroken device, a debugger attached to the running process, or a memory dump, because the key is in memory for as long as the database is open.
Managed keys aren’t recoverable. Losing the key store entry, through an application uninstall, a device wipe or, on Android, restoring a backup onto a different device, leaves the database permanently unreadable. Android keystore keys can’t be exported; iOS keychain entries do survive an encrypted backup and restore. If the data has to outlive the device, use a passphrase your user or your server holds.
DatabaseConfig.isKeyHardwareBacked() reports the
difference, and the simulator logs a warning the first time you use a managed key.What encryption costs your build
Nothing is added to an application that doesn’t use it. The build scans your own classes — not the framework’s — and decides from what they reference:
| What your code references | What the build adds |
|---|---|
nothing in | Nothing at all. No SQLite engine on the platforms that bundle one, no browser payload. |
| The plain SQLite engine where the platform needs one: compiled into the native Windows and Linux binaries, and about 1.5MB of WebAssembly in a JavaScript build. Android and iOS use the engine already in the operating system. |
| The cipher as well. On Android that’s |
android.min_sdk_version to 23 and requires
android.useAndroidX=true, because that’s SQLCipher’s floor. If your application targets an older
API level the build will raise it for you, and devices below API 23 will no longer see your app in
the store. This applies as soon as anything in your code mentions DatabaseConfig, so a build hint
alone won’t opt out of it — remove the reference if you need the lower floor.Converting an existing database
An application that already ships a plaintext database can convert it in place:
if (!Database.isEncrypted("myapp.db")) {
    Database.encrypt("myapp.db", DatabaseConfig.managed());
}
Database.decrypt is the reverse, and Database.changeKey re-keys a database that’s already open.
An interruption leaves the original file intact, and schema metadata such as PRAGMA user_version
survives.
How that’s achieved differs by platform, which matters only if you’re watching the filesystem. Most
platforms re-key the file in place. Android can’t: its SQLCipher engine re-keys only between two
encrypted states and refuses to convert to or from plaintext, so the port writes the converted
database alongside the original and swaps it in once it’s complete. A .cn1migrate file next to
your database means a conversion was interrupted partway; the original is still the live one, and
the leftover is cleaned up on the next attempt.
The on-disk format
Every platform reads and writes one format, so a database created on a phone can be pulled off the
device and opened in the simulator while you are debugging. The parameters are fixed: AES-256 in CBC
mode, PBKDF2-HMAC-SHA512 key derivation at 256000 iterations, a 4096 byte page size and per-page
HMAC-SHA512. This is the SQLCipher 4 format, so standard tools such as the sqlcipher command line
client can open these files too.
Transactions
Transactions are flat, because that’s the only model all the underlying engines can express. A
beginTransaction() while one is already open throws, and so does a commitTransaction() or
rollbackTransaction() with none open. Both end the transaction and return the connection to
autocommit, and closing a database with one open rolls it back.
A commit can fail. SQLite checks a deferred constraint when the transaction commits, not when the
offending row is inserted, so that’s where the failure surfaces. When it does, the transaction is
over: the port ends it for you and beginTransaction() works again straight away. Don’t roll back
afterward, because there’s nothing left to roll back and the call throws. The engines don’t agree
here on their own — Android ends the transaction before it reports the failure, while the SQLite C
API and JDBC leave it open — so the port reconciles them and your code sees one behaviour.
Schema migrations
The first release of an app creates its tables. Every later release has to cope with whichever of the earlier schemas a device still holds, and a user who skips three updates has to end up with the same tables as one who took each of them. A migration is one change to the schema, written once as a script. Each script runs exactly once per database, in order, so one call brings any database a device holds up to the schema this build expects.
Scripts go in the common module, in a directory of their own:
common/src/main/db/migration/
    V1__create_note.sql
    V2__add_note_created.sql
A file called V<version>__<description>.sql holds one change. Versions are
digits separated by dots or underscores and sort as numbers, and a change to the
schema is always a new file with a higher version: a script that has shipped is
never edited, because devices that ran the old text would no longer match the
ones that ran the new text.
-- V2__add_note_created.sql
ALTER TABLE note ADD COLUMN created BIGINT;
UPDATE note SET created = 0 WHERE created IS NULL;
The build compiles the scripts into the app, so they aren’t resources and add no files to it. Run them when the database is opened, before anything else touches it:
Database db = Display.getInstance().openOrCreate("notes.db");
Migrations.migrate(db);
EntityManager.open(name) does this by itself, since it opens the database and
nothing else has used it yet:
EntityManager manager = EntityManager.open("notes.db");
Each script runs in a transaction, and is recorded with a checksum in a table
called flyway_schema_history. A script that fails is rolled back and the call
throws, so a database is never left halfway between two versions. Run the call
on the thread that owns the database, and off the event dispatch thread when the
scripts move a lot of data.
The naming and the history table are Flyway’s, and the same engine runs the server’s migrations.
When the data is newer than the app
A user can install an older build over data that a newer one already migrated, by restoring a backup or downgrading. The older build can’t know what the newer scripts did to its tables, so the call refuses before changing anything:
Database db = Display.getInstance().openOrCreate("notes.db");
try {
    Migrations.migrate(db);
} catch (MigrationException refused) {
    if (refused.getCode() == MigrationException.FUTURE_SCHEMA) {
        db.close();
        // the data was written by a newer version of the app: ask the user to update
        return null;
    }
    throw refused;
}
An app that already shipped
A database created by a release from before the app had migrations has tables
and no history, and is refused for the same reason a server refuses one: V1
would run against a schema it didn’t create. Write the scripts so they add up to
the schema the shipped releases created, and tell the first run which version
that schema corresponds to:
Migrations.of(db).baselineOnMigrate(true).baselineVersion("3").migrate();
A fresh installation ignores the baseline and runs every script.
Scripts that rebuild a table
SQLite can’t drop a constraint or change a column’s type in place, so those
changes rebuild the table. Foreign key enforcement can only be switched inside
no transaction at all, so such a script manages its own. Put a file with the
same name plus .conf beside it, containing executeInTransaction=false:
-- V7__rebuild_note.sql, with V7__rebuild_note.sql.conf holding executeInTransaction=false
PRAGMA foreign_keys = OFF;
BEGIN;
CREATE TABLE note_new (id INTEGER PRIMARY KEY, body TEXT NOT NULL, created INTEGER NOT NULL DEFAULT 0);
INSERT INTO note_new (id, body, created) SELECT id, body, COALESCE(created, 0) FROM note;
DROP TABLE note;
ALTER TABLE note_new RENAME TO note;
COMMIT;
PRAGMA foreign_keys = ON;
Keep migration SQL to what every device’s SQLite accepts. Use single quotes
for strings, and prefer the oldest form of ALTER TABLE that does the job,
since the engine on an older phone is older than the one in the simulator.
Without the build step
A project that isn’t built with Maven or Gradle has no step to compile the scripts in. Register them in code instead; everything else works the same way:
MigrationSet set = MigrationSet.builder("default")
        .sql("1", "create note", "CREATE TABLE note (id INTEGER PRIMARY KEY, body TEXT)")
        .sql("2", "add note created", "ALTER TABLE note ADD COLUMN created INTEGER")
        .build();
Migrations.of(db, set).migrate();
Attaching a second database
ATTACH makes another database part of the connection, and SQLite holds it until you detach it or
close the connection. Codename One counts an attached database as open, so deleting it, converting
it or changing its key is refused while it’s attached, the same as for the database you opened
directly. That’s the protection you want: unlinking a file SQLite still has open loses everything
written through it.
SQLite lets you attach one file under several schema names at once. The file stays protected until
the last of them is detached, so a DETACH of one name doesn’t release a database the connection
still holds under another.
Write the filename as a single quoted literal, or bind it as a parameter. SQLite also accepts an
expression there — ATTACH '/data/' || name AS aux — but nothing can tell which file that names
until the engine evaluates it, which is after the database is already attached and too late to
refuse. Those
are rejected, and the message says so; build the name in your own code and pass it as a parameter.
Run ATTACH and DETACH through execute(). executeQuery() refuses them, because a cursor runs
its statement when it’s stepped — so the attachment would happen after the bookkeeping, and the
file could then be deleted while SQLite still holds it.
A path that runs through a symbolic link identifies the same database as the resolved path does.
The engine resolves links when it reports what it opened, so Codename One resolves them too before
it decides two names are one file — on the platforms where the engine does. Windows is the
exception, because SQLite’s Windows layer collapses . and .. as text and steps over a junction
rather than through it, so the unresolved name is what identifies the file there.
Name the file with an absolute path from Database.getDatabasePath(). A relative name is resolved
by SQLite against the process working directory, which is a different place on every platform and
isn’t something a Codename One application controls, while Codename One would look for it in the
database directory — so the database protected wouldn’t be the database attached. Those are
rejected on every port whose engine has a working directory to resolve against; in the browser,
where a name is an entry in a storage pool and means the same thing either way, they’re accepted.
If an attachment turns out to name a database that something else is deleting or converting, it’s
detached again and the next call on that connection throws to tell you.
Threading
A Database and its cursors aren’t thread safe. Either give each thread its own connection, or
wrap one in ThreadSafeDatabase, which routes every call through a single worker thread:
Database threadSafeDb = new ThreadSafeDatabase(Database.openOrCreate("shared.db"));
The wrapper costs a thread handoff per call, so a connection per thread is faster when the threads don’t genuinely need to share one.
Text and column indexes
Text is stored and read back exactly as written, for every character a Java String can hold:
accented characters, scripts outside ASCII, emoji, and even the character with code point zero,
which SQLite stores in a TEXT value like any other. A string written on one platform reads back
identical on every other.
Reading a column the result set doesn’t have — a negative index, or one past the last column — raises an IOException. It’s never reported as a null value, because SQLite’s own C interface
answers an out-of-range index with SQL NULL, and passing that on would make a mistyped index
impossible to tell apart from stored data.
Cursor performance
Iterating forward with next() costs the same everywhere. Seeking backwards or to an absolute row
is cheap on Android, which keeps a window of rows, and costs time proportional to the distance from
the start elsewhere, because a SQLite statement only steps forward and seeking back means rewinding
and stepping again. Prefer next() for large result sets.
One consequence is worth knowing: because a backward seek re-runs the statement, a cursor is a repeatable read only inside a transaction. Outside one, another thread can write between the two passes, changing what the second pass sees.
There’s a limit on Android that follows from the same mechanism. A statement that changes the
database and returns rows — INSERT … RETURNING and its relatives — runs once, and Android
reads its rows through a window it can only refill by running the statement again. The rows that
fit in the first window are therefore readable and the rest aren’t: reaching them would apply the
insert a second time. Codename One refuses that rather than doing it, and says so in the error,
including that the changes are already applied and the statement must not be retried. If the
result set may be large, run the statement with execute() and query for what you need
afterward. Every other port steps through such a statement once and has no such limit.
Compatibility with the previous behaviour
This API predates the portable contract, and its behaviour used to differ between platforms. If your
application depends on the old behaviour, set the db.legacy build hint, or call
Database.setLegacyBehavior(true) before opening any database. It restores each platform’s previous
behaviour exactly.
What your project gets by default
An Ant project that uses com.codename1.db is built in compatibility mode automatically. Ant
projects predate the portable contract, so a rebuild shouldn’t change how their queries behave
unless you ask for it. A Maven project gets the portable contract, which is the documented default everywhere else
in this section.
The build server decides this from the project itself, and says so in the build log when it turns
compatibility mode on. It only applies when your application actually references
com.codename1.db; an Ant project with no database is unaffected.
The build hint always wins, in either direction:
db.legacy | Ant project | Maven project |
|---|---|---|
unset | compatibility mode | portable contract |
| portable contract | portable contract |
| compatibility mode | compatibility mode |
An Ant project can therefore opt in to the portable contract by setting db.legacy=false, and a
Maven project can pin compatibility mode with db.legacy=true. Setting it explicitly is worth doing once
you’ve decided, because it makes the choice visible in the project rather than inferred from how
it’s built. If you migrate an Ant project to Maven without setting the hint, the default flips, so
set it before you migrate if you want the behaviour to stay put.
The hint works in the simulator too, so you can test either mode without a device.
| Restored behaviour | Platforms |
|---|---|
| iOS |
| Simulator |
| Android, iOS |
Parameters bind as text rather than by type | iOS |
| Android, Simulator |
The parameterized methods discard statements after the first, without saying so | all |
A nested | Android |
Malformed SQL surfaces from | Android |
| Simulator |
| Simulator |
| all |
| all |
| all |
| all but the browser |
The flag doesn’t cover defects, nor capabilities that used to throw and now work:
last(), prev() and position(int) on iOS and the simulator, reading blobs on iOS, blob query
parameters, binding null inside a String[], the existence of a database at all on the native
Windows and Linux ports, or seeking backwards through a statement that writes, which used to run
that statement a second time and repeat what it wrote. No application can depend on those.
Two settings the contract can’t reach
Everything above is behaviour Codename One implements, so it can be made the same everywhere. Two things are decided when the SQLite engine itself is compiled, and Codename One only compiles one of those engines — Android uses the platform’s, the simulator uses the JDBC driver’s, and iOS uses Apple’s unless the application encrypts:
Double-quoted string literals.
SELECT "value"isn’t valid SQL — the double quotes make it an identifier — but SQLite has a compatibility mode that turns an unknown identifier into a string, and that mode is fixed when the engine is compiled, with no pragma to change it. The Android and Apple engines accept it; the simulator’s driver rejects it with a message that tells you to use single quotes. Write string literals in single quotes and the question never arises. The engine Codename One bundles for Windows, Linux and encrypted iOS keeps SQLite’s default, so switching encryption on never changes what a statement means.Foreign keys. SQLite ignores declared foreign keys unless asked, and one driver enables them on its own. Codename One puts every port on SQLite’s default so a violation behaves the same in the simulator as on a device; run
PRAGMA foreign_keys = ONafter opening if you want them enforced, which works everywhere.
Both are easy to settle for yourself: SELECT "value" either returns the string or reports an
error, and PRAGMA foreign_keys reports whether they’re on. Codename One’s own port conformance
run reports both for every platform it covers.
Network manager & connection request
One of the more common problems in Network programming is spawning a new thread to handle the network operations. In Codename One this is done seamlessly and becomes unessential thanks to the NetworkManager.
NetworkManager effectively alleviates the need for managing network threads by managing the complexity of network threading. The connection request class can be used to ease web service requests when coupled with the JSON/XML parsing capabilities.
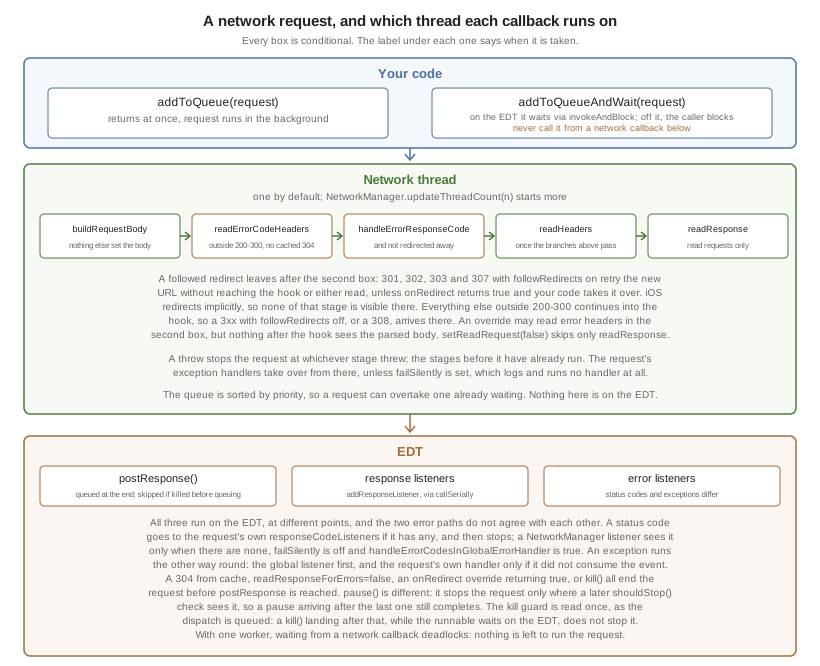
That convenience comes with one rule worth learning before the API: the
callbacks that read and write the request run on a network thread, while
postResponse, a response listener and an error listener all run on the EDT.
To open a connection one needs to use a ConnectionRequest object, which has some similarities to the networking mechanism in JavaScript but is obviously somewhat more elaborate.
You can send a get request to a URL using something like:
ConnectionRequest request = new ConnectionRequest(url, false);
request.addResponseListener((e) -> {
    // process the response
});

// request will be handled asynchronously
NetworkManager.getInstance().addToQueue(request);
Notice that you can also implement the same thing and much more by avoiding the response listener code and instead overriding the methods of the ConnectionRequest class which offers many points to override for example:
ConnectionRequest request = new ConnectionRequest(url, false) {
   protected void readResponse(InputStream input) {
        // just read from the response input stream
   }

   protected void postResponse() {
        // invoked on the EDT after processing is complete to allow the networking code
        // to update the UI
   }

   protected void buildRequestBody(OutputStream os) {
        // writes post data, by default this "just works" but if you want to write this
       // manually then override this
   }
};
NetworkManager.getInstance().addToQueue(request);
buildRequestBody(OutputStream) will work for POST requests and will replace writing the argumentsNetworkManager also supports synchronous requests which work in a similar way to Dialog through the invokeAndBlock call and thus don’t block the EDT [8] illegally. For example: you can do something like this:
ConnectionRequest request = new ConnectionRequest(url, false);
// request will be handled synchronously
NetworkManager.getInstance().addToQueueAndWait(request);
byte[] resultOfRequest = request.getResponseData();
Notice that in this case the addToQueueAndWait method returned after the connection completed. Also notice that this was totally legal to do on the EDT!
Timeouts & retries
Each request can override the global timeout using setTimeout(int), which
expects a duration in milliseconds. This is useful when you’re
talking to endpoints that occasionally need a longer window than the default
NetworkManager setting. You can also configure how many times Codename One
should retry a failing call by using setSilentRetryCount(int). When
the silent retry limit is reached the standard error handling kicks in (for example:
listeners fire, fail dialogs show, etc.).
Threading
By default the NetworkManager launches with a single network thread. This is enough for simple applications that don’t do too much networking but if you need to fetch many images concurrently and perform web services in parallel this might be an issue.
To update the number of threads use:
NetworkManager.getInstance().updateThreadCount(4);
The callbacks you override on a ConnectionRequest occur on the network thread and not on the EDT!
The callbacks you register are the other way round. postResponse(), designed to update the UI after the networking code completes, is dispatched back to the EDT with callSerially, and so are the listeners added through addResponseListener and NetworkManager.addErrorListener.
ConnectionRequest callback. You can either use a listener on the ConnectionRequest, use postResponse() (which is the exception to this rule) or wrap your UI code with callSerially.VPN detection (best effort)
NetworkManager includes two APIs for querying VPN state:
NetworkManager nm = NetworkManager.getInstance();
if (nm.isVPNDetectionSupported()) {
    boolean vpnActive = nm.isVPNActive();
}
Both Android and iOS implementations rely on platform networking metadata and
interface-name patterns (for example: tun, ppp, utun, ipsec). This means the
result can be wrong in either direction:
False negatives: Some VPNs may hide or avoid these patterns.
False positives: Other virtual/tunnel interfaces may look like VPNs.
Use this API for UX or diagnostics (for example: warnings, telemetry, or logging), not for access control or fraud prevention by itself.
Arguments, headers & methods
HTTP/S is a complex protocol that expects complex encoded data for its requests. Codename One tries to simplify and abstract most of these complexities behind common sense APIs while still providing the full low-level access you would expect from such an API.
Arguments
HTTP supports many "request methods," most commonly GET & POST but also a few others such as HEAD, PUT, DELETE etc.
Arguments in HTTP are passed differently between GET and POST methods. That’s what the setPost method in Codename One determines, whether arguments added to the request should be placed using the GET semantics or the POST semantics.
If you continue your example from above you can do something like this:
ConnectionRequest request = new ConnectionRequest(url, false);
request.addArgument("MyArgName", value);
This will implicitly add a get argument with the content of value. Notice that you don’t care what value is. It’s implicitly HTTP encoded based on the get/post semantics. In this case it will use the get encoding since you passed false to the constructor.
A simpler implementation could do something like this:
ConnectionRequest request = new ConnectionRequest(url +
    "?MyArgName=" + Util.encodeUrl(value), false);
This would be almost identical but doesn’t provide the convenience for switching back and forth between GET/POST and it isn’t as fluent.
You can skip the encoding in complex cases where server code expects illegal HTTP characters (this happens) using the addArgumentNoEncoding method. You can also add many arguments with the same key using addArgumentArray.
Methods
As you explained above, the setPost() method allows you to manipulate the get/post semantics of a request. This implicitly changes the POST or GET method submitted to the server.
For example, if you wish to have finer grained control over the submission process for example: for making a HEAD request you can do this with code like:
ConnectionRequest request = new ConnectionRequest(url, false);
request.setHttpMethod("HEAD");
Headers
When communicating with HTTP servers you often pass data within headers for authentication/authorization but also to convey various properties.
Some headers are built-in as direct APIs for example: content type is directly exposed within the API since it’s a pretty common use case. You can set the content kind of post request using:
ConnectionRequest request = new ConnectionRequest(url, true);
request.setContentType("text/xml");
You can also add any arbitrary header type you want, for example: a common use case is basic authorization where the authorization header includes the Base64 encoded user/password combination as such:
String authCode = user + ":" + password;
String authHeader = "Basic " + Base64.encodeNoNewline(authCode.getBytes());
request.addRequestHeader("Authorization", authHeader);
This can be tedious to do if you want all requests from your app to use this header. For this use case you can use:
String authCode = user + ":" + password;
String authHeader = "Basic " + Base64.encodeNoNewline(authCode.getBytes());
NetworkManager.getInstance().addDefaultHeader("Authorization", authHeader);
Server headers
Server returned headers are a bit trickier to read. You need to subclass the connection request and override the readHeaders method for example:
ConnectionRequest request = new ConnectionRequest(url, false) {
    protected void readHeaders(Object connection) throws IOException {
        String[] headerNames = getHeaderFieldNames(connection);
        for(String headerName : headerNames) {
            String headerValue = getHeader(connection, headerName);
            //....
        }
    }
    protected void readResponse(InputStream input) {
        // just read from the response input stream
    }
};
NetworkManager.getInstance().addToQueue(request);
Here you can extract the headers one by one to handle complex headers such as cookies, authentication etc.
Error handling
As you noticed above practically all the methods in the ConnectionRequest throw IOException. This allows you to avoid the try/catch semantics and let the error propagate up the chain so it can be handled uniformly by the application.
There are two distinct places where you can handle a networking error:
The
ConnectionRequest- by overriding callback methodsThe
NetworkManagererror handler
Notice that the NetworkManager error handler takes precedence thus allowing you to define a global policy for network error handling by consuming errors.
For example: to block all network errors from showing anything to the user you could do something like this:
NetworkManager.getInstance().addErrorListener((e) -> e.consume());
NetworkManager.getInstance().addToQueue(request);
The error listener is invoked first with the NetworkEvent matching the error. Consuming the event prevents it from propagating further down the chain into the ConnectionRequest callbacks.
You can also override the error callbacks of the various types in the request for example: for a server error code you can do:
ConnectionRequest request = new ConnectionRequest(url, false) {
    protected void handleErrorResponseCode(int code, String message) {
        if(code == 444) {
            // do something
            return;
        }
        super.handleErrorResponseCode(code, message);
    }
    protected void readResponse(InputStream input) {
        // just read from the response input stream
    }
};
NetworkManager.getInstance().addToQueue(request);
As a result it can’t access the UI to show a
Dialog or anything like that.Another approach is to use the setFailSilently(true) method on the ConnectionRequest. This will prevent the ConnectionRequest from displaying any errors to the user. It’s a powerful strategy if you use the synchronous version of the APIs for example:
ConnectionRequest request = new ConnectionRequest(url, false);
request.setFailSilently(true);
NetworkManager.getInstance().addToQueueAndWait(request);
if(request.getResponseCode() < 200 || request.getResponseCode() > 299) {
    // probably an error...
}
Error stream
When you get an error code that isn’t 200/300 you ignore the result. This is problematic as the result might contain information you need. For example: many webservices provide further XML/JSON based details describing the reason for the error code.
Calling setReadResponseForErrors(true) will trigger a mode where even errors will receive the readResponse callback with the error stream. This also means that APIs like getData and the listener APIs will also work in case of error.
GZIP
Gzip is a common compression format based on the lz algorithm, it’s used by web servers around the world to compress data.
Codename One supports GZIPInputStream and GZIPOutputStream, which allow you to compress data seamlessly into a stream and extract compressed data from a stream. This is useful and can be applied to every arbitrary stream.
Codename One also features a GZConnectionRequest, which will automatically unzip an HTTP response if it’s indeed gzipped. Notice that some devices (iOS) always request gzip’ed data and always decompress it for you, but for iOS it doesn’t remove the gziped header. The GZConnectionRequest is aware of such behaviors so it’s better to use that when connecting to the network (if applicable).
By default GZConnectionRequest doesn’t request gzipped data ( unzips it when its received) but its pretty easy to do so add the HTTP header Accept-Encoding: gzip for example:
GZConnectionRequest con = new GZConnectionRequest();
con.addRequestHeader("Accept-Encoding", "gzip");
Do the rest as usual and you should have smaller responses from the servers.
File upload
MultipartRequest tries to simplify the process of uploading a file from the local device to a remote server.
You can always submit data in the buildRequestBody but this is flaky and has some limitations in devices/size allowed. HTTP standardized file upload capabilities through the multipart request protocol, this is implemented by countless servers and is well documented. Codename One supports this out of the box:
MultipartRequest request = new MultipartRequest();
request.setUrl(url);
request.addData("myFileName", fullPathToFile, "text/plain");
NetworkManager.getInstance().addToQueue(request);
MultipartRequest is a ConnectionRequest most stuff you expect from there should work. Even addArgument etc.Since you assume most developers reading this will be familiar with Java here is the way to implement the multipart upload in the servlet API:
This is server-side Java rather than Codename One, so it isn’t one of the compiled examples:
@WebServlet(name = "UploadServlet", urlPatterns = {"/upload"})
@MultipartConfig(fileSizeThreshold = 1024 * 1024 * 100,
        maxFileSize = 1024 * 1024 * 150,
        maxRequestSize = 1024 * 1024 * 200)
public class UploadServlet extends HttpServlet {
    @Override
    public void doPost(HttpServletRequest req, HttpServletResponse res)
            throws ServletException, IOException {
        // By name, matching the addData(...) call above: getParts() also
        // carries any addArgument values and comes off an unordered map,
        // so the first part is not necessarily the file.
        Part data = req.getPart("myFileName");
        try (InputStream in = data.getInputStream()) {
            // Persist the bytes wherever the upload belongs.
        }
    }
}
Parsing
Codename One has many built in parsers for JSON, XML, CSV & Properties formats. You can use those parsers to read data from the Internet or data that’s shipping with your product. For example: use the CSV data to setup default values for your application.
All your parsers are designed with simplicity and small distribution size; they don’t check and will fail in odd ways when faced with broken data. The main logic behind this is that validation takes up CPU time on the device where CPU is a precious resource.
Parsing CSV
CSV is probably the easiest to use, the "Comma Separated Values" format is a list of values separated by commas (or some other character) with new lines to show another row in the table. These map well to an Excel spreadsheet or database table and are supported by default in all spreadsheets.
To parse a CSV use the CSVParser class as such:
Form hi = new Form("CSV Parsing", new BorderLayout());
CSVParser parser = new CSVParser();
try(Reader r = new CharArrayReader("1997,Ford,E350,\"Super, \"\"luxurious\"\" truck\"".toCharArray());) {
String[][] data = parser.parse(r);
String[] columnNames = new String[data[0].length];
for(int iter=  0 ; iter < columnNames.length ; iter++) {
columnNames[iter] = "Col " + (iter + 1);
}
TableModel tm = new DefaultTableModel(columnNames, data);
hi.add(BorderLayout.CENTER, new Table(tm));
} catch(IOException err) {
Log.e(err);
}
hi.show();

The data contains a two-dimensional array of the CSV content. You can change the delimiter character by using the CSVParser constructor that accepts a character.
CharArrayReader from the com.codename1.io package for this sample. You would want to use java.util.InputStreamReader for real world data.JSON
The JSON ("JavaScript Object Notation") format is popular on the web for passing values to/from webservices since it works so well with JavaScript. Parsing JSON is as easy but has two different variations. You can use the JSONParser class to build a tree of the JSON data as such:
JSONParser parser = new JSONParser();
Hashtable response = parser.parse(reader);
The response is a Map containing a nested hierarchy of Collection (java.util.List), Strings and numbers to represent the content of the submitted JSON. To extract the data from a specific path iterate the Map keys and recurs into it.
The sample below uses results from an API of ice and fire that queries structured data about the "Song Of Ice & Fire" book series. Here is a sample result returned from the API for the query https://www.anapioficeandfire.com/api/characters?page=5&pageSize=3 :
[
  {
    "url": "http://www.anapioficeandfire.com/api/characters/13",
    "name": "Chayle",
    "culture": "",
    "born": "",
    "died": "In 299 AC, at Winterfell",
    "titles": [
      "Septon"
    ],
    "aliases": [],
    "father": "",
    "mother": "",
    "spouse": "",
    "allegiances": [],
    "books": [
      "http://www.anapioficeandfire.com/api/books/1",
      "http://www.anapioficeandfire.com/api/books/2",
      "http://www.anapioficeandfire.com/api/books/3"
    ],
    "povBooks": [],
    "tvSeries": [],
    "playedBy": []
  },
  {
    "url": "http://www.anapioficeandfire.com/api/characters/14",
    "name": "Gillam",
    "culture": "",
    "born": "",
    "died": "",
    "titles": [
      "Brother"
    ],
    "aliases": [],
    "father": "",
    "mother": "",
    "spouse": "",
    "allegiances": [],
    "books": [
      "http://www.anapioficeandfire.com/api/books/5"
    ],
    "povBooks": [],
    "tvSeries": [],
    "playedBy": []
  },
  {
    "url": "http://www.anapioficeandfire.com/api/characters/15",
    "name": "High Septon",
    "culture": "",
    "born": "",
    "died": "",
    "titles": [
      "High Septon",
      "His High Holiness",
      "Father of the Faithful",
      "Voice of the Seven on Earth"
    ],
    "aliases": [
      "The High Sparrow"
    ],
    "father": "",
    "mother": "",
    "spouse": "",
    "allegiances": [],
    "books": [
      "http://www.anapioficeandfire.com/api/books/5",
      "http://www.anapioficeandfire.com/api/books/8"
    ],
    "povBooks": [],
    "tvSeries": [
      "Season 5"
    ],
    "playedBy": [
      "Jonathan Pryce"
    ]
  }
]
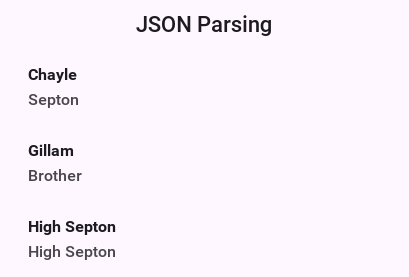
You will place that into a file named "anapioficeandfire.json" in the src directory to make the next sample simpler:
Form hi = new Form("JSON Parsing", new BoxLayout(BoxLayout.Y_AXIS));
JSONParser json = new JSONParser();
try (Reader r = new InputStreamReader(
        Display.getInstance().getResourceAsStream(getClass(), "/anapioficeandfire.json"), "UTF-8")) {
    Map<String, Object> data = json.parseJSON(r);
    java.util.List<Map<String, Object>> content =
            (java.util.List<Map<String, Object>>) data.get("root"); // (1)
    for (Map<String, Object> obj : content) { // (2)
        String url = (String) obj.get("url");
        String name = (String) obj.get("name");
        java.util.List<String> titles = (java.util.List<String>) obj.get("titles"); // (3)
        if (name == null || name.length() == 0) {
            java.util.List<String> aliases = (java.util.List<String>) obj.get("aliases");
            if (aliases != null && aliases.size() > 0) {
                name = aliases.get(0);
            }
        }
        MultiButton mb = new MultiButton(name);
        if (titles != null && titles.size() > 0) {
            mb.setTextLine2(titles.get(0));
        }
        mb.addActionListener((e) -> Display.getInstance().execute(url));
        hi.add(mb);
    }
} catch (IOException err) {
    Log.e(err);
}
hi.show();
The
JSONParserreturns aMapwhich is great if the root object is aMapbut sometimes its a list of elements (as is the case above). In this case a special case "root" element is created to contain the actual list of elements.This relies on the entries all being maps, which might not be the case for every API type.
Notice that the "titles" and "aliases" entries are both lists of elements. You use
java.util.Listto avoid a clash withcom.codename1.ui.List.
An alternative approach is to use the static data parse() method of the JSONParser class and implement a callback parser for example:
JSONParser.parse(reader, callback);
Notice that a static version of the method is used! The callback object is an instance of the JSONParseCallback interface, which includes many methods. These methods are invoked by the parser to show internal parser states, this is like the way traditional XML SAX event parsers work.
Writing JSON — JSONWriter
For typed DTO serialization use the @Mapped annotation framework
(see JSON / XML Object Mapping) plus Mappers.toJson(…). For ad-hoc
maps / lists where a build-time Mapper would be overkill, the
com.codename1.io.JSONWriter class is the complement of JSONParser:
// One-shot encoding of any Map / List / String / Number / Boolean / null tree
Map<String, Object> tree = new HashMap<>();
tree.put("name", "ada");
tree.put("values", Arrays.asList(1, 2, 3));
String json = JSONWriter.toJson(tree);

// Streaming variants for large outputs (UTF-8)
JSONWriter.toJson(value, writer);
JSONWriter.toJson(value, outputStream);
For tiny request bodies the fluent builders are usually faster to read
than a Map literal:
String body = JSONWriter.object()
        .put("email", email)
        .put("password", password)
        .toJson();

String coords = JSONWriter.array()
        .add(JSONWriter.object().put("lat", 37.7749).put("lng", -122.4194))
        .add(JSONWriter.object().put("lat", 51.5074).put("lng",   -0.1278))
        .toJson();
Strings are double-quoted with the standard backslash escapes for ",
\, \n, \r, \t, \b, \f, and control chars below 0x20 are
emitted as \u00xx. The writer doesn’t pretty-print; if you need
indented output, run the result through an external formatter at debug
time.
XML parsing
The XMLParser started its life as an HTML parser built for displaying mobile HTML. That usage has since been deprecated but the parser can still parse many HTML pages and is "loose" in verification. This is both good and bad as the parser will work with invalid data without complaining.
The simplest usage of XMLParser looks a bit like this:
XMLParser parser = new XMLParser();
Element elem = parser.parse(reader);
The Element contains children and attributes. It represents a tag within the XML document and even the root document itself. You can iterate over the XML tree to extract the data from within the XML file.
You’ve had a great sample of working with XMLParser in the Tree Section of this guide.
XMLParser has the complimentary XMLWriter class which can generate XML from the Element hierarchy. This allows developers to mutate (change) the elements and save them to a writer stream.
XPath processing
The Result class provides a subset of
XPath, but it isn’t limited to XML documents, it can also work with JSON documents, and even with raw Map objects.
Start by demonstrating how to process a response from the Google Reverse Geocoder API. Start with this XML snippet:
<?xml version="1.0" encoding="UTF-8"?>
<GeocodeResponse>
  <status>OK</status>
  <result> <!-- (irrelevant content removed) -->
      <address_component>
          <long_name>London</long_name>
          <short_name>London</short_name>
          <type>locality</type>
          <type>political</type>
      </address_component>
      <!-- (irrelevant content removed) -->
     <address_component>
          <long_name>Ontario</long_name>
          <short_name>ON</short_name>
          <type>administrative_area_level_1</type>
          <type>political</type>
      </address_component>
      <address_component>
         <long_name>Canada</long_name>
         <short_name>CA</short_name>
         <type>country</type>
         <type>political</type>
      </address_component>
  </result>
</GeocodeResponse>
You want to extract some data above into simpler string results. You can do this using:
Result result = Result.fromContent(input, Result.XML);
String country = result.getAsString("/result/address_component[type='country']/long_name");
String region = result.getAsString("/result/address_component[type='administrative_area_level_1']/long_name");
String city = result.getAsString("/result/address_component[type='locality']/long_name");
If you’re at all familiar with processing responses from webservices, you will notice that what would require many lines of code of selecting and testing nodes in regular java can now be done in a single line using the new path expressions.
In the code above, input can be any of:
InputStreamdirectly fromConnectionRequest.readResponse(java.io.InputStream).XML or JSON document in the form of a
StringJSON DOM
Mapreturned from JSONParser
To use the expression processor when calling a webservice, you could use something like the following to parse JSON (notice this is interchangeable between JSON and XML):
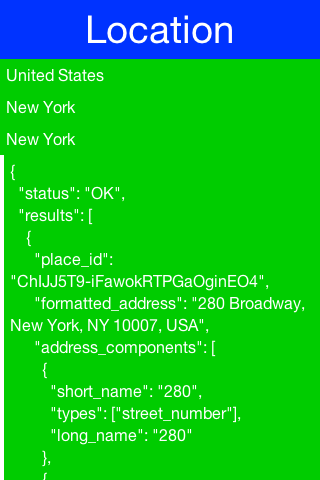
Form hi = new Form("Location", new BoxLayout(BoxLayout.Y_AXIS));
hi.add("Pinpointing Location");
Display.getInstance().callSerially(() -> {
    Location l = Display.getInstance().getLocationManager().getCurrentLocationSync();
    if(l == null) {
        hi.add("Location unavailable");
        hi.revalidate();
        return;
    }
    ConnectionRequest request = new ConnectionRequest("https://maps.googleapis.com/maps/api/geocode/json", false) {
        private String country;
        private String region;
        private String city;
        private String json;

        @Override
        protected void readResponse(InputStream input) throws IOException {
                Result result = Result.fromContent(input, Result.JSON);
                country = result.getAsString("/results/address_components[types='country']/long_name");
                region = result.getAsString("/results/address_components[types='administrative_area_level_1']/long_name");
                city = result.getAsString("/results/address_components[types='locality']/long_name");
                json = result.toString();
        }

        @Override
        protected void postResponse() {
            hi.removeAll();
            hi.add(country);
            hi.add(region);
            hi.add(city);
            hi.add(new SpanLabel(json));
            hi.revalidate();
        }
    };
    request.setContentType("application/json");
    request.addRequestHeader("Accept", "application/json");
    request.addArgument("key", googleApiKey);
    request.addArgument("latlng", l.getLatitude() + "," + l.getLongitude());

    NetworkManager.getInstance().addToQueue(request);
});
hi.show();
/* omitted */
The returned JSON looks something like this (notice it’s snipped because the data is too long):
{
  "status": "OK",
  "results": [
    {
      "place_id": "ChIJJ5T9-iFawokRTPGaOginEO4",
      "formatted_address": "280 Broadway, New York, NY 10007, USA",
      "address_components": [
        {
          "short_name": "280",
          "types": ["street_number"],
          "long_name": "280"
        },
        {
          "short_name": "Broadway",
          "types": ["route"],
          "long_name": "Broadway"
        },
        {
          "short_name": "Lower Manhattan",
          "types": [
            "neighborhood",
            "political"
          ],
          "long_name": "Lower Manhattan"
        },
        {
          "short_name": "Manhattan",
          "types": [
            "sublocality_level_1",
            "sublocality",
            "political"
          ],
          "long_name": "Manhattan"
        },
        {
          "short_name": "New York",
          "types": [
            "locality",
            "political"
          ],
          "long_name": "New York"
        },
        {
          "short_name": "New York County",
          "types": [
            "administrative_area_level_2",
            "political"
          ],
          "long_name": "New York County"
        },
        {
          "short_name": "NY",
          "types": [
            "administrative_area_level_1",
            "political"
          ],
          "long_name": "New York"
        },
        {
          "short_name": "US",
          "types": [
            "country",
            "political"
          ],
          "long_name": "United States"
        },
        {
          "short_name": "10007",
          "types": ["postal_code"],
          "long_name": "10007"
        },
        {
          "short_name": "1868",
          "types": ["postal_code_suffix"],
          "long_name": "1868"
        }
      ],
      "types": ["street_address"],
      "geometry": {
        "viewport": {
          "northeast": {
            "lng": -74.0044642197085,
            "lat": 40.7156470802915
          },
          "southwest": {
            "lng": -74.0071621802915,
            "lat": 40.7129491197085
          }
        },
        "location_type": "ROOFTOP",
        "location": {
          "lng": -74.00581319999999,
          "lat": 40.7142981
        }
      }
    }
    /* SNIPED the rest */
  ]
}
The XML processor handles global selections by using a double slash anywhere within the expression, for example:
// get all address_component names anywhere in the document with a type "political"
String array[] = result.getAsStringArray("//address_component[type='political']/long_name");

// get all types anywhere under the second result (dimension is 0-based)
String[] types = result.getAsStringArray("/result[1]//type");
Second example
It’s also possible to do some more complex expressions. You’ll use the following XML fragment for the next batch of examples:
<rankings type="aus" gender="male" date="2011-12-31">
    <player id="1036" coretennisid="6752" rank="1"
       delta="0" singlespoints="485000" doublespoints="675"
       deductedpoints="0" totalpoints="485675">
        <firstname>Bernard</firstname>
        <lastname>Tomic</lastname>
        <town>SOUTHPORT</town>
        <state>QLD</state>
        <dob>1992-10-21</dob>
    </player>
    <player id="2585" coretennisid="1500" rank="2"
       delta="0" singlespoints="313500" doublespoints="12630"
       deductedpoints="0" totalpoints="326130">
        <firstname>Mathew</firstname>
        <lastname>Ebden</lastname>
        <town>CHURCHLANDS</town>
        <state>WA</state>
        <dob>1987-11-26</dob>
    </player>
    <player id="6457" coretennisid="287" rank="3"
        delta="0" singlespoints="132500" doublespoints="1500"
        deductedpoints="0" totalpoints="134000">
       <firstname>Lleyton</firstname>
       <lastname>Hewitt</lastname>
       <town>EXETER</town>
       <state>SA</state>
       <dob>1981-02-24</dob>
    </player>
    <!-- ... etc ... -->
</rankings>
Above, if you want to select the IDs of all players that are ranked in the top 2, you can use an expression like:
int top2[] = result.getAsIntegerArray("//player[@rank < 3]/@id");
If a document is ordered, you might want to select nodes by their position, for example:
String first2[] = result.getAsStringArray("//player[position() < 2]/firstname");

String secondLast = result.getAsString("//player[last() - 1]/firstname");
It’s also possible to select parent nodes, by using the .. expression. For example:
int id = result.getAsInteger("//lastname[text()='Hewitt']/../@id");
Above, you globally find a lastname element with a value of ‘Hewitt’, then grab the parent node of lastname which happens to be the player node, then grab the ID attribute from the player node. Or, you could get the same result from the following simpler statement:
int id = result.getAsInteger("//player[lastname='Hewitt']/@id");
A predicate can’t hold another predicate. An expression such as
//player[//address[country/isocode='CA']]/@id is rejected with
Syntax error: unclosed predicate, because the outer predicate is split at
its comparator before it’s tokenized and that cuts the inner one in half.
Select the inner nodes first and match on what comes back.
To select a node based on the existence of an attribute:
int id[] = result.getAsIntegerArray("//player[@rank]/@id");
Above, you selected the IDs of all ranked players. Conversely, you can select the non-ranked players like this:
int id[] = result.getAsIntegerArray("//player[@rank=null]/@id");
!) operators aren’t implemented.There’s no matching test for a child node. A predicate that names one with no
comparison in it — //player[middlename] — is rejected with
Could not create a comparator, so test for a child by comparing it to
something, or select the child and work from what comes back.
Keep in mind that the Codename One path expression language isn’t a full implementation of XPath 1.0, but does already handle many of the most useful features of the specification.
Properties files
Properties files are standard key/value pairs encoded into a text file. This file format is familiar to Java developers and the Codename One specific version tries to be as close as possible to the original Java implementation.
Notice that properties file both in Java proper and in Codename One don’t support non-ascii characters. To encode Unicode values into the properties file format you should use the native2ascii tool that ships with the JDK.
One major difference between standard Java properties and the ones in Codename One is that Codename One sorts properties alphabetically when saving. Java uses random order based on the Hashtable natural ordering.
This was done to provide consistency for saved files.
Debugging network connections
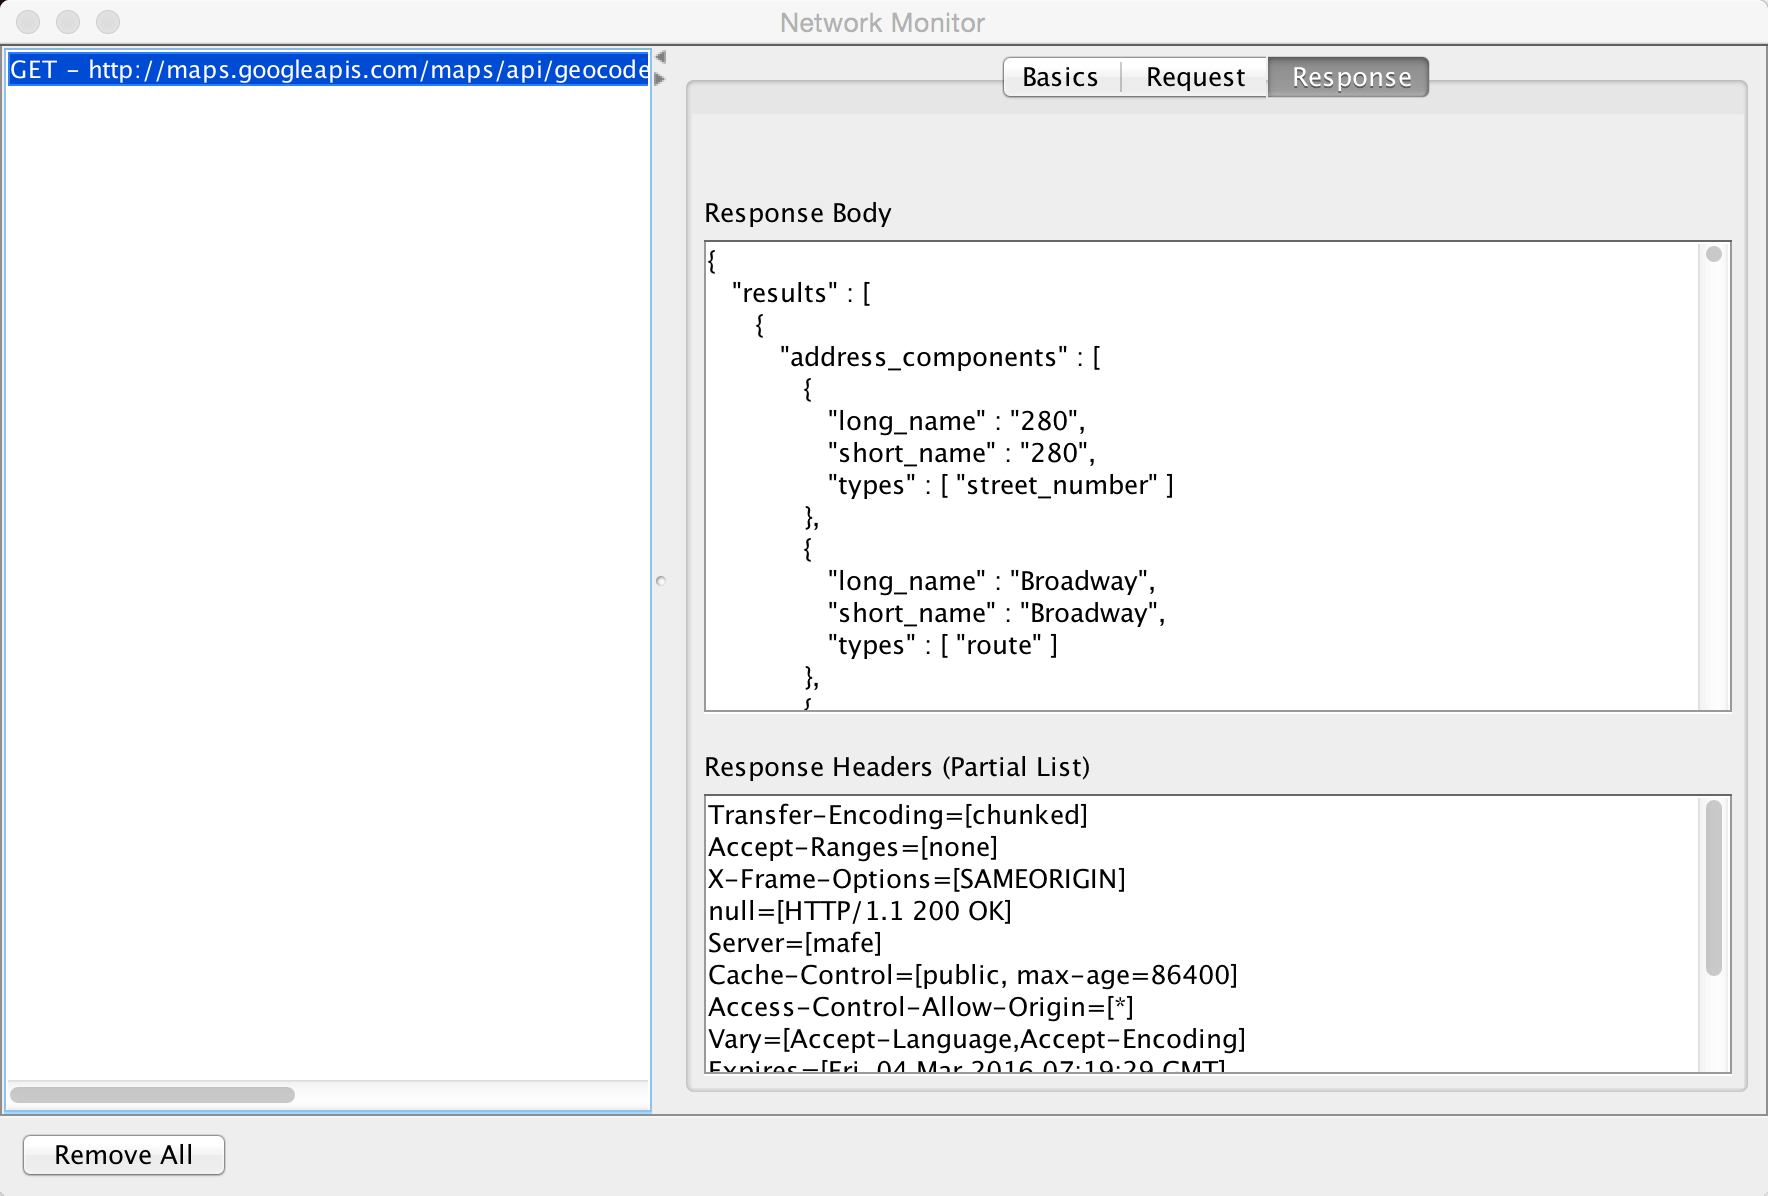
Codename One includes a Network Monitor tool which you can access through the simulator menu option. This tool reflects all the requests made through the connection requests and displays them in the left pane. This allows you to track issues in your code/web service and see everything the is "going through the wire."
This is a useful tool for optimizing and for figuring out what’s happening with your server connection logic.
Simpler downloads
A common task is file download to storage or filesystem.
The Util class has simple utility methods:
downloadUrlToFileSystemInBackground, downloadUrlToStorageInBackground, downloadUrlToFile & downloadUrlToStorage.
These all delegate to a feature in ConnectionRequest:
ConnectionRequest.setDestinationStorage(fileName) &
ConnectionRequest.setDestinationFile(fileName);
Both of which simplify the whole process of downloading a file.
Downloading images
Codename One has many ways to download an image and the general recommendation is the URLImage.
For example, the URLImage assumes that you know the size of the image in advance or that you’re willing to resize it. In that regard it works great for some use cases but not so much for others.
The download methods mentioned above are great alternatives but they’re a bit verbose when working with images and don’t provide fine grained control over the ConnectionRequest for example: making a POST request to get an image.
To make this process simpler there is a set of helper methods in ConnectionRequest that downloads images directly.
These methods complement the Util methods but go a bit further and feature terse syntax for example: you can
download a ConnectionRequest to Storage using code like this:
request.setUrl(url);
request.downloadImageToStorage("cached-image", (img) -> theImageIsHereDoSomethingWithIt(img));
This effectively maps the ConnectionRequest directly to a SuccessCallback for further processing.
URLImage caching
URLImage is great. It changed the way you do some things in Codename One.
For example, when it was introduced there was no support for the cache filesystem or for the JavaScript port. The cache filesystem is probably the best place for images of URLImage so supporting that as a target is an obvious choice, but JavaScript seems to work so why would it need a special case?
JavaScript already knows how to download and cache images from the web. URLImage is actually a step back from the things a good browser can do so why not use the native abilities of the browser when you’re running there and fallback to using the cache filesystem if it’s available and as a last resort go to storage…
That’s what the new method of URLImage does:
public static Image createCachedImage(String imageName, String url,
                                      Image placeholder, int resizeRule);
A few important things you need to notice about this method:
It returns Image and not URLImage. This is crucial. Down casting to `URLImage* will work on the simulator but might fail in some platforms (for example: JavaScript) so don’t do that!
Since this is implemented natively in JavaScript you need a different abstraction for that platform.It doesn’t support image adapters and instead uses a simplified resize rule. Image adapters work on
URLImagesince you have a lot of control in that class. For example, in the browser your control is limited and so an adapter won’t work.
If you do use this approach it would be far more efficient when running in the JavaScript port and will make better use of caching in most OSes.
Rest API
The Rest API makes it easy to invoke a RESTful webservice without many of the nuances of ConnectionRequest. You can use it to define the HTTP method and start building based on that. To get a parsed JSON result from a URL you could do:
Map<String, Object> jsonData = Rest.get(myUrl).getAsJsonMap().getResponseData();
For a lot of REST requests this will fail because you need to add an HTTP header indicating that you accept JSON results. You have a special case support for that:
Map<String, Object> jsonData = Rest.get(myUrl).acceptJson().getAsJsonMap().getResponseData();
POST requests use the same builder pattern:
Map<String, Object> jsonData = Rest.post(myUrl).body(bodyValueAsString).getAsJsonMap().getResponseData();
Notice the usage of post and the body builder method. MANY methods exist in the builder class that cover pretty much everything you would expect and then some when it comes to the needs of rest services.
Some highlights that are easy to miss:
.priority(byte)lets you change the underlyingConnectionRequestpriority when you need certain calls to jump the queue..cookiesEnabled(boolean)controls whether cookies are persisted for the request when you need stateless behavior..useBoolean(boolean)and.useLongs(boolean)toggle how the JSON parser materializes number and boolean types inside the resultingMap, which is handy when your back end is strict about data types..cacheMode(…)and.postParameters(…)expose the same knobs asConnectionRequest, keeping you in the fluent API even for advanced tweaks.
Top-level JSON arrays — fetchAsJsonList
When the endpoint returns a top-level JSON array (for example [{...}, {...}]),
use fetchAsJsonList rather than fetchAsJsonMap. The underlying
JSONParser wraps top-level arrays under a synthetic "root" key;
fetchAsJsonList unwraps that envelope for you so the callback receives
the array directly:
Rest.get("https://api.example.com/items")
    .header("Authorization", "Bearer " + token)
    .acceptJson()
    .fetchAsJsonList(response -> {
        List items = response.getResponseData();
        renderItems(items);
    });
There is no separate builder for the ambiguous "object or array" case:
when the response shape isn’t known up-front, use fetchAsJsonMap and
branch on data.get("root") instanceof List.
Typed responses — fetchAsMapped and fetchAsMappedList
Rest.fetchAsJsonMap returns a generic Map<String, Object> that the caller
casts and inspects key by key. Once your DTOs are @Mapped-annotated
(see JSON / XML Object Mapping), fetchAsMapped returns the typed object
directly:
// Model
@Mapped
public class Pet {
    @JsonProperty("id")        public long id;
    @JsonProperty("name")      public String name;
    @JsonProperty("photoUrls") public List<String> photoUrls;
}
// Call site
Rest.get(baseUrl + "/pet/" + petId)
    .header("Authorization", "Bearer " + token)
    .acceptJson()
    .fetchAsMapped(Pet.class, response -> {
        Pet pet = response.getResponseData();    // already typed -- no Map casts
        renderPet(pet);
    });
For endpoints that return a list of DTOs, use fetchAsMappedList:
Rest.get(baseUrl + "/albums")
    .header("Authorization", "Bearer " + token)
    .acceptJson()
    .fetchAsMappedList(Album.class, response -> {
        List<Album> albums = response.getResponseData();
        renderAlbums(albums);
    });
Both builders fall back to the untyped fetchAsJsonMap / fetchAsJsonList
path internally and then route every map element through the build-time
mapper that the @Mapped annotation processor generated. If a mapper isn’t
registered for the requested class (typical cause: the
process-annotations Mojo didn’t run on the class, or the class isn’t
@Mapped-annotated), the callback completes with null data — so always
inspect response.getResponseCode() rather than response.getResponseData()
to differentiate a server error response from the missing-mapper case.
The code in the kitchen sink webservice sample was updated to use this API. The result is shorter and more readable without sacrificing anything.
Rest in practice - twilio
The best way to explain the usage of this API is through a concrete "real world" example. Twilio provides many great telephony-oriented webservices to developers. One of those is an SMS sending webservice which can be useful for things such as "device activation."
To get started you would need to sign up to Twilio and have the following 3 variable values:
String accountSID = "----------------";
String authToken = "---------------";
String fromPhone = "your Twilio phone number here";
You can now send hello world as an SMS to the end user. Once this is in place sending an SMS through REST is a matter of using the Rest API:
Response<Map> result = Rest.post("https://api.twilio.com/2010-04-01/Accounts/" + accountSID + "/Messages.json").
        queryParam("To", destinationPhone).
        queryParam("From", fromPhone).
        queryParam("Body", "Hello World").
        basicAuth(accountSID, authToken).
        getAsJsonMap();
Notice that this is equivalent of this "curl" command:
curl 'https://api.twilio.com/2010-04-01/Accounts/[accountSID]/Messages.json' -X POST \
--data-urlencode 'To=[destinationPhone]' \
--data-urlencode 'From=[fromPhone]' \
--data-urlencode 'Body=Hello World' \
-u [accountSID]:[AuthToken]
That’s pretty cool as the curl command maps almost directly to the Rest API call!
What you do here is actually pretty trivial, you open a connection the api messages URL. You add arguments to the body of the post request and define the basic authentication data.
The result is in JSON form you ignore it since it isn’t that important but it might be useful for error handling. This is a sample response (redacted keys):
{
    "sid": "[sid value]",
    "date_created": "Sat, 09 Sep 2017 19:47:30 +0000",
    "date_updated": "Sat, 09 Sep 2017 19:47:30 +0000",
    "date_sent": null,
    "account_sid": "[sid value]",
    "to": "[to phone number]",
    "from": "[from phone number]",
    "messaging_service_sid": null,
    "body": "Sent from your Twilio trial account - Hello World",
    "status": "queued",
    "num_segments": "1",
    "num_media": "0",
    "direction": "outbound-api",
    "api_version": "2010-04-01",
    "price": null,
    "price_unit": "USD",
    "error_code": null,
    "error_message": null,
    "uri": "/2010-04-01/Accounts/[sid value]/Messages/SMe802d86b9f2246989c7c66e74b2d84ef.json",
    "subresource_uris": {
        "media": "/2010-04-01/Accounts/[sid value]/Messages/[message value]/Media.json"
    }
}
Notice the error message entry which is null meaning there was no error, if there was an error you’d have a message there or an error code that isn’t in the 200-210 range.
This should display an error message to the user if there was a problem sending the SMS:
if(result.getResponseCode() < 200 || result.getResponseCode() > 299) {
    String error = null;
    if(result.getResponseData() != null) {
        error = (String)result.getResponseData().get("error_message");
    }
    if(error == null) {
        error = "Error sending SMS: " + result.getResponseCode();
    }
    ToastBar.showErrorMessage(error);
}
Webservice wizard
webservice-wizard target, which runs
com.codename1.ws.wizard.WSWizard out of CodeNameOneBuildClient.jar. A Maven
project has no equivalent. com.codename1.io.WebServiceProxyCall is still in the
framework either way, so an app with generated proxies keeps working. For new
work use Rest API, which needs no code generation and speaks a format every
server already talks.The protocol it implements is a compact binary one. Method arguments were
restricted to a small set of types, extended through object externalization, and
every generated method came in two forms: one that blocks and throws
IOException, and one that takes a callback and reports through it.
Connection request caching
Caching server data locally is a huge part of the advantage a native app has over a web app. This is non-trivial as it requires a delicate balance if you want to test the server resource for changes.
HTTP provides two ways to do that the ETag and Last-Modified. While both are great they’re non-trivial to use and by no definition seamless.
Connection request has an experimental feature that allows you to set the caching mode to one of 4 states either globally or per connection request:
OFF is the default meaning no caching.
SMART means all get requests are cached intelligently and caching is "mostly" seamless
MANUAL means that the developer handles the actual caching but the system won’t do a request on a resource that’s already "fresh"
OFFLINE will fetch data from the cache and won’t try to go to the server. It will generate a 404 error if data isn’t available
You can toggle these in the specific request by using setCacheMode(CachingMode) and set the global
default using setDefaultCacheMode(CachingMode).
GET operations, it won’t work for POST or other methodsThere are many methods of interest to keep an eye for:
protected InputStream getCachedData() throws IOException;
protected void cacheUnmodified() throws IOException;
public void purgeCache();
public static void purgeCacheDirectory() throws IOException;
getCachedData()
This returns the cached data. This is invoked to implement readResponse(InputStream) when running offline
or when you detect that the local cache isn’t stale.
The smart mode implements this and will fetch the right data. For example, the manual mode doesn’t store the data and relies on you to do so. In that case you need to return the data you stored at this point and must implement this method for manual mode.
Cacheunmodified()
This is a callback that’s invoked to show a cache hit, meaning that you already have the data.
The default implementation still tries to call all the pieces for compatibility (for example: readResponse).
For example, if this is unnecessary you can override that method with a custom implementation or even a blank
implementation to block such a case.
Purgecache & purgeCacheDirectory
These methods are pretty self-explanatory. Notice one caveat though…
When you download a file or a storage element you don’t cache them and rely on the file/storage element to be present and serve as "cache." When purging you won’t delete a file or storage element you downloaded and thus these might remain.
For example, you do remove the ETag and Last-Modified data so the files might get refreshed the next time around.
Cached data service
The CachedDataService allows caching data and updating it if the data changed on the server. The download APIs won’t check for update if there is a local cache of the data (for example: URLImage always uses the local copy). This isn’t a bad thing, it’s pretty efficient.
For example, it might be important to update the image if it changed but you still want caching.
The CachedDataService will fetch data if it isn’t cached locally and cache it. When you "refresh" it will send a special HTTP request that will send back the data if it has been updated since the last refresh:
CachedDataService.register();
CachedData d = (CachedData)Storage.getInstance().readObject("LocallyCachedData");

if(d == null) {
  d = new CachedData();
  d.setUrl("https://....");
}
final CachedData data = d;
// check if there is a new version of this on the server
CachedDataService.updateData(data, new ActionListener() {
    public void actionPerformed(ActionEvent ev) {
        // the fresh copy arrives on the event, updateData leaves ours alone
        CachedData fresh = (CachedData)((NetworkEvent)ev).getMetaData();
        // the service fills in the bytes and validators but not the URL
        fresh.setUrl(data.getUrl());
        Storage.getInstance().writeObject("LocallyCachedData", fresh);
    }
});
Externalizable objects
Codename One provides the Externalizable interface, which is like the Java SE Externalizable interface.
This interface allows an object to declare itself as Externalizable for serialization (so an object can be stored in a
file/storage or sent over the network). For example, due to the lack of reflection and use of obfuscation these objects
must be registered with the Util class.
Codename One doesn’t support the Java SE Serialization API due to the size issues and complexities related to obfuscation.
The major objects that are supported by default in the Codename One Externalizable are:
String, Collection, Map, ArrayList, HashMap, Vector, Hashtable, Integer, Double, Float, Byte, Short, Long, Character, Boolean, Object[],
byte[], int[], float[], long[], double[].
Externalizing an object such as h below should work fine:
Map<String, Object> h = new HashMap<>();
h.put("Hi","World");
h.put("data", new byte[] {(byte)1});
Storage.getInstance().writeObject("Test", h);
For example, notice that some things aren’t polymorphic for example: if you will externalize a String[] you will get back an Object[]
since String arrays aren’t detected by the implementation.
Implementing the Externalizable interface is important when you want to store a proprietary object. In this case you must register the object with the com.codename1.io.Util class so the externalization algorithm will be able to recognize it by name by invoking:
Util.register("MyClass", MyClass.class);
init(Object) but you shouldn’t do it in a static initializer within the object as that might never be invoked!An Externalizable object must have a default public constructor and must implement the following 4 methods:
public int getVersion();
public void externalize(DataOutputStream out) throws IOException;
public void internalize(int version, DataInputStream in) throws IOException;
public String getObjectId();
The getVersion() method returns the current version of the object allowing the stored data to change its structure in the future (the version is then passed when internalizing the object). The object ID is a String uniquely representing the object;
it corresponds to the class name (in the example above the Unique Name should be MyClass).
getClass().getName() to implement getObjectId() and it would seem to work in the simulator. This isn’t the case though!Since devices obfuscate the class names this becomes a problem as data is stored in a random name that changes with every release.
Developers need to write the data of the object in the externalize method using the methods in the data output stream and read the data of the object in the internalize method for example:
public void externalize(DataOutputStream out) throws IOException {
    out.writeUTF(name);
    if(value != null) {
        out.writeBoolean(true);
        out.writeUTF(value);
    } else {
        out.writeBoolean(false);
    }
    if(domain != null) {
        out.writeBoolean(true);
        out.writeUTF(domain);
    } else {
        out.writeBoolean(false);
    }
    out.writeLong(expires);
}

public void internalize(int version, DataInputStream in) throws IOException {
    name = in.readUTF();
    if(in.readBoolean()) {
        value = in.readUTF();
    }
    if(in.readBoolean()) {
        domain = in.readUTF();
    }
    expires = in.readLong();
}
Since strings might be null sometimes you also included convenience methods to implement such externalization. This effectively writes a boolean before writing the UTF to show whether the string is null:
public void externalize(DataOutputStream out) throws IOException {
    Util.writeUTF(name, out);
    Util.writeUTF(value, out);
    Util.writeUTF(domain, out);
    out.writeLong(expires);
}

public void internalize(int version, DataInputStream in) throws IOException {
    name = Util.readUTF(in);
    value = Util.readUTF(in);
    domain = Util.readUTF(in);
    expires = in.readLong();
}
Assuming you added a new date field to the object you can do the following. Notice that a Date is a long value in Java that can be null. For completeness the full class is presented below:
public class MyClass implements Externalizable {
    private static final int VERSION = 2;
    private String name;
    private String value;
    private String domain;
    private Date date;
    private long expires;

    public MyClass() {}

    public int getVersion() {
        return VERSION;
    }

    public String getObjectId() {
        return "MyClass";
    }

    public void externalize(DataOutputStream out) throws IOException {
        Util.writeUTF(name, out);
        Util.writeUTF(value, out);
        Util.writeUTF(domain, out);
        if(date != null) {
            out.writeBoolean(true);
            out.writeLong(date.getTime());
        } else {
            out.writeBoolean(false);
        }
        out.writeLong(expires);
    }

    public void internalize(int version, DataInputStream in) throws IOException {
        name = Util.readUTF(in);
        value = Util.readUTF(in);
        domain = Util.readUTF(in);
        if(version > 1) {
            boolean hasDate = in.readBoolean();
            if(hasDate) {
                date = new Date(in.readLong());
            }
        }
        expires = in.readLong();
    }
}
Notice that you need to check for compatibility during the reading process as the writing process always writes the latest version of the data.
UI bindings & utilities
Codename One provides many tools to simplify the path between networking/IO & GUI. A common task of showing a wait dialog or progress sign while fetching network data can be simplified by using the InfiniteProgress class for example:
InfiniteProgress ip = new InfiniteProgress();
Dialog dlg = ip.showInifiniteBlocking();
request.setDisposeOnCompletion(dlg);
The process of showing a progress bar for a long IO operation such as downloading is automatically mapped to the IO stream in Codename One using the SliderBridge class.
The SliderBridge class can bind a ConnectionRequest to a Slider and effectively show the progress of the download. For example:
Form hi = new Form("Download Progress", new BorderLayout());
Slider progress = new Slider();
Button download = new Button("Download");
download.addActionListener((e) -> {
    ConnectionRequest cr = new ConnectionRequest("https://www.codenameone.com/img/blog/new_icon.png", false);
    SliderBridge.bindProgress(cr, progress);
    NetworkManager.getInstance().addToQueueAndWait(cr);
    if(cr.getResponseCode() == 200) {
        hi.add(BorderLayout.CENTER, new ScaleImageLabel(EncodedImage.create(cr.getResponseData())));
        hi.revalidate();
    }
});
hi.add(BorderLayout.SOUTH, progress).add(BorderLayout.NORTH, download);
hi.show();

Logging & crash protection
Codename One includes a Log API that allows developers to invoke Log.p(String) or Log.e(Throwable) to log information to storage.
As part of the premium cloud features it’s possible to invoke Log.sendLog() to email a log directly to the developer account. Codename One can do that seamlessly based on changes printed into the log or based on exceptions that are uncaught or logged for example:
Log.setReportingLevel(Log.REPORTING_DEBUG);
DefaultCrashReporter.init(true, 2);
This code will send a log every 2 minutes to your email if anything was changed. You can place it within the init(Object) method of your application.
For a production application you can use Log.REPORTING_PRODUCTION which will email the log on exception.
Sockets
At this moment Codename One supports TCP sockets. Server socket (listen/accept) is available on Android and the simulator but not on iOS.
You can check if Sockets are supported using the Socket.isSupported(). You can test for server socket support using Socket.isServerSocketSupported().
To use sockets you can use the Socket.connect(String host, int port, SocketConnection eventCallback) method.
To listen on sockets you can use the Socket.listen(int port, Class scClass) method which will instantiate a
SocketConnection instance (scClass is expected to be a subclass of SocketConnection) for every incoming
connection.
This simple example allows you to create a server and a client assuming the device supports both:
public class MyApplication {
    private Form current;

    public void init(Object context) {
        try {
            Resources theme = Resources.openLayered("/theme");
            UIManager.getInstance().setThemeProps(theme.getTheme(theme.getThemeResourceNames()[0]));
        } catch(IOException e){
            e.printStackTrace();
        }
    }

    public void start() {
        if(current != null){
            current.show();
            return;
        }
        final Form soc = new Form("Socket Test");
        Button btn = new Button("Create Server");
        Button connect = new Button("Connect");
        final TextField host = new TextField("127.0.0.1");
        // the handle is the only way to close the listening socket, so a second
        // tap would otherwise leave the first accept thread running for good
        Socket.StopListening[] listening = new Socket.StopListening[1];
        btn.addActionListener((evt) -> {
            if(listening[0] != null) {
                listening[0].stop();
            }
            soc.addComponent(new Label("Listening: " + Socket.getHostOrIP()));
            soc.revalidate();
            listening[0] = Socket.listen(5557, SocketListenerCallback.class);
        });
        connect.addActionListener((evt) -> {
            Socket.connect(host.getText(), 5557, new SocketConnection() {
                @Override
                public void connectionError(int errorCode, String message) {
                    System.out.println("Error");
                }

                @Override
                public void connectionEstablished(InputStream is, OutputStream os) {
                    try {
                        int counter = 1;
                        while(isConnected()) {
                            os.write(("Hi: " + counter).getBytes());
                            counter++;
                            Thread.sleep(2000);
                        }
                    } catch(Exception err) {
                        err.printStackTrace();
                    }
                }
            });
        });
        soc.setLayout(new BoxLayout(BoxLayout.Y_AXIS));
        soc.addComponent(btn);
        soc.addComponent(connect);
        soc.addComponent(host);
        soc.show();
    }

    public static class SocketListenerCallback extends SocketConnection {
        private Label connectionLabel;

        @Override
        public void connectionError(int errorCode, String message) {
            System.out.println("Error");
        }

        private void updateLabel(final String t) {
            Display.getInstance().callSerially(new Runnable() {
                public void run() {
                    if(connectionLabel == null) {
                        connectionLabel = new Label(t);
                        Display.getInstance().getCurrent().addComponent(connectionLabel);
                    } else {
                        connectionLabel.setText(t);
                    }
                    Display.getInstance().getCurrent().revalidate();
                }
            });
        }

        @Override
        public void connectionEstablished(InputStream is, OutputStream os) {
            try {
                byte[] buffer = new byte[8192];
                while(isConnected()) {
                    int size = is.read(buffer, 0, 8192);
                    if(size == -1) {
                        return;
                    }
                    if(size > 0) {
                        updateLabel(new String(buffer, 0, size));
                    }
                }
            } catch(Exception err) {
                err.printStackTrace();
            }
        }
    }

    public void stop() {
        current = Display.getInstance().getCurrent();
    }

    public void destroy() {
    }
}
Properties
In standard Java you have a POJO (Plain Old Java Object) which has getters/setters for example: you can have a
simple Meeting class like this:
public class Meeting {
     private Date when;
     private String subject;
     private int attendance;

     public Date getWhen() {
        return when;
    }

     public String getSubject() {
        return subject;
     }

     public int getAttendance() {
        return attendance;
     }

     public void setWhen(Date when) {
        this.when = when;
    }

     public void setSubject(String subject) {
        this.subject  = subject;
     }

     public void setAttendance(int attendance) {
        this.attendance = attendance;
     }
}
That’s a classic POJO and it’s the force that underlies JavaBeans and a few tools in Java.
The properties are effectively the getters/setters for example: subject, when etc. But properties have many features
that are crucial:
They can be manipulated in runtime by a tool that had no knowledge of them during compile time
They’re observable - a tool can monitor changes to a value of a property
They can have meta-data associated with them
These features are crucial since properties allow you all kinds of magic for example: hibernate/ORM uses properties to bind Java objects to a database representation, jaxb does it to parse XML directly into Java objects and GUI builders use them to customize UI’s visually.
POJO’s don’t support most of that so pretty much all Java based tools use a lot of reflection & bytecode manipulation. This works but has a lot of downsides for example: say you want to map an object both to the Database and to XML/JSON.
Would the bytecode manipulation collide?
Would it result in duplicate efforts?
And how do you write custom generic code that uses such abilities? Do you need to manipulate the VM?
Properties in Java
These are all abstract ideas, lets look at how you think properties should look in Java and how you can gain from this moving forward.
This is the same class as the one above written with properties:
public class Meeting implements PropertyBusinessObject {
     public final Property<Date,Meeting> when = new Property<>("when");
     public final Property<String,Meeting> subject = new Property<>("subject");
     public final Property<Integer,Meeting>  attendance = new Property<>("attendance");
     private final PropertyIndex idx = new PropertyIndex(this, "Meeting", when, subject, attendance);

    @Override
    public PropertyIndex getPropertyIndex() {
        return idx;
    }
}
This looks a bit like a handful, so start with usage which might clarify a few things, then dig into the class itself.
With a plain object you would have written this:
Meeting meet = new Meeting();
meet.setSubject("My Subject");
Log.p(meet.getSubject());
With properties you do this:
Meeting meet = new Meeting();
meet.subject.set("My Subject");
Log.p(meet.subject.get());
Encapsulation
At first glance it looks like you created public fields (which you did) but if you will look at the declaration
you will notice the final keyword:
public final Property<String,Meeting> subject = new Property<>("subject");
That final is what makes the field safe to expose: meet.subject = otherValue
doesn’t compile, because there’s nothing to assign to.
All setting/getting must happen through the set/get methods and they can be replaced. For example: this is valid syntax that prevents setting the property to null and defaults it to an empty string:
public final Property<String,Meeting> subject = new Property<String, Meeting>("subject", "") {
     public Meeting set(String value) {
         if(value == null) {
            return Meeting.this;
         }
         return super.set(value);
     }
};
Meeting instance belowIntrospection & observability
Since Property is a common class it’s pretty easy for introspective code to manipulate properties. For example,
it can’t detect properties in an object without reflection.
That’s why you have the index object and the PropertyBusinessObject interface (which defines getPropertyIndex).
The PropertyIndex class provides metadata for the surrounding class including the list of the properties within.
It allows enumerating the properties and iterating over them making them accessible to all tools.
Furthermore all properties are observable with the property change listener. You can write this to instantly print out any change made to the property:
meet.subject.addChangeListener((p) -> Log.p("New property value is: " + meet.subject.get()));
The cool stuff
That’s the simple stuff that can be done with properties, but they can do much more!
For starters all the common methods of Object can be implemented with almost no code:
public class Meeting implements PropertyBusinessObject {
     public final Property<Date,Meeting> when = new Property<>("when");
     public final Property<String,Meeting> subject = new Property<>("subject");
     public final Property<Integer,Meeting>  attendance = new Property<>("attendance");
     private final PropertyIndex idx = new PropertyIndex(this, "Meeting", when, subject, attendance);

    @Override
    public PropertyIndex getPropertyIndex() {
        return idx;
    }

    public String toString() {
        return idx.toString();
    }

    @Override
    public boolean equals(Object obj) {
        return obj != null && obj.getClass() == getClass() &&
            idx.equals(((Meeting)obj).getPropertyIndex());
    }

    @Override
    public int hashCode() {
        return idx.hashCode();
    }
}
This is easy thanks to introspection…
You already have some simple code that can convert an object to/from JSON Maps for example: this can fill the property values from parsed JSON:
meet.getPropertyIndex().populateFromMap(jsonParsedData);
And vice versa:
String jsonString = meet.getPropertyIndex().toJSON();
You also have a simple ORM solution that maps values to table columns and can create tables. It’s no hibernate but sqlite isn’t big iron so it might be good enough.
Constructors
One of the problematic issues with constructors is that any change starts propagating everywhere. If you have fields in the constructor and you add a new field later you need to keep the old constructor for compatibility.
Codename One added a new syntax:
Meeting meet = new Meeting().
        subject.set("My Subject").
        when.set(new Date());
That’s why every property in the definition needed the Meeting generic and the set method returns the Meeting
instance…
You’re pretty conflicted on this feature and are thinking about removing it.
Without this feature the code would look like this:
Meeting meet = new Meeting();
meet.subject.set("My Subject");
meet.when.set(new Date());
Seamless serialization
Suppose you have an object called Contacts which includes contact information for example:
public class Contact implements PropertyBusinessObject {
    public final IntProperty<Contact> id  = new IntProperty<>("id");
    public final Property<String, Contact> name = new Property<>("name");
    public final Property<String, Contact> email = new Property<>("email");
    public final Property<String, Contact> phone = new Property<>("phone");
    public final Property<Date, Contact> dateOfBirth = new Property<>("dateOfBirth", Date.class);
    public final Property<String, Contact> gender  = new Property<>("gender");
    public final IntProperty<Contact> rank  = new IntProperty<>("rank");
    public final PropertyIndex idx = new PropertyIndex(this, "Contact", id, name, email, phone, dateOfBirth, gender, rank);

    @Override
    public PropertyIndex getPropertyIndex() {
        return idx;
    }

    public Contact() {
        name.setLabel("Name");
        email.setLabel("E-Mail");
        phone.setLabel("Phone");
        dateOfBirth.setLabel("Date Of Birth");
        gender.setLabel("Gender");
        rank.setLabel("Rank");
    }
}
Standard Java Objects can be serialized in Codename One by implementing the Codename One Externalizable interface. You also need to register the Externalizable object so the implementation will be aware of it. Codename One business objects are seamlessly Externalizable and you need to register them.
For example: you can do something like this in your init(Object) method:
new Contact().getPropertyIndex().registerExternalizable();
After you do that once you can write/read contacts from storage if you so want:
Storage.getInstance().writeObject("MyContact", contact);

Contact readContact = (Contact)Storage.getInstance().readObject("MyContact");
This will obviously also work for things like List<Contact> etc.
Seamless SQL storage
Writing SQL code can be tedious. Which is why SQLMap is such an important API for some of you. SQLMap allows CRUD (Create, Read, Update, Delete) operations on the built-in SQLite database using property objects.
If you continue the example from above to show persistence to the SQL database you can do something like this:
private Database db;
private SQLMap sm;
public void init(Object context) {
    theme = UIManager.initFirstTheme("/theme");
    Toolbar.setGlobalToolbar(true);
    Log.bindCrashProtection(true);

    try {
        Contact c = new Contact();
        db = Display.getInstance().openOrCreate("propertiesdemo.db"); // (1)
        sm = SQLMap.create(db); // (2)
        sm.setPrimaryKeyAutoIncrement(c, c.id); // (3)
        sm.createTable(c); // (4)
    } catch(IOException err) {
        Log.e(err);
    }
}
In the above code you do the following:
Open or create the SQLite database. The name is an identifier rather than a path.
Wrap it in a
SQLMap, which is what maps properties to columns.Declare
idthe primary key and let the database assign it.Create the table if it isn’t there yet.
alter call manuallyYou can then add entries to the contact table using:
sm.insert(myContact);
You can update an entry using:
sm.update(myContact);
And delete an entry using:
sm.delete(myContact);
Listing the entries is more interesting:
List<PropertyBusinessObject> contacts = sm.select(c, c.name, true, 1000, 0);

for(PropertyBusinessObject cc : contacts) {
    Contact currentContact = (Contact)cc;

   // ...
}
The arguments for the select method are:
The object type
The attribute by which you want to sort the result (can be null)
Whether sort is ascending
Number of elements to fetch
Page to start with - in this case if you have more than 1000 elements you can fetch the next page using
sm.select(c, c.name, true, 1000, 1)
There are many more configurations where you can fine tune how a specific property maps to a column etc.
What’s still missing
The SQLMap API is simplistic and doesn’t try to be Hibernate/JPA for mobile. Basic things aren’t available now and won’t work. This isn’t necessarily a problem as mobile databases don’t need to be as powerful as server databases.
Relational Mappings/JOIN
There’s no way to map an object to another object in the database with the
one-many or one-one relationships JPA offers. The SQLMap API isn’t suited to
that level of mapping.
Threading
SQLite is sensitive to threading issues on iOS, so SQLMap issues its calls in
process rather than moving them off the caller’s thread. That can be a problem
for larger data sets, because the calls then run on the EDT.
Alter
Altering a table to match a schema that changed after the table was created isn’t supported. Migrating such a schema means issuing that SQL directly.
Complex SQL/Transactions
Functions, joins, transactions and a good deal of other SQL sit outside the mapping.
SQL can be used directly for any of that. A transaction begun before an insert, update or delete works as advertised, but the mapping is unaware of a rollback, so the data has to be re-fetched afterward.
The mapping covers autoincrement and the cases that map cleanly onto a table; a use case that needs more than that subset is better served by dropping to SQL directly.
Caching/Collision
Nothing is cached, so selecting the same row twice produces two separate instances. Update both and one of them wins, with no indication that the other was discarded.
That means the application has to keep track of the objects it holds, so a modified version isn’t left sitting beside an older one.
Preferences binding
Some objects make sense as global objects, you can use the Preferences API to store that data directly but then you don’t have the type safety that property objects bring to the table. That’s where the binding of property objects to preferences makes sense. For example: say you have a global Settings property object you can bind it to preferences using:
PreferencesObject.create(settingsInstance).bind();
If settings has a property called companyName it would bind into Preferences under the Settings.companyName entry.
You can do some more elaborate bindings such as:
PreferencesObject.create(settingsInstance).
    setPrefix("MySettings-").
    setName(settingsInstance.companyName, "company").
    bind();
This would customize all entry keys to start with MySettings- instead of Settings.. This would also set the company name entry to company so in this case instead of Settings.companyName you’d have MySettings-company.
UI binding
One of the bigger features of properties are their ability to bind UI to a property. For example: if you continue the sample above with the Contact class, say you have a text field on the form and you want the property (which you mapped to the database) to have the value of the text field. You could do something like this:
myNameTextField.setText(myContact.name.get());
myNameTextField.addActionListener(e -> myContact.name.set(myNameTextField.getText()));
That would work but what if you changed the property value, that wouldn’t be reflected in the text field?
Also that works for text field but what about other types for example: numbers, check boxes, pickers etc. This becomes a bit more tedious with those.
Binding makes this all seamless. For example: the code above can be written as:
UiBinding uib = new UiBinding();
uib.bind(myContact.name, myNameTextField);
The cool thing is that this works with many component types and property types almost magically. Binding works by using an adapter class to convert the data to/from the component. The adapter itself works with a generic converter for example: this code:
uib.bind(myContact.rank, myRankTextField);
Seems like the one above but it takes a String that’s returned by the text field and seamlessly converts it to the integer needed by rank. This also works in the other direction…
You can build a UI that would allow you to edit the Contact property in memory:
Container resp = new Container(BoxLayout.y());
UiBinding uib = new UiBinding();

TextField nameTf = new TextField();
uib.bind(c.name, nameTf);
resp.add(c.name.getLabel()). // (1)
        add(nameTf);

TextField emailTf = new TextField();
emailTf.setConstraint(TextField.EMAILADDR);
uib.bind(c.email, emailTf);
resp.add(c.email.getLabel()).
        add(emailTf);

TextField phoneTf = new TextField();
phoneTf.setConstraint(TextField.PHONENUMBER);
uib.bind(c.phone, phoneTf);
resp.add(c.phone.getLabel()).
        add(phoneTf);

Picker dateOfBirth = new Picker();
dateOfBirth.setType(Display.PICKER_TYPE_DATE); // (2)
uib.bind(c.dateOfBirth, dateOfBirth);
resp.add(c.dateOfBirth.getLabel()).
        add(dateOfBirth);

ButtonGroup genderGroup = new ButtonGroup();
RadioButton male = RadioButton.createToggle("Male", genderGroup);
RadioButton female = RadioButton.createToggle("Female", genderGroup);
RadioButton undefined = RadioButton.createToggle("Undefined", genderGroup);
uib.bindGroup(c.gender, new String[] {"M", "F", "U"}, male, female, undefined); // (3)
resp.add(c.gender.getLabel()).
        add(GridLayout.encloseIn(3, male, female, undefined));

TextField rankTf = new TextField();
rankTf.setConstraint(TextField.NUMERIC);
uib.bind(c.rank, rankTf); // (4)
resp.add(c.rank.getLabel()).
        add(rankTf);
Notice the use of the property’s label, which allows better encapsulation
You can bind picker seamlessly
You can bind many radio buttons to a single property to allow the user to select the gender, notice that labels and values can be different for example: "Male" selection will translate to "M" as the value
Numeric bindings "work"
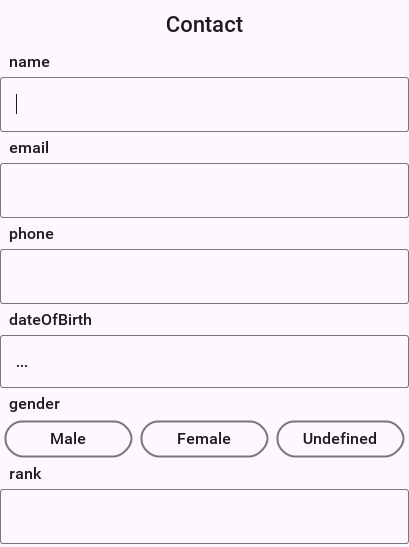
Binding object & auto commit
You skipped a couple of fact about the bind() method. It has an additional version that accepts a ComponentAdapter which allows you to adapt the binding to any custom 3rd party component. That’s a bit advanced for now but I might discuss this later.
For example, the big thing "skipped" earlier was the return value… bind returns a UiBinding.Binding object when performing the bind. This object allows you to manipulate aspects of the binding specifically unbind a component and also manipulate auto commit for a specific binding.
Auto commit determines if a property is changed instantly or on commit. This is useful for a case where you have an "OK" button and want the changes to the UI to update the properties when "OK" is pressed (this might not matter if you keep different instances of the object). When autocommit is on (the default which you can change through setAutoCommit in the UiBinding) changes reflect instantly, when it’s off you need to explicitly call commit() or rollback() on the Binding class.
commit() applies the changes in the UI to the properties, rollback() restores the UI to the values from the properties object (useful for a "reset changes" button).
Binding also includes the ability to "unbind" this is important if you have a global object that’s bound to a UI that’s discarded. Binding might hold a hard reference to the UI and the property object might create a memory leak.
By using the disconnect() method in Binding you can separate the UI from the object and allow the GC to clean up.
UI generation
Up until now this was pretty cool but if you looked at the UI construction code above you would see that it’s pretty full of boilerplate code. The thing about boilerplate is that it shows where automation can be applied, that’s the exact idea behind the magical "InstantUI" class. This means that the UI above can be generated using this code:
InstantUI iui = new InstantUI();
iui.excludeProperty(myContact.id); // (1)
iui.setMultiChoiceLabels(myContact.gender, "Male", "Female", "Undefined"); // (2)
iui.setMultiChoiceValues(myContact.gender, "M", "F", "U");
Container cnt = iui.createEditUI(myContact, true); // (3)
The id property is useful for database storage but you want to exclude it from the UI
This implements the
gendertoggle button selection, you provide a hint to the UI so labels and values differYou create the UI from the screenshot above with one line and it’s seamlessly bound to the properties of myContact. The second argument indicates the "auto commit" status.
This still carries most of the flexibilities of the regular binding for example: you can still get a binding object using:
UiBinding.Binding b = iui.getBindings(cnt);
You might not have noticed this but in the previous verbose code you had lines like:
emailTf.setConstraint(TextField.EMAILADDR);
You might be surprised to know that this will still work seamlessly without doing anything, as would the picker component used to pick a date…
The picker component implicitly works for date type properties, numeric constraints and numbers are implicitly used for number properties and check boxes are used for booleans.
However, how do you know to use an email constraint for the email property?
You’ve some special case defaults for some common property names, so if your property is named email it will use an email constraint by default. If it’s named url or password etc. It will do the "right thing" unless you explicitly state otherwise. You can customize the constraint for a specific property using something like:
iui.setTextFieldConstraint(myContact.email, TextArea.ANY);
This will override the defaults you’ve in place. The goal of this tool is to have sensible "magical" defaults that "work."