Phone functions
Most of the low-level phone functionality is accessible in the Display class. Think of it as a global class that covers access to the "system."
SMS
Codename One supports sending SMS messages but not receiving them as this functionality isn’t portable. You can send an SMS using either the Display singleton or the static helper methods on CN. Both APIs throw IOException, which you should handle in case the native layer reports a failure:
try {
    // true opens the platform composer, which is what both Android and
    // iOS offer. iOS opens it either way, but Android takes the flag
    // literally and its background path is not implemented
    Display.getInstance().sendSMS("+999999999", "My SMS Message", true);
    // Or: CN.sendSMS("+999999999", "My SMS Message", true);
} catch(IOException err) {
    Log.e(err);
    Dialog.show("SMS Failed", "Unable to send the SMS", "OK", null);
}
Both Android and iOS launch the native SMS application with your message
composed, for the user to send. Neither sends in the background, so check
getSMSSupport rather than assuming — the constant is the contract, and the
base implementation defaults to SMS_SEAMLESS.
That’s why the samples pass true for the interactive argument. On Android
the two-argument overload does nothing at all — it asks for the seamless
send, and that branch isn’t implemented. The iOS port ignores the flag and
opens the composer either way, so passing true is what works on both.
The getSMSSupport API returns one of the following options:
SMS_NOT_SUPPORTED - for desktop, tablet etc.
SMS_SEAMLESS -
sendSMSwon’t show a UI and will send in the backgroundSMS_INTERACTIVE -
sendSMSwill show an SMS sending UISMS_BOTH -
sendSMScan support both seamless and interactive mode
The sendSMS can accept an interactive argument: sendSMS(String phoneNumber, String message, boolean interactive)
Pass true for it whenever getSMSSupport reports SMS_INTERACTIVE. The
two-argument overload asks for a seamless send, and a port that only offers the
system composer does nothing with that request — on Android nothing happens at
all, because the background-send path isn’t implemented there. Both the Android and
the iOS port report SMS_INTERACTIVE. A platform reporting SMS_SEAMLESS
sends without a composer, and one reporting SMS_BOTH does whichever the
interactive argument asks for, which is why the switch above branches on the
constant instead of hard coding one call.
A typical use of this API would be something like this:
try {
    switch(Display.getInstance().getSMSSupport()) {
        case Display.SMS_NOT_SUPPORTED:
            return;
        case Display.SMS_SEAMLESS:
            showUIDialogToEditMessageData();
            Display.getInstance().sendSMS(phone, data);
            return;
        default:
            // interactive ports hand off to the platform composer. On
            // Android the two-argument overload asks for a seamless
            // send it does not implement, and nothing happens at all
            Display.getInstance().sendSMS(phone, data, true);
            return;
    }
} catch(IOException err) {
    Log.e(err);
    Dialog.show("SMS Failed", "Unable to send the SMS", "OK", null);
}
Dialing
Dialing the phone is pretty trivial. This should open the dialer UI without physically dialing the phone, as that’s discouraged by device vendors.
You can dial the phone by using:
Display.getInstance().dial("+999999999");
Call detection
Codename One includes a generic call detection API through Display.isCallDetectionSupported() and Display.isInCall().
This API is intentionally best effort and should be used as a UX hint (for example, to defer a non-critical animation while the app is interrupted).
On iOS, isInCall() is inferred from app interruption lifecycle events, which means it can report true for non-call interruptions (for example: Control Center, app switching, permission sheets), and some call flows may still be missed.
Because iOS toggles this flag during app lifecycle transitions, polling it with a UITimer can miss the interruption window entirely (timers are paused while the app is inactive, and the flag is reset when the app becomes active again). If you need to react, check it from lifecycle callbacks such as your app’s stop()/start() flow instead of periodic polling.
On Android, call detection is unsupported because robust detection would require invasive telephony permissions that are intentionally avoided:
Display display = Display.getInstance();
if (display.isCallDetectionSupported() && display.isInCall()) {
    Log.p("Call interruption is currently active (heuristic)");
}
You can send an email through the platforms native email client with code such as this:
Message m = new Message("Body of message");
Display.getInstance().sendMessage(new String[] {"[email protected]"}, "Subject of message", m);
You can add one attachment by using setAttachment and setAttachmentMimeType.
FileSystemStorage and NOT Storage files!You can add more than one attachment by putting them directly into the attachment map for example:
Message m = new Message("Body of message");
m.getAttachments().put(textAttachmentUri, "text/plain");
m.getAttachments().put(imageAttachmentUri, "image/png");
Display.getInstance().sendMessage(new String[] {"[email protected]"}, "Subject of message", m);
Larger text accessibility
Codename One can adapt to the operating system’s larger text accessibility setting. The Display APIs expose two signals: isLargerTextEnabled() indicates whether the user has enabled larger text, and getLargerTextScale() returns the scale factor that should be applied to fonts.
If you want the theme system to automatically scale its fonts when larger text is enabled, enable the UIManager setting:
UIManager.getInstance().setUseLargerTextScale(true);
You can also enable this behavior in the theme by setting the useLargerTextScaleBool theme constant to true.
Component fonts are the theme’s job — don’t scale them by hand. For anything the theme can’t reach, a custom-painted row or an icon measured in code, read the values directly:
void snippet() throws Exception {
    Display display = Display.getInstance();
    // 1.0 when the user has not asked for larger text, so the same
    // arithmetic works either way
    float scale = display.isLargerTextEnabled() ? display.getLargerTextScale() : 1f;

    // a custom-painted row has no Style for the theme to scale, so give it
    // the same preference the theme fonts get
    int rowHeight = Math.round(baseRowHeight * scale);
    int iconSize = Math.round(baseIconSize * scale);
    drawingArea.setPreferredH(rowHeight);
    g.drawRect(0, 0, iconSize, iconSize);
}
How the scale is computed per platform
iOS: the scale is the ratio between the body text size at the user’s current Dynamic Type setting and the iOS standard 17pt body size, that is,
[UIFont preferredFontForTextStyle:UIFontTextStyleBody].pointSize / [UIFont systemFontSize]. Scales for the standard slider stops range from0.82×(Extra Small) through1.00×(Large, default) up to1.35×(Extra Extra Large). When the user enables Larger Accessibility Sizes in Settings → Accessibility → Display & Text Size → Larger Text, the slider extends with five more stops whose scales reach as high as3.12×. These values match what every native iOS app sees fromUIFontMetrics.Android: the scale is
Configuration.fontScale, which is bucketed by Android (typically0.85,1.0,1.15,1.30).
defaultFontSizeInt: 18 in your CSS is 6% larger than iOS’s 17pt body, so at iOS Dynamic Type Extra Extra Large (1.35×) your text will render at 24.3pt versus a native iOS app’s 23pt. If you intentionally use a base size larger than the platform default and you also enable useLargerTextScaleBool, expect the absolute size at high accessibility settings to be visibly larger than typical native apps. Many native iOS apps cap Dynamic Type via UIFontMetrics maximumPointSize: for non-text-heavy UIs to avoid layout breakage.Previewing in the simulator
The JavaSE simulator includes a Simulate → Larger Text menu that lets you preview every iOS Dynamic Type stop (Extra Small through Accessibility 5) without leaving your desktop. The simulator returns the same scale factor that the corresponding iOS device would report, so this is the recommended way to verify how your UI behaves at each setting before testing on hardware. The selected stop is persisted across simulator restarts.
1.65× and exceed what the standard slider can reach.Contacts API
The contacts API provides you with the means to query the phone’s address book, delete elements from it and create new entries into it. To get the platform specific list of contacts you can use
String[] contacts = ContactsManager.getAllContacts();
Notice that on some platforms this will prompt the user for permissions and the user might choose not to grant that permission. To detect whether this is the case you can invoke isContactsPermissionGranted() after invoking getAllContacts(). This can help you adapt your error message to the user.
Once you have a Contact you can use the getContactById method, but the default method is a bit slow if you want to pull a large batch of contacts. The solution for this is to extract the data that you need through
Here you can specify true for the attributes that actually matter to you.
Another capability of the contacts API is the ability to extract all the contacts. This isn’t supported on all platforms but platforms such as Android can get a boost from this API as extracting the contacts one by one is slow on Android.
You can check if a platform supports the extraction of all the contacts through ContactsManager.isAllContactsFast().
You can then extract all the contacts using code that looks a bit like this, notice that you use a thread so the UI won’t be blocked!
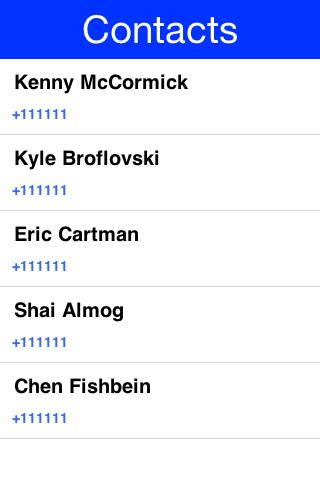
Notice that you didn’t fetch the image of the contact as the performance of loading these images might be prohibitive. You can enhance the code above to include images by using slightly more complex code such as this:
scheduleBackgroundTask method is like new Thread() in some regards. It places elements in a queue instead of opening too many threads so it can be good for non-urgent tasks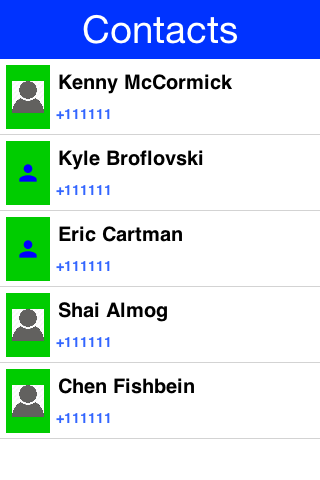
callSerially & scheduleBackgroundTask in a liberal nested way. This is important to avoid an EDT violationYou can use createContact(String firstName, String familyName, String officePhone, String homePhone, String cellPhone, String email) to add a new contact and deleteContact(String id) to delete a contact.
Contact picker
The API above reads the whole address book, so it needs the broad contacts permission. If all you need is a contact the user chose, use ContactPicker instead. It shows the platform’s own picker, and the app only ever sees the contacts the user tapped and only the fields it asked for.
ContactPicker picker = new ContactPicker();
picker.setRequestedFields(ContactPicker.NAME | ContactPicker.PHONE);
picker.pick(ev -> {
    Contact[] picked = ContactPicker.getPickedContacts(ev);
    if(picked.length > 0) {
        numberField.setText(picked[0].getPrimaryPhoneNumber());
    }
});
READ_CONTACTS to pass a Play Console declaration explaining why the picker isn’t enough. An app that only picks never requests that permission, so it never files that declaration. The build only adds READ_CONTACTS for the broad API, so mixing the two in one app puts the permission back.Ask for as little as you can. On Android the requested fields also decide which contacts the picker offers, and the platform returns nothing you didn’t ask for. setMultiSelect(boolean) lets the user pick several contacts, setSelectionLimit(int) caps how many, and setRequireAllRequestedFields(boolean) hides contacts that are missing one of them.
The contacts you get back are snapshots. There’s no continuing access behind them, so anything you need later has to be copied out of the Contact and stored by your app.
ContactPicker.isSupported() tells you whether the platform has a picker at all. Android, iOS and the simulator do; where a platform doesn’t, pick reports an empty selection rather than falling back to reading the address book, because that fallback would need the permission you were avoiding. A cancelled pick reports the same empty selection, so getPickedContacts is the only thing your listener has to check.
setRequireAllRequestedFields has no effect. Nothing about that escalates into a permission prompt - the fields you can’t have simply come back null, so read every one you asked for defensively.Localization & internationalization (L10N & I18N)
Localization (l10n) means adapting to a locale which is more than translating to a specific language but also to a specific language within environment for example: en_US!= en_UK.
Internationalization (i18n) is the process of creating one application that adapts to all locales and regional requirements.
Codename One supports automatic localization and seamless internationalization of an application using Java properties bundles.
Place locale-specific properties files inside an l10n directory directly under your module’s main directory (for example: common/src/main/l10n).
Each file inside this directory is treated as a resource bundle and will be packaged automatically with your app, allowing you to version translations alongside the rest of your source code.
When you’re iterating on translations you can also use the simulator to capture bundles automatically.
Open the Simulator menu and enable Auto Update Default Bundle so that running your app in the Codename One simulator will create any missing resource bundles on the fly as you interact with the UI, which makes it simple to populate keys without manually editing files during development.
The resource is keyed by the properties file’s base name rather than by the
directory holding it, so the archetype’s common/src/main/l10n/Bundle.properties
becomes Bundle. The locale comes from the _xx suffix, and a file without one
is filed under the empty locale, so ask for that when the device’s language has
no bundle of its own:
// the bundle id is the .properties base name, not the directory: the
// archetype ships common/src/main/l10n/Bundle.properties
Hashtable<String, String> bundle = res.getL10N("Bundle", local);
if (bundle == null) {
    // a file with no _locale suffix is filed under the empty locale,
    // and getL10N is an exact lookup that will not fall back for you
    bundle = res.getL10N("Bundle", "");
}
UIManager.getInstance().setBundle(bundle);
The device language (as an ISO 639 two-letter code) could be retrieved with this:
String local = L10NManager.getInstance().getLanguage();
Once installed a resource bundle takes over the UI and every string set to a label (and label like components) will be automatically localized based on the bundle. You can also use the localize method of UIManager to perform localization on your own:
UIManager.getInstance().localize( "KeyInBundle", "DefaultValue");
The list of available languages in the resource bundle could be retrieved like this. Notice that this a list that was set by you and doesn’t need to confirm to the ISO language code standards:
Resources res = fetchResourceFile();
Enumeration locales = res.listL10NLocales("Bundle");
An exception for localization is the TextField/TextArea components both of which contain user data, in those cases the text won’t be localized to avoid accidental localization of user input.
The resource bundle is a map between keys and values for example: the code below displays "This Label is localized" on the Label with the hardcoded resource bundle. It would work the same with a resource bundle loaded from a resource file:
Form hi = new Form("L10N", new BoxLayout(BoxLayout.Y_AXIS));
HashMap<String, String> resourceBudle = new HashMap<String, String>();
resourceBudle.put("Localize", "This Label is localized");
UIManager.getInstance().setBundle(resourceBudle);
hi.add(new Label("Localize"));
hi.show();

Localization manager
The L10NManager class includes a multitude of features useful for common localization tasks.
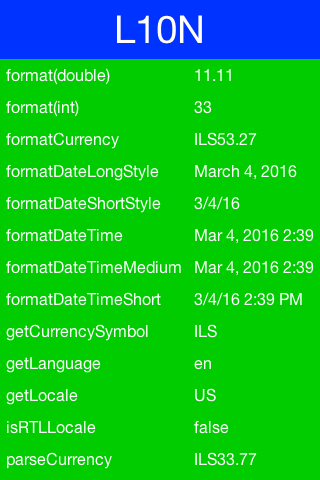
It allows formatting numbers/dates & time based on platform locale. It also provides a great deal of the information you need such as the language/locale information you need to pick the proper resource bundle:
Form hi = new Form("L10N", new TableLayout(16, 2));
L10NManager l10n = L10NManager.getInstance();
// the parsers take locale-formatted input -- a hard coded "34.35" is
// read as 3435 anywhere "." groups digits -- so round-trip the
// formatters' own output
String localeDouble = l10n.format(34.35);
String localeCurrency = l10n.formatCurrency(33.77);
hi.add("format(double)").add(l10n.format(11.11)).
    add("format(int)").add(l10n.format(33)).
    add("formatCurrency").add(l10n.formatCurrency(53.267)).
    add("formatDateLongStyle").add(l10n.formatDateLongStyle(new Date())).
    add("formatDateShortStyle").add(l10n.formatDateShortStyle(new Date())).
    add("formatDateTime").add(l10n.formatDateTime(new Date())).
    add("formatDateTimeMedium").add(l10n.formatDateTimeMedium(new Date())).
    add("formatDateTimeShort").add(l10n.formatDateTimeShort(new Date())).
    add("getCurrencySymbol").add(l10n.getCurrencySymbol()).
    add("getLanguage").add(l10n.getLanguage()).
    add("getLocale").add(l10n.getLocale()).
    add("isRTLLocale").add("" + l10n.isRTLLocale()).
    add("parseCurrency").add(l10n.formatCurrency(l10n.parseCurrency(localeCurrency))).
    add("parseDouble").add(l10n.format(l10n.parseDouble(localeDouble))).
    add("parseInt").add(l10n.format(l10n.parseInt("56"))).
    add("parseLong").add("" + l10n.parseLong("4444444"));
hi.show();
RTL/Bidi
RTL stands for right to left, in the world of internationalization it refers to languages that are written from right to left (Arabic, Hebrew, Syriac, Thaana).
Most western languages are written from left to right (LTR), but some languages are written from right to left (RTL) speakers of these languages expect the UI to flow in the opposite direction otherwise it seems weird like reading this word would be to most English speakers: "drieW."
The problem posed by RTL languages is known as BiDi (Bi-directional) and not as RTL since the "true" problem isn’t the reversal of the writing/UI but rather the mixing of RTL and LTR together. For example: numbers are always written from left to right ( like in English) so in an RTL language the direction is from right to left and once you reach a number or English text embedded in the middle of the sentence (such as a name) the direction switches for a duration and is later restored.
The main issue in the Codename One world is in the layouts, which need to reverse on the fly. Codename One supports this through an RTL flag on all components that’s derived from the global RTL flag in UIManager.
Resource bundles can also include special case constant @rtl, which indicates if a language is written from right to left. This allows everything to automatically reverse.
When in RTL mode the UI will be the exact mirror so WEST will become EAST, RIGHT will become LEFT and this would be true for paddings/margins as well.
If you have a special case where you don’t want this behavior you will need to wrap it with an isRTL check. You can also use setRTL on a per Component basis to disable RTL behavior for a specific Component.
LEADING instead of making WEST mean the opposite direction. You think that was a mistake since the cases where you wouldn’t want the behavior of automatic reversal are rare.Codename One’s support for bidi includes the following components:
Bidi algorithm - allows converting between logical to visual representation for rendering
Global RTL flag - default flag for the entire application indicating the UI should flow from right to left
Individual RTL flag - flag indicating that the specific component/container should be presented as an RTL/LTR component (for example: for displaying English elements within an RTL UI).
RTL text field input
Most of Codename One’s RTL support is under the hood, the LookAndFeel global RTL flag can be enabled using:
UIManager.getInstance().getLookAndFeel().setRTL(true);
Once RTL is activated all positions in Codename One become reversed and the UI becomes a mirror of itself. For example: Adding a Toolbar command to the left will actually make it appear on the right. Padding on the left becomes padding on the right. The scroll moves to the left etc.
This applies to the layout managers (except for group layout) and most components. Bidi is seamless in Codename One but a developer still needs to be aware that his UI might be mirrored for these cases.
Localizing native iOS strings
Some strings in iOS need to be localized using iOS’s native mechanisms - namely providing *.lproj directories with .strings files. For example, if you want the app to have a different bundle display name for each language, or you want to translate the "UsageDescription" strings of your Info.plist into many languages, you would need to use iOS' native localization facilities.
Example: Localizing the app name
The app name, as it’s displayed to the user, is defined in using the CFBundleDisplayName key of the app’s Info.plist file., this will be automatically set to your app’s display name, as defined in your codenameone_settings.properties file. This works fine if your app will have the same name in every locale, but suppose you want your app to take on a different name in French than in English. For example: You want your app to be called "Hello App" for English-speaking users, and "Bonjour App" for French-speaking users.
In this case, you need to add iOS localization bundles "en.lproj" and fr.lproj, each with a file named InfoPlist.strings. If you’re using Maven, then you can add these directly inside the ios/src/main/strings directory of your project.
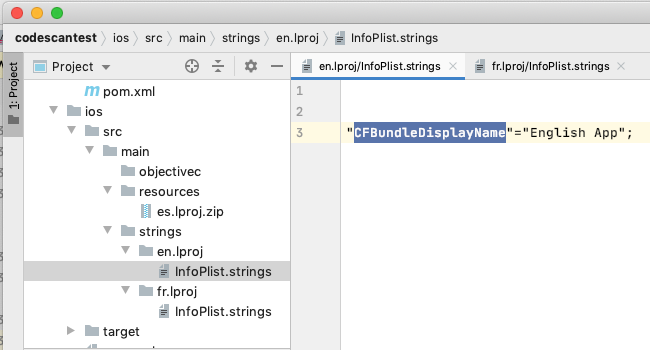
"CFBundleDisplayName"="Hello App";"CFBundleDisplayName"="Bonjour App";The strings format is like the properties file format, except that both the "key" and the "value" must be wrapped in quotes. And if there are many strings, then they must be delimited by a semi-colon ;.
Example: Localization app usage description strings
iOS requires you to supply usage descriptions for many features that will be displayed to the user when the app requests permission to use the feature. For example, the NSCameraUsageDescription string must be provided if your app needs to use the camera. You can specify these values as build hints using the pattern ios.NSXXXUsageDescription=This feature is needed blah blah. In the NSCameraUsageDescription case, you might include the build hint:
ios.NSCameraUsageDescription=This app needs to use your camera to scan bar codes
These descriptions are embedded in your app’s Info.plist file, so they can be localized the same way you localize other Info.plist values - in the localized InfoPlist.strings file.
See the above example for instructions on localizing values in the Info.plist file. Then add translations to the InfoPlist.strings file for your usage descriptions.
"CFBundleDisplayName"="Hello App";
"NSCameraUsageDescription"="This app needs to use your camera to scan bar codes";"CFBundleDisplayName"="Bonjour App";
"NSCameraUsageDescription"="Cette application doit utiliser votre appareil photo pour scanner les codes à barres";Localizing the app icon
Codename One can ship a different launcher icon per locale on iOS and Android by detecting specially named PNG files during the build. Drop your per-locale artwork into common/src/main/resources using the convention:
cn1_icon_<lang>[_<country>].png
<lang> is a two-letter ISO 639-1 language code and the optional <country> is a two-letter ISO 3166-1 country code. Language is treated as case-insensitive; the country component is normalized to uppercase. A few valid examples:
cn1_icon_fr.png: French (any region)cn1_icon_en_GB.png: British Englishcn1_icon_es_MX.png: Mexican Spanish
Supply a square source image at least 432×432 pixels (the largest size emitted for Android adaptive icons; 1024×1024 is recommended, matching the main app icon); the build resizes it to every target density. A smaller source would be upscaled and look blurry, so the build now fails with a clear error when it detects an undersized localized icon rather than shipping a soft one. The default app icon continues to be controlled by your codenameone_settings.properties file and is used whenever the device locale doesn’t match any of the localized variants.
src/main/resources and Maven copies them into target/classes incrementally — it doesn’t delete the copy when you remove or rename the source file. If you replace a localized icon and still see the old (often blurry) one, run mvn clean to clear the stale resource from target/classes before rebuilding. The build also fails when it finds an undersized cn1_icon_*.png in the compiled output that’s about to be bundled and sent to the build server.At runtime the builders look for a <lang>_<COUNTRY> match first, then fall back to a bare <lang> match. Providing both (for example cn1_icon_en.png plus cn1_icon_en_GB.png) lets you give British users a country-specific icon while every other English locale still receives the generic English icon.
Android behavior
On Android the build generates locale-qualified drawable resources at every density so the platform picks the right icon automatically based on the device’s current locale:
drawable-<lang>[-r<COUNTRY>][-<dpi>]/icon.pngat 36, 48, 72, 96, 128, 144 and 192 pixels for legacy launchers.When
android.enableAdaptiveIcons=truethe same variants are also written asmipmap-<lang>[-r<COUNTRY>]-<dpi>/ic_launcher.pngandic_launcher_foreground.png. The default adaptive background and themipmap-anydpi-v26/ic_launcher.xmldefinition are reused as-is.
No code changes are required—Android’s resource framework switches icons when the locale changes.
When you supply a region-qualified icon (such as cn1_icon_ar_AE.png) without a matching language-only variant, the build also emits the default (non-localized) icon into drawable-<lang>/ and the matching mipmap-*-<lang>/ directories. This barrier is required because Android’s resource resolver (API 24+) walks every child of the parent locale when it can’t find an exact or parent-language match, and would otherwise pick ar-rAE for, say, an ar-PK device. The barrier short-circuits that lookup so only devices whose region matches the supplied variant receive the localized icon. If you also ship a language-only file (for example cn1_icon_ar.png) it’s used as the barrier instead, so you keep full control of the fallback icon for Arabic speakers outside AE.
iOS behavior
iOS doesn’t localize launcher icons natively, so Codename One wires up alternate app icons for you:
For each detected locale the build generates an
AppIcon_<lang>_<COUNTRY>.appiconsetinsideImages.xcassetscontaining the 120×120, 180×180, 152×152 and 167×167 (iPad Pro) PNGs along with a matchingContents.json.The build adds the matching
ASSETCATALOG_COMPILER_ALTERNATE_APPICON_NAMESXcode build setting soactoolemits a coherent partialInfo.plistcovering bothCFBundlePrimaryIconandCFBundleAlternateIcons. The user’sInfo.plistis left untouched; injectingCFBundleIconsmanually would be dropped during the actool merge and is therefore avoided.The
CodenameOne_GLAppDelegateis patched to call-[UIApplication setAlternateIconName:completionHandler:]at launch. The delegate reads[NSLocale preferredLanguages], tries the full<lang>_<COUNTRY>key first, then falls back to the language-only key, and clears the alternate icon (reverting to the default) if no variant matches.The injection is idempotent and runs before the
ios.afterFinishLaunchinghook, so any custom code you supply via that build hint is unaffected.
Tips and troubleshooting
File names are matched case-insensitively.
cn1_icon_EN_uk.pngis treated the same ascn1_icon_en_UK.png.Names that don’t fit the
<2-letter lang>[_<2-letter country>]pattern are logged and skipped; the rest of the build continues.The original
cn1_icon_*.pngfiles are removed after processing so they aren’t shipped as stray bundle resources.To override the default (non-localized) icon, keep using the
Iconsetting incodenameone_settings.propertiesor theiconimage inCN1Resource.res. This feature only adds alternate icons for specific locales.
Location - GPS
The Location API allows you to track changes in device location or the current user position.
The most basic usage for the API allows you to fetch a device Location, notice that this API is blocking and can take a while to return:
Location position = LocationManager.getLocationManager().getCurrentLocationSync();
ios.locationUsageDescription and describe why your application needs access to location. Otherwise you won’t get location updates!The getCurrentLocationSync() method is good for cases where you need to fetch a current location once and not repeatedly query location. It activates the GPS then turns it off to avoid excessive battery usage. For example, if an application needs to track motion or position over time it should use the location listener API to track location as such:
getCurrentLocation() which will return the current state and might not be right for some cases:class MyListener implements LocationListener {
public void locationUpdated(Location location) {
// update UI etc.
}
public void providerStateChanged(int newState) {
// handle status changes/errors appropriately
}
}
LocationManager.getLocationManager().setLocationListener(new MyListener());
Location in the background - geofencing
Polling location is expensive and requires a special permission on iOS. Its also implemented rather differently both in iOS and Android. Both platforms place restrictions on the location API usage in the background.
Because of the nature of background location the API is non-trivial. It starts with the venerable LocationManager but instead of using the standard API you need to use setBackgroundLocationListener.
Instead of passing a LocationListener instance you need to pass a Class object instance. This is important because background location might be invoked when the app isn’t running and an object would need to be allocated.
Notice that you shouldn’t perform long operations in the background listener callback. IOS wake-up time is limited to about 10 seconds and the app could get killed if it exceeds that time slice.
Notice that the listener can also send events when the app is in the foreground, so it’s recommended to check the app state before deciding how to process this event. You can use Display.isMinimized() to determine if the app is running or in the background.
When implementing this make sure that:
The class passed to the API is a public class in the global scope. Not an inner class or anything like that!
The class has a public no-argument constructor
You need to pass it as a class literal for example:
MyClassName.class. Don’t useClass.forName("my.package.MyClassName")!
Class names are problematic since device builds are obfuscated, you should use literals which the obfuscator detects and handles.
The following code demonstrates usage of the Geofence API:
Geofence gf = new Geofence("test", loc, 100, 100000);

LocationManager.getLocationManager()
        .addGeoFencing(GeofenceListenerImpl.class, gf);
The listener it registers looks like this:
public class GeofenceListenerImpl implements GeofenceListener {
    @Override
    public void onExit(String id) {
    }

    @Override
    public void onEntered(String id) {
        if(Display.getInstance().isMinimized()) {
            // backgrounded, so there is no form to show a dialog on
            LocalNotification ln = new LocalNotification();
            ln.setId("geofence-welcome");
            ln.setAlertTitle("Welcome");
            ln.setAlertBody("Thanks for arriving!");
            Display.getInstance().scheduleLocalNotification(ln,
                    System.currentTimeMillis() + 10, LocalNotification.REPEAT_NONE);
        } else {
            Display.getInstance().callSerially(() -> {
                Dialog.show("Welcome", "Thanks for arriving", "OK", null);
            });
        }
    }
}
Android background location permissions (API 30+)
On Android 11 (API level 30) and higher, requesting background location permission requires a two-step process. First, foreground location permissions must be granted. Then, the app must request background location access, which will direct the user to the system settings to select Allow all the time. Codename One handles this flow automatically when you use LocationManager.
For Android 11+ (API 30+), Codename One detects if background location is needed and presents a dialog explaining the need before redirecting the user to the app settings. You can customize both dialogs through localization keys under
android.permission.ACCESS_BACKGROUND_LOCATION. The first one, offering to open
the settings screen, takes its body from the bare key and its title and buttons
from .title, .settings and .cancel. The second, shown after the user comes
back, uses .explanation_title, .explanation_body and .ok:
// the port reads these through UIManager.localize(). There is only one
// bundle, so add to the installed one rather than replacing it -- a
// fresh map here would drop every other localized string in the app.
// setBundle keeps whatever map it was handed, so the installed one may
// be immutable -- copy before adding
java.util.Map<String, String> installed = UIManager.getInstance().getBundle();
java.util.Map<String, String> bundle = installed == null
        ? new java.util.HashMap<String, String>()
        : new java.util.HashMap<String, String>(installed);
// the bare key is the body of the first prompt; the suffixed ones
// dress the follow-up dialog that sends the user to settings
bundle.put("android.permission.ACCESS_BACKGROUND_LOCATION",
        "Reminders need your location while the app is closed.");
bundle.put("android.permission.ACCESS_BACKGROUND_LOCATION.title",
        "Location needed");
bundle.put("android.permission.ACCESS_BACKGROUND_LOCATION.explanation_body",
        "Choose \"Allow all the time\" so reminders still arrive when the app is closed.");
bundle.put("android.permission.ACCESS_BACKGROUND_LOCATION.explanation_title",
        "One more step");
bundle.put("android.permission.ACCESS_BACKGROUND_LOCATION.settings", "Open settings");
bundle.put("android.permission.ACCESS_BACKGROUND_LOCATION.ok", "Done");
bundle.put("android.permission.ACCESS_BACKGROUND_LOCATION.cancel", "Not now");
UIManager.getInstance().setBundle(bundle);
One-time location - the location button
Google Play draws a line between two ways an application uses precise location. Tracking, navigation and geofencing are ongoing, and an application that does them holds ACCESS_FINE_LOCATION and declares why. A transactional use is different: finding restaurants nearby, filling in an address, tagging a photo. For those, applications that target Android 17 (API level 37) must let the user share their location through a button that the system draws, and the deadline is January 27, 2027.
LocationButton is that control:
LocationButton locationButton =
        new LocationButton(LocationButton.TEXT_USE_PRECISE_LOCATION);
locationButton.addLocationSharedListener(loc -> {
    if (loc == null) {
        status.setText("Location not shared");
    } else {
        status.setText(loc.getLatitude() + ", " + loc.getLongitude());
    }
    status.getParent().revalidate();
});
root.add(locationButton);
The listener is called once the user has answered, with a Location or with null. null means the user declined, or that no fix arrived before the button’s timeout. A platform control that fails to open isn’t reported this way: the component replaces it with the ordinary button, so the user is asked again there rather than told no. isSystemRendered() is how to see that happened.
Where the system draws it, and where it doesn’t
On Android 17 and later this component is the system’s control. Another process renders it, and the application can neither change its wording nor intercept its taps. That’s the point: a tap on a button the system drew is what earns the session-scoped grant, so the application never has to hold precise location permanently.
Everywhere else — on Android below API level 37, on iOS, on the desktop and in the simulator — the component is an ordinary Codename One button that asks for the location permission the usual way, styled through the LocationButton UIID like any other component. Your code is the same either way. isSystemRendered() on the button tells you which of the two it ended up with, for an application that wants to word something differently around it. It answers for that button rather than for the platform, so it’s also false on an Android 17 device where the system control failed to open and the component fell back. To ask the platform question before you build anything, use Display.getInstance().isLocationButtonSupported().
The label comes from the text type you pass to the constructor, one of TEXT_NONE, TEXT_PRECISE_LOCATION, TEXT_USE_PRECISE_LOCATION, TEXT_SHARE_PRECISE_LOCATION, TEXT_NEAR_MY_PRECISE_LOCATION or TEXT_NEAR_YOUR_PRECISE_LOCATION. setButtonBackgroundColor() and setButtonTextColor() reach the system control; the fallback button follows the theme.
Permissions
Nothing to configure. Referencing LocationButton makes the Android build add USE_LOCATION_BUTTON to the manifest, which the platform requires before it will render the control.
The build also decides how to declare ACCESS_FINE_LOCATION. An application that uses the button and nothing else from the location or maps packages gets it declared onlyForLocationButton, which means the system grants precise location through the button and never any other way: no "allow precise location" question, nothing held between taps, and nothing to justify to Google Play. An application that also tracks, navigates or geofences needs the ordinary grant and gets the ordinary declaration. The class scan the build already runs answers this, so neither case needs a build hint.
The one thing it can’t see is native Android code reaching the platform’s location APIs directly, because Gradle compiles that after the decision is made. An application like that declares itself:
codename1.arg.android.locationButton.exclusive=false
true forces the restriction on and false forces it off; the default, auto, infers it. Force it off when native code needs the ordinary grant — the failure is otherwise silent, with location requests coming back approximate rather than refusing.
One consequence is worth knowing. The restriction is what it says: precise location comes through the button and no other way. On an application that carries it, the fallback described above can’t recover precise location — if the system control fails to open, the ordinary button that replaces it asks a question the system won’t answer with precise access, and the listener receives an approximate location or none. That’s the bargain the restriction makes, and it’s the right one for an application whose only use of precise location is the button; it’s another reason not to force it on for an application that reaches precise location some other way.
Background music playback
Codename One supports playing music in the background (for example: when the app is minimized) which is useful for developers building a music player style application.
This support isn’t totally portable since the Android and iOS approaches for background music playback differ a great deal. To get this to work on Android you need to use the API: MediaManager.createBackgroundMedia().
You should use that API when you want to create a media stream that will work even when your app is minimized.
For iOS you will need to use a special build hint: ios.background_modes=music.
Which should allow background playback of music on iOS and would work with the createBackgroundMedia() method.
Capture - photos, video, audio
The capture API allows you to use the camera to capture photographs or the microphone to capture audio. It even includes an API for video capture.
The API itself couldn’t be simpler:
String filePath = Capture.capturePhoto();
Just captures and returns a path to a photo you can either open it using the Image class or save it somewhere.
Image objectFor example: you can copy the Image to Storage using:
String filePath = Capture.capturePhoto();
if(filePath != null) {
    Util.copy(FileSystemStorage.getInstance().openInputStream(filePath), Storage.getInstance().createOutputStream(myImageFileName));
}
Capture API opens a file chooser API instead of physically capturing the data. This makes debugging device or situation specific issues simplerYou can capture an image from the camera using an API like this:
Form hi = new Form("Capture", new BorderLayout());
hi.setToolbar(new Toolbar());
Style s = UIManager.getInstance().getComponentStyle("Title");
FontImage icon = FontImage.createMaterial(FontImage.MATERIAL_CAMERA, s);

ImageViewer iv = new ImageViewer(icon);

hi.getToolbar().addCommandToRightBar("", icon, (ev) -> {
    String filePath = Capture.capturePhoto();
    if(filePath != null) {
        try {
            DefaultListModel<Image> m = (DefaultListModel<Image>)iv.getImageList();
            Image img = Image.createImage(filePath);
            if(m == null) {
                m = new DefaultListModel<>(img);
                iv.setImageList(m);
                iv.setImage(img);
            } else {
                m.addItem(img);
            }
            m.setSelectedIndex(m.getSize() - 1);
        } catch(IOException err) {
            Log.e(err);
        }
    }
});

hi.add(BorderLayout.CENTER, iv);
hi.show();

You show video capture in the MediaManager section.
The sample below captures audio recordings (using the 'Capture' API) and copies them locally under unique names. It also demonstrates the storage and organization of captured audio:
Form hi = new Form("Capture", BoxLayout.y());
hi.setToolbar(new Toolbar());
Style s = UIManager.getInstance().getComponentStyle("Title");
FontImage icon = FontImage.createMaterial(FontImage.MATERIAL_MIC, s);

FileSystemStorage fs = FileSystemStorage.getInstance();
String recordingsDir = fs.getAppHomePath() + "recordings/";
fs.mkdir(recordingsDir);
try {
    for(String file : fs.listFiles(recordingsDir)) {
        MultiButton mb = new MultiButton(file.substring(file.lastIndexOf("/") + 1));
        mb.addActionListener((e) -> {
            try {
                Media m = MediaManager.createMedia(recordingsDir + file, false);
                m.play();
            } catch(IOException err) {
                Log.e(err);
            }
        });
        hi.add(mb);
    }

    hi.getToolbar().addCommandToRightBar("", icon, (ev) -> {
        try {
            String file = Capture.captureAudio();
            if(file != null) {
                SimpleDateFormat sd = new SimpleDateFormat("yyyy-MMM-dd-kk-mm");
                String fileName =sd.format(new Date());
                String filePath = recordingsDir + fileName;
                Util.copy(fs.openInputStream(file), fs.openOutputStream(filePath));
                MultiButton mb = new MultiButton(fileName);
                mb.addActionListener((e) -> {
                    try {
                        Media m = MediaManager.createMedia(filePath, false);
                        m.play();
                    } catch(IOException err) {
                        Log.e(err);
                    }
                });
                hi.add(mb);
                hi.revalidate();
            }
        } catch(IOException err) {
            Log.e(err);
        }
    });
} catch(IOException err) {
    Log.e(err);
}
hi.show();
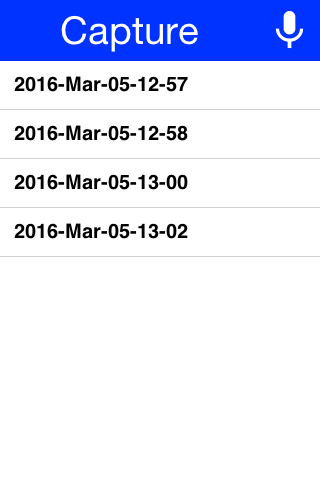
You can also record audio through MediaRecorderBuilder, which describes a
recording by path, MIME type, sample rate, bit rate and channel count instead of
handing the job to the platform’s own capture UI.
Build it with MediaRecorderBuilder.build(), which passes the whole builder to
the platform implementation.
MediaManager.createMediaRecorder(MediaRecorderBuilder) accepts the same object,
and what it does with it depends on the destination. A builder with
redirectToAudioBuffer(true) is delegated straight to build(), so every setting
survives. A builder recording to a file is reduced to its path and MIME type,
which drops the sample rate, bit rate and channel count set on it and leaves the
platform’s defaults in place. A stereo request isn’t refused so much as ignored,
and what you get is whatever that platform would have recorded anyway.
Call build() yourself when those settings matter, bearing in mind how far each
port carries them. Android, iOS, the JavaScript port and the simulator implement
the builder overload in full. The native Linux and Windows ports implement it
too but read only the sampling rate and channel count, their WAV recorders
fixing the MIME type and ignoring the bit rate; they also take no notice of
redirectToAudioBuffer(true), so asking those two for live PCM writes a file at
the builder’s path instead. Anywhere else the framework’s own fallback reduces
the builder to a path and a MIME type again.
How far the settings then travel depends on the port, and on the format. The
JavaScript port takes only the path when recording to a file, so a web file
recording uses the browser’s defaults; recording into an audio buffer it does ask
for the sampling rate — though not always. It skips the request on iOS whatever
the browser, and on any browser that doesn’t advertise the sampleRate
constraint, so those recordings arrive at the platform’s own rate. Elsewhere the whole builder reaches the port, which applies
what its codec supports: Android sets the sampling rate and
bit rate when encoding AAC and leaves both to the encoder for AMR, and the
simulator never reads the bit rate at all.
Treat the builder’s numbers as preferences rather than guarantees. An
AudioBuffer reports getSampleRate() for the data it holds — the recorder
fills that in from the rate the audio actually arrived at, or from the rate it
resampled the audio to, so the figure describes the samples in your hands.
getNumChannels() reports the layout the recorder built, and on the JavaScript
port that much is exact: it emits channel 0 alone for a mono request and
interleaves left and right for a stereo one, so the count always matches the PCM
you hold and you can split the channels by it. It says nothing about the capture,
though — the port never submits a channel count to the browser, so a stereo
request depends on the input device already providing two channels.
Capture asynchronous API
The Capture API also includes a callback based API that uses the ActionListener interface to implement capture. For example: you can adapt the previous sample to use this API as such:
hi.getToolbar().addCommandToRightBar("", icon, (ev) -> {
    Capture.capturePhoto((e) -> {
        if(e != null && e.getSource() != null) {
            try {
                DefaultListModel<Image> m = (DefaultListModel<Image>)iv.getImageList();
                Image img = Image.createImage((String)e.getSource());
                if(m == null) {
                    m = new DefaultListModel<>(img);
                    iv.setImageList(m);
                    iv.setImage(img);
                } else {
                    m.addItem(img);
                }
                m.setSelectedIndex(m.getSize() - 1);
            } catch(IOException err) {
                Log.e(err);
            }
        }
    });
});
Gallery
The gallery API allows picking an image and/or video from the cameras gallery (camera roll).
Capture API the image returned is a temporary image that should be copied locally, this is due to device restrictions that don’t allow direct modifications of the galleryYou can adapt the Capture sample above to use the gallery as such:
Form hi = new Form("Capture", new BorderLayout());
hi.setToolbar(new Toolbar());
Style s = UIManager.getInstance().getComponentStyle("Title");
FontImage icon = FontImage.createMaterial(FontImage.MATERIAL_CAMERA, s);

ImageViewer iv = new ImageViewer(icon);

hi.getToolbar().addCommandToRightBar("", icon, (ev) -> {
    Display.getInstance().openGallery((e) -> {
        if(e != null && e.getSource() != null) {
            try {
                DefaultListModel<Image> m = (DefaultListModel<Image>)iv.getImageList();
                Image img = Image.createImage((String)e.getSource());
                if(m == null) {
                    m = new DefaultListModel<>(img);
                    iv.setImageList(m);
                    iv.setImage(img);
                } else {
                    m.addItem(img);
                }
                m.setSelectedIndex(m.getSize() - 1);
            } catch(IOException err) {
                Log.e(err);
            }
        }
    }, Display.GALLERY_IMAGE);
});

hi.add(BorderLayout.CENTER, iv);
The last value is the type of content picked which can be one of:
Display.GALLERY_ALL, Display.GALLERY_VIDEO or Display.GALLERY_IMAGE.
Analytics integration
Analytics now has its own chapter. It covers the provider SPI, consent and privacy handling, the built-in providers (the Codename One first-party service, Google Analytics 4, Matomo, Firebase and a logging provider), and how to write your own. See the Analytics chapter.
The AnalyticsService class documented here previously is deprecated but still works — it delegates to the new API. The migration table at the end of the Analytics chapter maps each old call to its replacement.
Social sign-in (Facebook, Google, …)
The legacy Facebook and Google OAuth2 sign-in flows that used to live here drove an embedded WebBrowser, which the providers no longer permit. The full sign-in stack — system-browser-based OpenID Connect for any provider, plus Facebook / Google / Microsoft / Apple / Auth0 / Firebase helpers — now lives in the Authentication and Identity chapter.
Lead Component
Codename One has two basic ways to create new components:
Subclass a
Componentoverridepaint, implement event callbacks etc.Compose many components into a new component, by subclassing a
Container.
Components such as Tabs subclass Container which make a lot of sense for that component since it’s physically a Container.
For example,
components like MultiButton, SpanButton & SpanLabel don’t necessarily seem like the right candidate for compositing but they’re all Container subclasses.
Using a Container provides you a lot of flexibility in layout & functionality for a specific component. MultiButton
is a great example of that. It’s a Container internally that’s composed of 5 labels and a Button.
Codename One makes the MultiButton "feel" like a single button through the use of setLeadComponent(Component) which
turns the button into the "leader" of the component.
When a Container hierarchy is placed under a leader all events within the hierarchy are sent to the leader, so if a label within the lead component receives a pointer pressed event this event will be sent to the leader.
For example: for the MultiButton the internal button will receive that event and send the action performed event, change the state etc.
This creates some potential issues for instance in MultiButton:
myMultiButton.addActionListener((e) -> {
    if(e.getComponent() == myMultiButton) {
        // this won't occur since the source component is really a button!
    }
    if(e.getActualComponent() == myMultiButton) {
        // this will happennull
    }
});
The leader also determines the style state, so all the elements being lead are in the same state. For example: if the button is pressed all elements will display their pressed states, notice that they will do so with their own styles but
they will each pick the pressed version of that style so a Label UIID within a lead component in the pressed state
would return the Pressed state for a Label not for the Button.
This is convenient when you need to construct more elaborate UI’s and the cool thing about it’s that you can do this entirely in the designer which allows assembling containers and defining the lead component inside the hierarchy.
For example: the SpanButton class is like this code:
public class SpanButton extends Container {
    private Button actualButton;
    private TextArea text;

    public SpanButton(String txt) {
        setUIID("Button");
        setLayout(new BorderLayout());
        text = new TextArea(getUIManager().localize(txt, txt));
        text.setUIID("Button");
        text.setEditable(false);
        text.setFocusable(false);
        actualButton = new Button();
        addComponent(BorderLayout.WEST, actualButton);
        addComponent(BorderLayout.CENTER, text);
        setLeadComponent(actualButton);
    }


    public void setText(String t) {
        text.setText(getUIManager().localize(t, t));
    }

    public void setIcon(Image i) {
        actualButton.setIcon(i);
    }

    public String getText() {
        return text.getText();
    }

    public Image getIcon() {
        return actualButton.getIcon();
    }

    public void addActionListener(ActionListener l) {
        actualButton.addActionListener(l);
    }

    public void removeActionListener(ActionListener l) {
        actualButton.removeActionListener(l);
    }

}
Blocking lead behavior
The Component class has two methods that allow you to exclude a component from lead behavior: setBlockLead(boolean) & isBlockLead().
Effectively when you have a Component within the lead hierarchy that you would like to treat differently from the rest you can use this method to exclude it from the lead component behavior while keeping the rest in line…
This should have no effect if the component isn’t a part of a lead component.
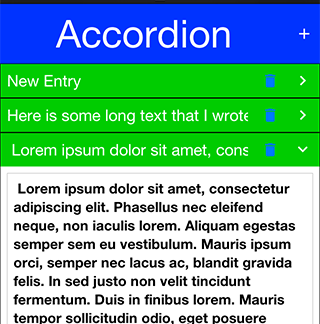
The sample below is based on the Accordion component which uses a lead component internally:
f.getToolbar().addMaterialCommandToRightBar("", FontImage.MATERIAL_ADD, e -> addEntry(accr));
addEntry(accr);
f.add(BorderLayout.CENTER, accr);
f.show();
This allows you to add/edit entries but it also allows the delete button above to actually work. Without a call to setBlockLead(true) the delete button would cat as the rest of the accordion title.
Pull to refresh
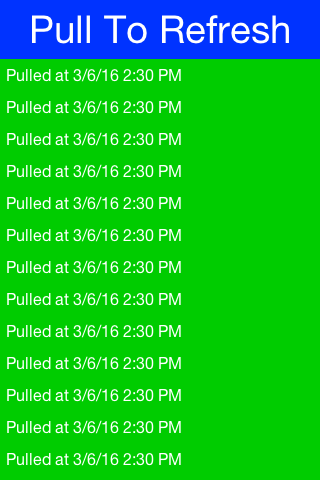
Pull to refresh is the common UI paradigm that Twitter popularized where the user can pull down the form/container to receive an update. Adding this to Codename One couldn’t be simpler!
Just invoke addPullToRefresh(Runnable) on a scrollable container (or form) and the runnable method will be invoked when the refresh operation occurs.
InfiniteContainerForm hi = new Form("Pull To Refresh", BoxLayout.y());
hi.getContentPane().addPullToRefresh(() -> {
hi.add("Pulled at " + L10NManager.getInstance().formatDateTimeShort(new Date()));
});
hi.show();
setPullToRefresh(Runnable) is provided as a more discoverable alias for the
same single-task slot — both names route to the same field, and a second
call replaces whatever runnable was previously registered.
Modern arc-spinner pull-to-refresh
The legacy pull-to-refresh visual is the classic "rotating arrow + text"
stack. Modern Material 3 / iOS apps instead show a thin circular arc
that grows as the user pulls and spins once the task fires. This is
shipped as an opt-in path via the pullToRefreshModernBool theme
constant; the iOS Modern and Android Material themes enable it by
default so apps shipping against those themes get the spec-accurate
look without any extra wiring.
To enable in a custom theme:
#Constants {
    pullToRefreshModernBool: true;
    pullToRefreshIndicatorDiameterMm: 8;       /* 8mm circle           */
    pullToRefreshIndicatorStrokeMm: "0.6";     /* 0.6mm stroke thickness */
}

TabIndicator {
    /* The pull-to-refresh arc shares its color with the animated tab
       indicator -- both follow the brand's accent. */
    color: #007aff;
    background-color: transparent;
    padding: 0;
    margin: 0;
}
Behavior:
During the pull gesture the arc sweep grows from 0° to ~330° proportional to how far the user has pulled past the threshold.
When the refresh task fires the arc rotates continuously at ~360°/sec until the task completes.
All sizing is in millimetres so the indicator stays physical-size-accurate across device densities; no rasterized images involved.
The legacy addPullToRefresh API is unchanged — the same Runnable is
invoked at the same moment; only the visual rendering differs.
Running 3rd party apps using display’s execute
The Display class’s execute method allows you to invoke a URL which is bound to a particular application.
This works rather well assuming the application is installed. Apple’s URL scheme reference lists the schemes iOS handles itself, for common applications and built-in functionality.
Some URLs might not be supported if an app isn’t installed, on Android there isn’t much that can be done but iOS has a canOpenURL method for Objective-C.
On iOS you can use the Display.canExecute() method which returns a Boolean instead of a boolean which
allows you to support 3 result states:
Boolean.TRUE- the URL can be executedBoolean.FALSE- the URL isn’t supported or the app is missingnull- you’ve no idea whether the URL will work on this platform.
The sample below launches a "godfather" search on IMDB when this is sure to work ( on iOS currently). You can actually try to search for null as well but this sample plays it safe by using the http link which is sure to work:
Boolean can = Display.getInstance().canExecute("imdb:///find?q=godfather");
if(can != null && can) {
    Display.getInstance().execute("imdb:///find?q=godfather");
} else {
    Display.getInstance().execute("http://www.imdb.com");
}
Automatic build hint configuration
You try to make Codename One "seamless," this expresses itself in small details such as the automatic detection of permissions on Android etc. The build servers go a long way in setting up the environment as intuitive. However, it isn’t enough, build hints are often confusing and obscure. It’s hard to abstract the mess that’s native mobile OSes and the odd policies from Apple/Google…
A good example for a common problem developers face is location code that doesn’t work in iOS. This is due to the ios.locationUsageDescription build hint that’s required. The reason that build hint was added is a need by Apple to provide a description for every app that uses the location service.
To solve this sort of used case you have two APIs in Display:
void ensureLocationUsageDescription() {
    // Both calls only work in the simulator, and setProjectBuildHint throws
    // anywhere else -- so this belongs behind an isSimulator() check, run
    // once during development rather than on every launch.
    if (!Display.getInstance().isSimulator()) {
        return;
    }

    Map<String, String> hints = Display.getInstance().getProjectBuildHints();
    if (hints == null) {
        // No codename1_settings.properties beside the running project, or
        // it could not be read. Nothing to check against, and nothing to
        // write into.
        return;
    }

    String description = hints.get("ios.locationUsageDescription");
    if (description == null || description.length() == 0) {
        Display.getInstance().setProjectBuildHint("ios.locationUsageDescription",
                "Used to show nearby results on the map");
    }
}
Both of these allow you to detect if a build hint is set and if not (or if it’s set incorrectly) set its value…
If you use the location API from the simulator and you didn’t define ios.locationUsageDescription Codename One will implicitly define a string there. The cool thing is that you will now see that string in your settings and you would be able to customize it.
For example, this gets way better than that trivial example!
The real value is for 3rd party cn1lib authors. For example: Google Maps or Parse. They can inspect the build hints in the simulator and show an error in case of a misconfiguration. They can even show a setup UI. Demos that need special keys in place can force the developer to set them up before continuing.
Easy thread
Working with threads is ranked as one of the least intuitive and painful tasks in programming. This is such an error prone task that some platforms/languages took the route of avoiding threads entirely. A typical scenario: you need to convert some code to work on a separate thread but you still want the ability to communicate and transfer data from that thread.
This is possible in Java but non-trivial, the thing is that this is easy to do in Codename One with tools such as callSerially that let arbitrary code run on the EDT. Why not offer that to any random thread?
That’s why EasyThread exists: it takes some concepts of Codename One’s threading and makes them more accessible to an arbitrary thread. This way you can move things like resource loading into a separate thread and synchronize the data back into the EDT as needed…
Easy thread can be created like this:
EasyThread e = EasyThread.start("ThreadName");
You can send a task to the thread using:
e.run(() -> doThisOnTheThread());
However, it gets better, say you want to return a value:
// the result callback runs on the EasyThread, not the EDT, so anything
// that touches the UI has to be marshalled back explicitly
e.run((success) -> success.onSucess(doThisOnTheThread()),
      (myResult) -> Display.getInstance().callSerially(() -> onEDTGotResult(myResult)));
Lets break that down. (success) → success.onSucess(doThisOnTheThread()) runs on the EasyThread, off the EDT, and the result callback runs there too: EasyThread hands your SuccessCallback straight to the worker and never marshals it. Anything that touches the UI has to be sent back with callSerially, which is what the second lambda does.
These asynchronous calls make things a bit painful to wade through, so the API wraps them in a simplified synchronous version:
EasyThread e = EasyThread.start("Hi");
int result = e.run(() -> {
    System.out.println("This is a thread");
    return 3;
});
// the worker stays alive waiting for more work, so release it when the
// thread has nothing left to do
e.killWhenIdle();
There are a few other variants like runAndWait and there is a kill() method which stops a thread and releases its resources.
Mouse cursor
Codename one can change the mouse cursor when hovering over specific areas to show resizability, movability etc. For obvious reasons this feature is available in the desktop and JavaScript ports as the other ports rely on touch interaction. The feature is off by default and needs to be enabled on a Form by using Form.setEnableCursors(true);. If you’re writing a custom component that can use cursors such as SplitPane you can use:
@Override
protected void initComponent() {
    super.initComponent();
    getComponentForm().setEnableCursors(true);
}
Once this is enabled you can set the cursor over a specific region using cmp.setCursor() which accepts one of the cursor constants defined in Component.
Working with git
A generated Maven project ships a .gitignore for its build output — target,
build, and the RAD schema generated under common/src/main/rad. It says
nothing about your editor, and that’s deliberate, because most of what sits in
those directories belongs to the project rather than to you. The archetype
generates .idea and .vscode itself, including run configurations for the
debug proxy, on-device debugging and the certificate wizard, and a CodeRAD
project needs common/.settings/org.eclipse.m2e.apt.prefs before Eclipse will
run the annotation processor. Commit those.
The part worth ignoring is the narrow set that records what you personally had
open, chiefly .idea/workspace.xml, .idea/shelf/ and *.iml. That set is the
same in every project you work on, which makes it a good fit for a global ignore
file rather than a per-project one — git config --global core.excludesFile
~/.gitignore_global, with the patterns in the file it names.
The theme used to be the hard part here, because a .res is a binary that git
can’t diff, and two people editing one produce a conflict no merge tool can
resolve. A Maven project doesn’t have that problem. The theme’s source is
common/src/main/css/theme.css, and the .res is compiled out of it into
target/classes on each build, so what’s under version control is text and the
binary is an artifact the .gitignore above already excludes.
That leaves the resource editor’s File → XML Team Mode, which writes a
matching res/theme.xml tree beside a resource file so its contents diff and
merge like source. It’s on by default, but it only fires for the older Ant
layout, because saveXML wants the resource’s own directory to be named src
with codenameone_settings.properties beside it, and no Maven source path looks
like that. Expect to meet it in an inherited project rather than to adopt it in
a new one.