Security is a "big word." It implies many things and that’s also true for the mobile app development so before you get started lets try to define the scope of security.
You will deal with application security and its communication mechanisms while ignoring everything beyond that scope. Start with a simple fact:
Codename One applications are secure on the devices by the nature of the mobile OS security.
For most intents and purposes this will be enough, unless you’re specifically concerned about security this section isn’t for you. Mobile OSes isolate applications from one another so it’s hard for an application to damage the OS or even damage/spy on a different app.
The restrictions laid on apps are here to make them extra secure and on top of that Codename One lays a few big advantages in security:
Codename One code is compiled (unlike for example, PhoneGap/Cordova)
Android release builds are obfuscated by default with R8, which makes the binaries harder to reverse engineer. On the other ports the shipped code is compiled or translated (the iOS/native ports go through ParparVM to C) rather than renamed. Enterprise accounts can turn on cross-platform hardening — name obfuscation, string encryption and more — for every port; see the App Hardening chapter
Codename One compiles the UI to native code too which means typical reverse engineering code will have a harder time following
Codename One disables debug flags so a hacker won’t be able to debug your production app on the device
Despite that you still need to keep in mind that the binary could still be reverse engineered and so it’s important to avoid storing keys in the client side code. For example, if you have an API key to access a service (for example, Google Cloud key) it needs to be stored in your server and not as a constant in your app!
Each section below discusses some attack vectors against applications and how they can be stopped. Pretty much all these attacks require a sophisticated attacker which will exist for high value targets (for example, bank apps, government etc.).
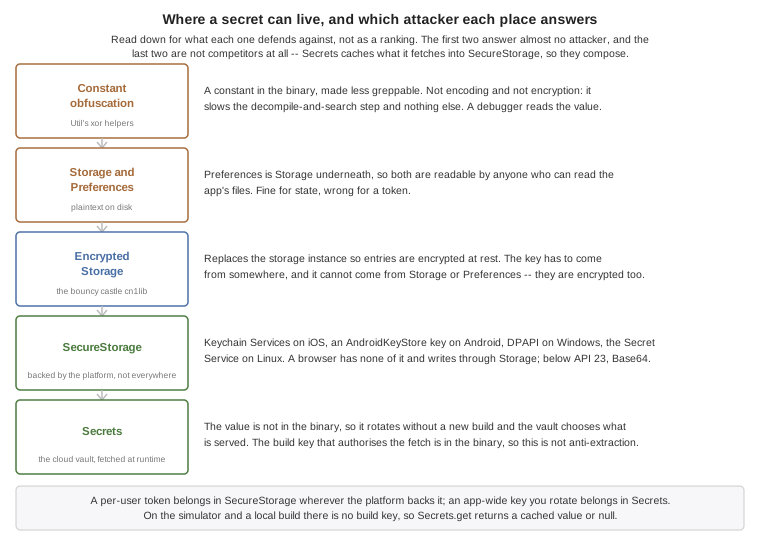
The sections that follow work through the places a value can be kept. They aren’t interchangeable and they aren’t a single ranking: each one answers a different attacker, the first two barely answer any, and the last two compose rather than compete — Secrets caches what it fetches in SecureStorage. A per-user token belongs in the keychain; an app-wide key you want to rotate without a release belongs in the vault.
Constant obfuscation
One of the first things a hacker will do when compromising an app is look at it. For example, an attacker wanting to exploit a bank’s login UI would look at the label next to the login and then search for it in the decompiled code. If the UI has the String "enter username and password" they can search for that.
It won’t lead directly to a hack or exploit, but it will narrow down the area of the code where you should look and it makes the first step that much easier. Obfuscation helps as it removes descriptive method names but it can’t hide the Strings you use in constants. If an app has a secret key within obfuscating it can make a difference (albeit a slight difference).
Notice that this is a temporary roadblock as any savvy hacker would compile the app and connect a debugger eventually (although this is blocked in release builds) and would be able to inspect values of variables/flow. But the road to reverse engineering the app would be harder even with a simple xor obfuscation.
The Util class has two static methods for it: xorEncode(String) turns a string into the obfuscated form, and xorDecode(String) turns it back.
They use a simple xor based obfuscation to make a String less readable. For example, if you’ve code like this:
private static final String SECRET = "Don't let anyone see this/* omitted */";
You might be concerned about the secret, then this would make it slightly harder to find out:
// Don't let anyone see this/* omitted */
Notice that this isn’t secure, if you have a crucial value that must not be found you need to store it in the server. No alternative exists because everything that’s sent to the client can be compromised by a determined hacker.
Codename One’s built-in user-specific constants are obfuscated with this method. For example, an app built with Codename One carries some internal data such as the user who built the app, which is now obfuscated. The following small app encodes strings so you can copy and paste them into your app:
Form hi = new Form("Encoder", BoxLayout.y());
TextField bla = new TextField("", "Type Text Here", 20, TextArea.ANY);
TextArea encoded = new TextArea();
SpanLabel decoded = new SpanLabel();
hi.addAll(bla, encoded, decoded);
bla.addDataChangedListener((a, b) -> {
    String s = bla.getText();
    String e = Util.xorEncode(s);
    encoded.setText(e);
    decoded.setText(Util.xorDecode(e));
    hi.getContentPane().animateLayout(100);
});

hi.show();
This allows you to type in the first text field and the second text area shows the encoded result. A text area is used so copy/paste is easy.
Storage encryption
Codename One had support for bouncy castle encryption for quite a while but it isn’t as intuitive as you’d like it to be. This makes securing/encrypting your app more painful than it should.
Codename One supports full encryption of the Storage (notice the distinction, Storage isn’t FileSystemStorage).
This is available by installing the bouncy castle cn1lib from the extensions menu then using one line of code
init(Object) methodNotice that you can’t use storage or preferences to store this data as it would be encrypted (Preferences uses
Storage internally). You can use a password for this key and it would make it way more secure but if a user
changes his password you might have a problem. In that case you might need the old password to migrate to
a new password.
This works through a new mechanism in storage where you can replace the storage instance with another instance using:
Storage.setStorageInstance(new MyCustomStorageSubclass());
You can leverage that knowledge to change the encryption password on the encryption storage. The key is installed for the whole of Storage, so every entry has to move together: read them all under the old key, install the new one, write them all back. EncryptedStorage comes from the bouncy castle cn1lib, so this listing isn’t part of the compiled examples:
EncryptedStorage.install(oldKey);
Map<String, byte[]> all = new LinkedHashMap<>();
for (String name : Storage.getInstance().listEntries()) {
    try (InputStream is = Storage.getInstance().createInputStream(name)) {
        all.put(name, Util.readInputStream(is));
    }
}

EncryptedStorage.install(newKey);
for (Map.Entry<String, byte[]> e : all.entrySet()) {
    try (OutputStream o = Storage.getInstance().createOutputStream(e.getKey())) {
        o.write(e.getValue());
    }
}
The try-with-resources is deliberate: Util.cleanup swallows a close failure, and on the write side a swallowed close means an entry was never finalized under the new key. Let it throw.
Storage has no rename, so there is no way to stage the converted copies and swap them in atomically, and the recovery data lives only in that in-memory map.Which is the real argument for not rotating the storage key at all. Encrypt Storage with a random key your app generates once, keep that key wrapped under the password-derived one in a single record outside Storage, and a password change re-wraps that one small record instead of rewriting every entry. Nothing else moves, so there is no half-converted state to recover from. If you do rewrite the store in place, do it once at startup with nothing else touching Storage, and treat the possibility of an interrupted run as something your app has to survive rather than something this loop prevents.
If you use preferences it might be a good idea to set their built-in location to a different path using something like Preferences.setPreferencesLocation("EncryptedPreferences");.
This is useful as it prevents the encrypted preferences from colliding with the regular preferences.
Secure storage and secrets
Some values are too sensitive for Storage or Preferences, which are plaintext on disk: auth tokens, refresh tokens, and API keys. Codename One gives you two complementary tools for them.
SecureStorage (the platform keychain)
com.codename1.security.SecureStorage keeps small string values in the operating system’s secure keychain (iOS Keychain Services and the Android Keystore) so they’re protected by the platform’s secure enclave instead of being written to app storage. The quiet, no-prompt API is three calls:
SecureStorage ss = SecureStorage.getInstance();
ss.set("auth.token", token);
String token = ss.get("auth.token");   // null if absent
ss.remove("auth.token");
What backs it differs by port, and a null read isn’t the only thing to watch for. The native ports mostly put the value behind something real: Keychain Services on iOS, an AndroidKeyStore key on Android from API 23, DPAPI on Windows and the Secret Service on Linux. Below API 23 the Android path falls back to Base64 in SharedPreferences and warns about itself, so it’s a store and not a protection. The base implementation returns false / null where there’s nothing to use, so treat that as "not available" and fall back accordingly. The browser port now encrypts what it writes: the value goes into origin-private storage as AES-GCM ciphertext under a CryptoKey created with extractable: false and held in IndexedDB, which is a key the page can use and can’t read out. That protects a copied storage file, a profile backup and a stolen database, and it doesn’t protect the value from script running on the origin, which calls get exactly as your code does. Outside a secure context there is no Web Crypto at all, so writing over plain http: is refused rather than stored in the clear. The simulator’s non-prompting tier still describes itself as obfuscation rather than security. Don’t let a successful read in either of those stand in for a test on a device.
Secrets (fetched from the cloud, never shipped in the binary)
Baking an API key (for example a Google Maps key) into your app means it’s in the binary forever, and rotating it means shipping a new build. com.codename1.security.Secrets keeps the value out of the binary and lets you rotate it server-side. Be clear about what that does and doesn’t buy you: the fetch is authenticated with the build key, which is in the binary, so a determined attacker who extracts it can call the vault the same way your app does. What you gain is rotation without a release, and a vault that decides what a client may ever read — not secrecy against someone reverse engineering the binary. You define the secret once in the Codename One Cloud vault, and the app fetches it at runtime and caches it in SecureStorage:
// off the EDT -- the first call may hit the network:
String mapsKey = Secrets.get("googlemaps.key");
get returns the keychain-cached value when present, otherwise it fetches from the vault over TLS, caches it, and returns it. refresh(name) forces a fresh fetch (after you rotate the value server-side) and clear(name) drops the cached copy.
To publish a secret, open the Secrets page of the build console and add it under the app-readable namespace (the app. prefix; you reference it by its bare name from Secrets.get). Only secrets in that namespace are ever served to a device, so your server-only credentials (such as the store API keys used by commerce validation) stay in the vault and can’t be fetched from a client. Authentication uses the build key every cloud build already carries, so there’s nothing to wire up; on the simulator or a local build there’s no build key, so get returns the cached value if any and otherwise null.
| Build hint | Default | Description |
|---|---|---|
| (Codename One cloud) | Base URL of the secrets service. Override only if you self-host. |
Vaults: One password, every device
SecureStorage answers one question — where does this device keep a small secret — and it answers it per device. com.codename1.security.vault.Vault answers the harder one: how does the same user read the same encrypted data on their phone and in a browser, without a server ever being able to read it, and without typing a password on every page load.
One random 32-byte data key protects everything a vault holds. The data key is never stored. What’s stored are wrapped copies of it: one sealed under a key derived from the user’s password, optionally one sealed under a recovery code, and, if the user asked to be remembered, one sealed by this device’s key store — the keychain on iOS, the keystore on Android, a non-extractable CryptoKey in a browser. Unlocking means unwrapping one of those copies. Changing the password rewrites one wrap and re-encrypts no data at all.
That shape is what makes synchronization work. The record describing a vault is ciphertext, and so is every record the vault seals, so a sync server can store both and read neither.
Setting one up
Vault vault = Vault.named("notes");
VaultOptions options = new VaultOptions()
        .policy(rememberThisDevice ? UnlockPolicy.REMEMBER_DEVICE
                : UnlockPolicy.SESSION_ONLY)
        .autoLockAfter(5 * 60 * 1000);
vault.configure(options);
vault.enroll(password, options).ready(ready -> Log.p("vault ready"));
On every later run, try the remembered key first and fall back to asking:
Vault vault = Vault.named("notes");
vault.unlockRemembered()
        .except(notRemembered -> vault.unlockWithPassword(password)
                .except(wrong -> Log.p("that password did not open the vault")));
KEY_MISSING from unlockRemembered is the ordinary case, not an error to show anyone: it’s how you learn this device was never remembered, or has been forgotten.
Storing things
Small secrets go in by name. Values are char[] rather than String so you can clear them — a String is immutable and lives in the heap until it’s collected, which is an unbounded window in a heap dump.
vault.putSecret("api.token", token);
vault.getSecret("api.token").ready(value -> {
    useToken(value);
    // The caller owns the characters and can clear them; a String could not be.
    java.util.Arrays.fill(value, '\0');
});
Larger data is sealed rather than stored, so you decide where it lives:
vault.seal("note-7", note).ready(sealed -> upload("note-7", sealed));
// The vault record itself is safe to upload too: it carries the data key only in
// wrapped form, so a server holding it can neither read the notes nor help anyone else.
upload("vault", vault.exportSyncState());
A second device enrolls from the first device’s exported state and the same password:
Vault vault = Vault.named("notes");
vault.importSyncState(syncState, password)
        .ready(ok -> vault.open("note-7", sealedNote).ready(this::showNote))
        .except(failure -> Log.p("could not enroll this device: " + failure.getMessage()));
Keep the credentials the user signs into your sync server with separate from the vault password. A server that can verify the login must not be able to derive the vault key, and it can if they’re the same string.
Unlock policies
Three, and the choice belongs to the user rather than to you.
| Policy | What it means |
|---|---|
| The password is required every launch, and every page load in a browser. Nothing that can reopen the vault is written to the device. |
| The data key is additionally wrapped under this device’s key store, so the vault reopens with no prompt. That’s unattended access: anyone who can run the app on this device reopens the vault without the password. |
| Reaching the key needs the user to verify themselves. Choosing this deletes the unattended wrap, because a policy that promises a prompt while a wrap that skips it sits alongside promises nothing. |
In a browser the third one isn’t the second with a flag on it — it’s a different mechanism. REMEMBER_DEVICE wraps the data key under a non-extractable CryptoKey in IndexedDB; REQUIRE_USER_VERIFICATION wraps it under key material a passkey derives, through the WebAuthn PRF extension.
That distinction is the one thing a browser can offer that the stored key can’t: the key material doesn’t exist until the user verifies. A copied browser profile carries the credential id, which isn’t a secret, and can’t derive anything without the authenticator and a person in front of it. The stored CryptoKey, by contrast, travels with the profile and works in the copy.
A passkey may be synced, and that’s your choice to make. By default the browser offers whatever authenticators it has, so on a Mac the credential can land in iCloud Keychain and reach every device on that Apple account; a Google-account passkey on Android behaves the same way. Where that happens, "remember this device" amounts to "remember this account" — still a genuine protection, because it needs the account and a biometric, but not device-binding.
For a note-taking app that’s usually what the user wants: a new laptop unlocks with a face scan and no password. For something holding a second factor it’s the opposite, which is why this is a choice:
VaultOptions options = new VaultOptions()
        .policy(UnlockPolicy.REQUIRE_USER_VERIFICATION);
if (mustNotLeaveThisDevice) {
    // Excludes security keys and every synced passkey. Enrolment fails with
    // POLICY_NOT_MET where no authenticator can meet it, so have a fallback.
    options.requireDeviceBoundPasskey();
}
Vault vault = Vault.named("payments").configure(options);
vault.enroll(password, options).except(failure -> offerPasswordOnly());
requireDeviceBoundPasskey() checks the credential’s backup-eligibility flag, which is the part that actually decides. Asking for platform attachment alone isn’t enough — an iCloud Keychain passkey is platform-attached and syncs anyway. A browser that won’t report the flag counts as may leave this device, so an unknown answer is never rounded up into a guarantee.
What it costs: hardware security keys are excluded, and a user whose only authenticator syncs can’t enroll at all — enrollment fails with POLICY_NOT_MET rather than keeping a credential that doesn’t meet the requirement. Offer the weaker policy as a fallback, or don’t require it.
Checked on real hardware and not only against a virtual authenticator: macOS Touch ID in Chrome derives 32 bytes, and derives the same 32 bytes again after the browser has been quit and reopened — which is the property the whole scheme rests on, since a passkey that derived fresh bytes each time would make the wrapped data key unrecoverable.
A passkey signature isn’t an encryption key, and it’s worth being clear why, because the obvious shortcut is wrong: signatures are randomized, so signing a fixed challenge gives different bytes every time. PRF is the part of WebAuthn that actually derives a key — the authenticator evaluates its own HMAC secret over a salt, so the same credential and salt give the same 32 bytes forever.
Not every authenticator implements it. Enrollment checks prf.enabled from the creation ceremony and refuses to keep a credential that can’t derive, so capabilities().supports(…) tells you the truth rather than offering a prompt with nothing behind it. And note that WebAuthn doesn’t work on an IP-address origin at all — a relying-party id has to be a domain. For local development that means serving from localhost, not 127.0.0.1.
Measured browser support
Run by hand against the shipped bridge on macOS, with Touch ID as the platform authenticator:
| Browser | Device key | Passkey PRF | storage.persisted() |
|---|---|---|---|
Chrome 152 | yes | yes | false |
Safari 26.6 | yes | yes | false |
Firefox 155 | yes | yes | false |
"Device key" is the whole REMEMBER_DEVICE path: a non-extractable CryptoKey structured-cloned into IndexedDB, a wrap round trip, and a wrong binding correctly failing its tag. That’s the one that mattered — it’s the default, and had Safari refused the clone, remembered vaults would have been broken on every iPhone and Mac.
PRF derived 32 stable bytes in all three, and in Chrome the same bytes after the browser was quit and reopened.
What this doesn’t cover: mobile Safari, Chrome on Android, Windows Hello, hardware security keys, and older versions of all three. The runtime detection above is what protects those — the table says what was seen, not what’s guaranteed. Every one of these browsers reported storage.persisted() as false on a fresh profile, which is why PERSISTENT is reported from storage working rather than from that call.
Reproduce any row with node scripts/verify-javascript-vault-passkey.mjs, which serves a page running the same bridge an application does.
REQUIRE_USER_VERIFICATION isn’t available everywhere. Ask vault.capabilities().supports(policy) before you offer the switch, because a "remember this device" toggle on a platform that can’t remember is worse than no toggle.
Asking what actually protects it
Protections are independent flags with three answers each — yes, no, and can’t say — rather than a security level. The third is a real answer: no browser will tell you whether a key ended up in a secure element, and a report that guessed would be inventing a guarantee.
ProtectionReport report = vault.protection();
if (report.answer(Protection.HARDWARE_BACKED) == ProtectionReport.UNKNOWN) {
    // Not "no". This platform will not say, and a screen that rendered that as "no"
    // would understate an authenticator that does use a secure element.
    return "Encrypted on this device; hardware backing could not be confirmed.";
}
return report.provides(Protection.HARDWARE_BACKED)
        ? "Encrypted with a hardware-backed key."
        : "Encrypted with a software key.";
When you need a protection rather than a description of one, require it. The vault then refuses instead of storing with less:
VaultOptions options = new VaultOptions()
        .policy(UnlockPolicy.REMEMBER_DEVICE)
        .require(Protection.OS_PROTECTED);
Vault vault = Vault.named("payments").configure(options);
vault.enroll(password, options).except(failure -> {
    if (failure instanceof VaultException
            && ((VaultException) failure).getError() == VaultError.POLICY_NOT_MET) {
        // The browser reaches this: there is no OS key store in a page. Offer the
        // session-only policy instead of pretending the requirement was met.
        Log.p("this device cannot hold the key in the OS key store");
    }
});
UNKNOWN never satisfies a requirement.
What a vault protects against
| Threat | Protected |
|---|---|
A stolen database file, a stolen backup, a copied storage pool | Yes. Everything at rest is authenticated ciphertext under a key that isn’t stored beside it. |
A copied browser profile, vault locked | Yes under |
A copied profile, vault unlocked | No. The data key is in memory. |
Script running on your own origin, vault unlocked | No. It calls the same decrypt your code calls. Non-extractable keys and Web Workers don’t change this. |
Script on your origin, vault locked | It can’t read the data. It can wait, and read the password when the user next types it. |
A browser extension, or malware on the device | No. |
A compromised server that serves new application code | No. New code runs in your origin and inherits everything your application has. |
Data already copied elsewhere | No. |
The second row is the one that gets misread. "The database file alone is useless" and "a copy of the whole profile is useless" are different claims, and only the first holds for a browser with a remembered device. Say that to users in those words.
Keys you can use and can’t read
operationalKey hands back a KeyHandle — a key with no byte accessor at all. There’s no getEncoded() on it and no method that adds one, and it stops working the moment the vault locks.
vault.operationalKey("cache").ready(key -> {
    // There is no getEncoded() on a KeyHandle, and no method that adds one.
    key.seal(payload, null).ready(sealed -> storeInCache(sealed));
});
Encrypted databases
SQLCipher keys from bytes, on the device and in the browser’s WebAssembly build alike, so a database can’t be keyed by a handle. DatabaseConfig.vault(…) therefore produces real key bytes, and says so rather than exporting a handle behind your back:
// The vault must be unlocked here: the key does not exist until it is. Locking the
// vault afterwards does not close the connection -- the engine already has the key.
return Database.openOrCreate("notes", DatabaseConfig.vault(vault, "notes"));
While the database is open the key is in the process and stays there; locking the vault doesn’t close the connection. What the vault adds over DatabaseConfig.managed() is that the key doesn’t exist at all until the user unlocks — which in a browser is the difference between a page that holds a database key from the moment it loads and one that doesn’t. If you can’t accept the exposure, call VaultOptions.requireOpaqueKeysOnly(), which makes that call fail with POLICY_NOT_MET and means this vault can’t key a database.
rotateDataKey and importing a rotation both change the current database key. Record vault.getDataKeyVersion() alongside the database when creating it, and use DatabaseConfig.vault(vault, alias, recordedVersion) to open that file even after a later rotation arrives. The vault retains the retired keys across restarts; vault.databaseKey(alias, version) also exposes them for database engines you manage directly.
To change the database key, open the file at its recorded version, call database.changeKey(DatabaseConfig.vault(vault, alias, newVersion)), and update the recorded version only after that succeeds. Keep both version numbers in a local migration journal until reopening succeeds, so a crash between changing the key and updating that record is recoverable. There is no automatic key change.
If import policy setup fails, an untouched import is rolled back. VaultError.IMPORT_COMMITTED means the import reached committed state and rollback would risk existing data or couldn’t be confirmed. The session is locked; reread the persisted sync state before retrying policy setup.
Cross-platform interoperability
Everything about the format is pinned so the same password opens the same data everywhere:
AES-256-GCM with a 12-byte nonce and a 128-bit tag, in a versioned envelope whose header — version, cipher suite, KDF parameters, key id — is authenticated rather than merely present. Rewriting the iteration count fails the tag instead of steering the decryption.
PBKDF2-HMAC-SHA256, 600,000 iterations by default, with the count carried in the envelope so it can be raised without breaking what’s already written. It’s the one password KDF a browser has, and a KDF one of the three platforms has to emulate in application code isn’t a portable one.
UTF-8 encoded by Codename One rather than by the platform, because runtimes disagree about unpaired surrogates. No normalization is applied: if you want to accept two spellings of the same accented password, normalize before you call.
Every envelope is bound to its application, vault, record and purpose. Ciphertext moved from one record to another fails to authenticate rather than decrypting into the wrong slot.
Deploying the browser build
The vault needs a secure context. Served over plain http: on anything but localhost there’s no Web Crypto, and writes are refused rather than stored in the clear.
The SQLite engine — about 1.5 MB of WebAssembly and its loader — is copied into the build only when the application can actually reach it. It’s fetched on first use rather than at page load, so it never cost startup time for anyone; it cost deployment size in an artifact you upload to static hosting. The decision is made from the translated output, and it fails toward shipping: if the build can’t tell, the engine goes in, because a database that won’t open is a worse outcome than a download nobody makes.
The JavaScript build writes its own deployment configuration into a cn1-security directory: a _headers file for Netlify and Cloudflare Pages, configuration for nginx and for Apache, and a README explaining them. It’s written beside the bundle directory and named after it — MyApp-js-cn1-security next to MyApp-js — because the bundle directory is the web root you upload. Host configuration doesn’t belong there, and a directory that sits outside the bundle can’t be published by accident. A Maven build copies it, and the suspension report beside it, into target/. Nothing here is active until you copy the file your host reads to where it reads it. That’s on purpose: Netlify and Cloudflare read _headers automatically, and an application that never asked for a policy shouldn’t acquire one on its next deploy. Read the README first: the policy restricts connect-src to this origin, so an app that calls a backend elsewhere has to add it. The Content-Security-Policy in them is generated from the page that was actually emitted — each inline block is hashed — so it doesn’t go stale against a template.
Three of those protections exist only as response headers and are ignored in a <meta> tag: frame-ancestors, X-Frame-Options and Strict-Transport-Security. A deployment that puts the policy in the page and skips the host configuration has no clickjacking protection and no HSTS, whatever the rest of it says.
Give the application its own origin where you can. Storage, IndexedDB, the vault’s key and cookies are all keyed by origin and not by path, so a second application on the same host under a different path shares every one of them.
Disabling screenshots
One of the common security features some apps expect is the ability to block a screenshot. In the past apps like snapchat required that you touch the screen to view a photo to block the ability to grab a screenshot (on iOS). This no longer works…
Blocking screenshots is implemented by classifying the app window as secure on Android. You can enable this via the build hint android.disableScreenshots=true. Once that’s added screenshots should no longer work for the app, this might impact other things as well such as the task view which will no longer show the screenshot either.
On iOS, you can’t prevent a user from taking a static screenshot, but you can block screen capture/recording while it’s active. This uses UIScreen.isCaptured and its change notification to hide the app contents while a capture session is active. Enable this behavior with the build hint ios.disableScreenshots=true.
Blocking copy & paste
Blocking copy & paste is useful for cases where a device might have spyware installed that monitors the clipboard. This also prevents a user from using a password manager (which rely on the clipboard), those managers could be compromised and thus if you’re building a secure app this might be necessary.
You can block copy & paste on Android & iOS. Blocking of copy & paste can be implemented globally or on a specific field.
To block copy & paste globally use:
Display.getInstance().setProperty("blockCopyPaste", "true");
To block copy & paste on a specific field do:
textCmp.putClientProperty("blockCopyPaste", Boolean.TRUE);
false might not work as expectedBlocking jailbreak
iOS & Android are walled gardens which is both a blessing and a curse. Looking at the bright side the walled garden aspect of locked down devices means the devices are more secure by nature. For example, on a PC that was compromised you can detect the banking details of a user logging into a bank. But on a phone it would be much harder due to the deep process isolation.
This isn’t true for jailbroken or rooted devices. In these devices security has often been compromised with good intentions (opening up the ecosystem) but it can also be used as a step in a serious attack on an application!
For obvious reasons it’s hard to accurately detect a jailbroken or rooted device but when possible if you have a high security app you might want to block the functionality or even raise a "silent alarm" in such a case. To detect this you can use the isJailbrokenDevice method as such:
if(Display.getInstance().isJailbrokenDevice()) {
    // probably jailbroken or rooted
} else {
   // probably not
}
Notice that this isn’t right, you can’t be 100% sure as there are no official ways to detect jailbreak. That’s why it’s crucial to encrypt everything and assume the device was compromised to begin with when dealing with sensitive data. Still it’s worthwhile to use these APIs to make the life of an attacker a little bit harder.
Device integrity, RASP & attestation
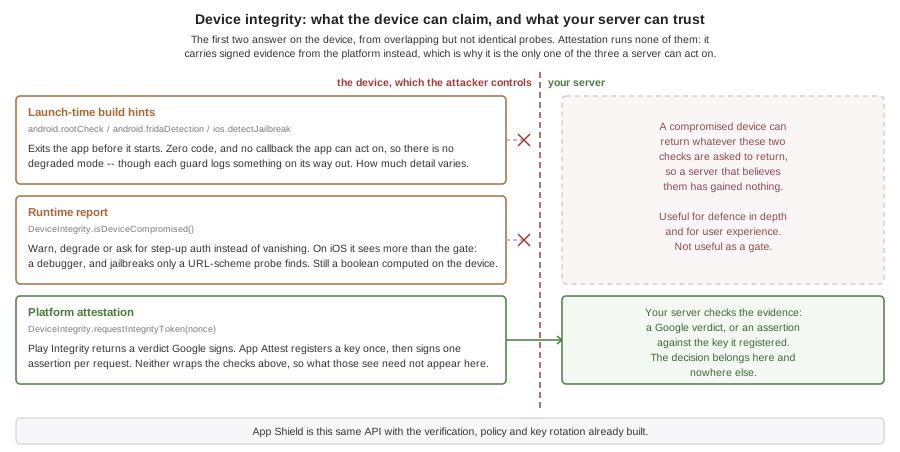
The isJailbrokenDevice check above is a single, coarse signal. For high-security apps (banking, payments, healthcare) Codename One exposes a richer, cross-platform device-integrity API in com.codename1.security.DeviceIntegrity. It groups three families of runtime self-protection (RASP) primitives, each available both as a zero-code build hint (an automatic launch-time guard) and as a runtime API (so your app can make granular, per-transaction decisions). The build hints are wired into the build server, so enabling a feature is just a settings entry away.
Detecting rooted / jailbroken / tampered devices (RASP)
Codename One ships several launch-time hard gates that terminate the app on a compromised device. They’re enabled through build hints and need no code:
android.rootCheck=true— bundles the RootBeer library and exits at launch on a rooted device (subinaries, test-keys / custom ROM signals, Magisk indicators, dangerous system properties).android.fridaDetection=true— detects the Frida dynamic-instrumentation toolkit (the core RASP threat) and exits.ios.detectJailbreak=true— exits at launch on a jailbroken iOS device (MobileSubstrate / Liberty / FridaGadget dylibs, Cydia/apt paths, sandbox-escape probes).
When you’d rather respond in-app than be hard-killed — for example to block only a single risky operation, raise a silent alarm, or require additional authentication — use the non-exiting runtime report instead:
if (DeviceIntegrity.isDeviceCompromised()) {
    // root / jailbreak / Frida / emulator detected -- do not hard-exit,
    // instead degrade: disable the transfer button, require step-up auth, etc.
    for (String reason : DeviceIntegrity.getCompromiseReasons()) {
        // reason is a machine-readable code: "root", "frida", "emulator", "jailbreak"
        Log.p("Device compromise signal: " + reason);
    }
}
isDeviceCompromised() covers the root, jailbreak and Frida ground the launch gates do, plus emulator heuristics, but it isn’t the same set and never terminates the app. On iOS it reports more than the gate enforces: the launch guard exits only on the file, path, mount and hooking signals, leaving out the one that fires when a debugger is attached, by design, so a device launched from Xcode still runs, while the runtime report includes it and also probes for the package managers a jailbreak leaves behind. Don’t read a passed launch as covering whatever your runtime policy checks. On unsupported ports it returns false. The simulator returns false too until you set a signal under Simulate > App Shield, which is how you exercise your warning, degradation and step-up branches without a compromised device.
android.gradleDep / ios.pods build hints — Codename One’s built-in checks complement, but don’t claim to replace, a dedicated MTD product.Platform attestation: Google Play Integrity & Apple App Attest
The trustworthy way to verify device and app integrity is hardware-backed attestation: Google Play Integrity on Android and Apple App Attest on iOS. Both produce a signed token that your backend verifies with Google / Apple. This is the mechanism to use when you must, for example, block an outward transfer to a newly added beneficiary on a device that fails integrity.
Enable it with a build hint, which bundles the SDK (Android) or links the entitlement (iOS):
android.playIntegrity=true— bundles the Play Integrity SDK and enables the runtime token API. Optionally addandroid.playIntegrity.verifyUrl=https://backend.example.com/integrityto also attest at launch on a background thread and exit if your backend rejects the token.android.playIntegrityVersionoverrides the bundled SDK version.ios.appAttest=true— enables App Attest (DeviceCheck.framework) and the runtime token API.ios.appAttest.environmentisdevelopment(debug builds) orproduction(release) by default.
The runtime API is identical on both platforms — request a token bound to a fresh server nonce, then POST it to your backend for verification:
// serverNonce is generated by, and round-tripped from, your backend so it can
// detect replay. The returned token is opaque and MUST be verified server-side.
DeviceIntegrity.requestIntegrityToken(serverNonce).onResult((token, err) -> {
    if (err != null) {
        // Attestation unavailable -- treat the device as untrusted /
        // require an additional verification step before allowing the transfer.
        return;
    }
    // POST `token` to your backend. The backend decrypts/validates the verdict
    // with Google / Apple and decides whether to authorize the transfer.
    authorizeTransferAfterServerVerification(token);
});
DeviceIntegrity.isAttestationSupported() reports whether attestation is available and was bundled into this build. On the simulator, on unsupported ports, or when the build hint is off, requestIntegrityToken() completes with an error rather than throwing.
DeviceIntegrity hands you the raw platform blob and leaves verification, policy, replay protection, key management and rotation to you. If you’d rather not build that, App Shield is the managed layer on top of exactly this API: the attestation is verified server-side against Apple and Google, evaluated against a policy you control, and turned into a short-lived signed token your backend checks with a few lines of middleware. Both remain available and this API keeps working unchanged.
Defending against accessibility-service abuse (Android)
A common Android malware technique is to abuse the accessibility services API for overlays, remote control, and on-screen text extraction (including reading text destined for text-to-speech). Codename One lets you detect untrusted accessibility services and lock down sensitive screens.
The android.accessibilityGuard=true build hint checks the enabled accessibility services at launch and, by default, exits when an untrusted one is active. Tune it with:
android.accessibilityGuard.allow=com.google.android.marvin.talkback,com.example.trusted— a comma-separated allow-list of accessibility-service packages the user legitimately relies on (such as a screen reader). Any enabled service outside this list trips the guard.android.accessibilityGuard.mode=exit|warn—exit(default) terminates the app;warnonly logs, leaving the decision to your runtime code.
At runtime you get the same information for granular control:
// Enumerate the enabled accessibility services (component ids "pkg/.Service").
String[] services = DeviceIntegrity.getEnabledAccessibilityServices();

// True if any enabled service is outside your trusted allow-list.
if (DeviceIntegrity.hasUntrustedAccessibilityService("com.google.android.marvin.talkback")) {
    // Likely accessibility-abusing malware -- block the sensitive action.
}
For the screens that actually matter (PIN entry, transfer confirmation), mark them secure so the OS blocks screenshots, screen recording, and accessibility screen scraping while they’re displayed:
// Entering a sensitive screen (Android FLAG_SECURE; no-op on iOS):
DeviceIntegrity.setSecureScreen(true);
// null leaving it:
DeviceIntegrity.setSecureScreen(false);
setSecureScreen() are Android concepts; on iOS they’re no-ops (iOS has no equivalent third-party accessibility-service threat model). Use ios.disableScreenshots=true to block screen capture on iOS as described in Disabling screenshots.Defending against tapjacking and screen overlays (Android)
Tapjacking is the other half of the same attack. Instead of driving your app through an accessibility service, a malicious app draws its own window on top of yours — a fake PIN pad, a fake confirmation button, or an invisible layer — so the user believes they’re tapping your UI while the tap is being framed, or harvested, by someone else. It’s the classic way a banking transfer gets confirmed by a user who thought they were dismissing a notice.
Android exposes this as flags on each touch event, and Codename One turns that into a policy you set once:
android.tapjackingGuard=true— switches on protection at launch with no code. By default it blocks obscured touches and asks Android 12+ to hide overlay windows.android.tapjackingGuard.mode=block|strict|report—block(default) drops any gesture that starts while another window covers the touched point.reportobserves without changing behavior, which is the safe way to measure how often this happens in your user base first.strictalso drops touches where only part of the window is covered; read the warning below before choosing it.android.tapjackingGuard.hideOverlays=true|false— whether to also callsetHideOverlayWindows(). Defaults totrue.
The runtime API gives you the same control plus a notification:
// Switch on tapjacking protection once, during startup. BLOCK drops any gesture
// that begins while another app's window covers the touched point.
DeviceIntegrity.setTapjackingProtection(TapjackingPolicy.BLOCK);

// A blocked gesture never reaches your components, so this listener is how the
// app learns the tap happened. It fires when the state changes, not per touch.
//
// Read the state off the event, not from isScreenObscured(). The callback is
// delivered on the EDT while the state is updated on the platform's input thread,
// so a busy EDT can let a later clean touch land first -- and re-reading the
// global state would then skip the warning for the event that caused it.
DeviceIntegrity.addTapjackingListener(e -> {
    if (Boolean.TRUE.equals(e.getSource())) {
        Dialog.show("Security warning",
                "Another app is drawing over this screen. Close it before continuing.",
                "OK", null);
    }
});

// On a sensitive screen, remove the overlay instead of merely filtering its taps.
// This is Android 12+ only, and unlike the touch filter it also protects native
// peer components such as BrowserComponent.
if (DeviceIntegrity.isHideOverlayWindowsSupported()) {
    DeviceIntegrity.setHideOverlayWindows(true);
}
DeviceIntegrity.setSecureScreen(true);
Two properties of this API are worth being precise about, because getting them wrong leads to a false sense of coverage.
Detection is touch-driven, not a live window query. Android reports obscuring as a flag on a delivered MotionEvent, so isScreenObscured() means "the most recently observed touch arrived obscured." If an overlay appears and the user never touches the screen, nothing is observed. That’s a platform limitation, not an implementation gap.
A blocked gesture is dropped in full. Swallowing only the press and delivering the release would leave the framework holding half a gesture, so once a gesture starts obscured, everything through to the matching release is discarded. Your components see nothing at all — which is exactly why the listener exists, and why an app that blocks should register one rather than rely on polling.
setHideOverlayWindows(true) is the strongest of the three defenses and the only one that also covers native peer components such as BrowserComponent and native text fields, because it removes the offending window instead of filtering the touches it enables. Pair it with setSecureScreen(true) when you enter a sensitive screen and clear both on the way out.
It has two requirements, and isHideOverlayWindowsSupported() reports on both — it returns false rather than claiming a protection you aren’t getting:
Android 12 (API 31) or newer.
The
android.permission.HIDE_OVERLAY_WINDOWSmanifest permission. Without it the OS throws, so the call is skipped and logged instead.android.tapjackingGuard=truedeclares it for you; if you drive the runtime API without that hint, addandroid.hideOverlayWindows=true. It’s a normal install-time permission — no runtime prompt and no special-access screen for the user.
strict mode blocks touches where only part of the window is covered, and ordinary system UI causes that as a matter of course. On some devices this will discard taps the user intended and the app will simply feel broken, with nothing in the logs to explain it. Use it only where a missed tap is clearly preferable to a hijacked one, and test it on real hardware.isScreenObscured() is always false and the policy has no effect. Screen recording and mirroring are a different threat, covered by ios.disableScreenshots=true. In the simulator, Simulate > App Shield > Screen Overlay (Tapjacking) fakes an overlay so you can exercise your listener on the desktop.Strong Android certificates
When Android launched RSA1024 with SHA1 was considered strong enough for the foreseeable future, this hasn’t changed completely but the recommendation today is to use stronger ciphers for signing & encrypting as those can be compromised.
APKs are signed as part of the build process when you upload an app to the Google Play Store. This process seems redundant as you generate the signature/certificate ourselves (unlike Apple which generates it for you). But, this is a crucial step as it allows the device to verify upgrades and make sure a new update is from the same original author!
This means that if a hacker takes over your account on Google Play, he still won’t be able to ship fake updates to your apps without your certificate. That’s important since if a hacker would have access to your certificate he could create an app update that would send him all the users private information for example, if you’re a bank this could be a disaster.
Android launched with RSA1024/SHA1 as the signing certificates. This was good enough at the time and is still pretty secure. But, these algorithms are eroding and it’s conceivable that within the 10-15 year lifetime of an app they might be compromised using powerful hardware. That’s why Google introduced support for stronger cryptographic signing in newer versions of Android and you can use that.
The bad news
A downside exists…
Google introduced that capability in Android 4.3 so using these new keys will break compatibility with older devices. If you’re building a highly secure app this is probably a tradeoff you should accept. If not this might not be worth it for some theoretical benefit.
Furthermore, if your app is already shipping you’re out of luck. Due to the obvious security implications once you shipped an app the certificate is final. Google doesn’t provide a way to update the certificate of a shipping app. Thus this feature applies to apps that aren’t yet in the play store.
The good
If you’re building a new app this is pretty easy to integrate and requires no changes on your part. Just a new certificate. You can generate the new secure key using instructions in articles like this one.
If you’re using Codename One Setting you can check the box to generate an SHA512 key which will harden the security for the APK.
Certificate pinning
When you connect to HTTPS servers your networking code checks the certificate on the server. If the certificate was issued by a trusted certificate authority then the connection goes through, otherwise it fails. Imagine you’re sitting in a coffee shop connected to the local Wi-Fi, and you try to connect to Gmail to check your email. Since you use HTTPS to Google you trust the connection is secure.
HTTPS is encrypted and the way encryption works is through the certificate. The server sends you a certificate and you can use that to send encrypted data to it.
This won’t work since the data you send to the server is encrypted with the certificate from the server.
That won’t work either. All certificates are signed by a "certificate authority" indicating that a google.com certificate is valid.
That’s a problem!
It’s obviously hard to do but if someone was able to do this he could execute a "man in the middle" attack as described above. People were able to fool certificate authorities in the past and gain fake certificates using various methods so this is possible and probably doable for any government level attacker.
Certificate pinning
This is the attack certificate pinning (or SSL pinning) aims to prevent. You code into your app the "fingerprint" of the certificate that’s "good" and thus prevent the app from working when the certificate is changed. This might break the app if you replace the certificate at some point but that might be reasonable in such a case.
To do this you have a cn1lib. It fetches the certificate fingerprint from the server so you can check the fingerprint against a list of authorized keys. Run mvn cn1:settings, open Extensions, and install SSLCertificateFingerprint. Then use something like this to verify your server:
Notice that once connection is established you don’t need to verify again for the current application run.
Cryptographic primitives
The com.codename1.security package gives you the cryptographic building blocks you need for typical mobile-app concerns — hashing, message authentication, symmetric and asymmetric encryption, digital signatures, JSON Web Tokens, and time/counter-based one-time passwords. The supporting com.codename1.components.OtpField component covers the UI side of OTP entry.
The hash and HMAC primitives are implemented in portable Java so they produce identical output on every platform without depending on any external library. Symmetric and asymmetric encryption, signing, and the secure RNG go through each platform’s native crypto provider via Codename One’s implementation layer:
The simulator (JavaSE) and Android route through the JRE’s
java.securityandjavax.crypto.iOS routes through Apple’s CommonCrypto and the Security framework (via
Ports/iOSPort/nativeSources/CN1Crypto.{h,m}and the correspondingIOSImplementationoverrides).
Application code never sees these differences — you call the same com.codename1.security classes regardless of the platform you are running on.
com.codename1.security.CryptoException, an unchecked exception. You can let it bubble up or catch it; you don’t have to declare it.Hashing
com.codename1.security.Hash implements MD5, SHA-1, SHA-224, SHA-256, SHA-384, and SHA-512. SHA-256 is the recommended default for new code; MD5 and SHA-1 are exposed only for compatibility with older protocols since both are broken for collision resistance:
// One-shot
byte[] digest = Hash.sha256("hello".getBytes("UTF-8"));
String hex    = Hash.toHex(digest);          // 64-character lowercase hex
byte[] back   = Hash.fromHex(hex);           // round-trip helper

// Streaming
Hash h = Hash.create(Hash.SHA256);
h.update(part1);
h.update(part2);
byte[] full = h.digest();                    // hash is reset after digest()
The algorithm identifier strings (Hash.MD5, Hash.SHA256, etc.) are also accepted with or without dashes and in any case ("sha256" and "SHA-256" are equivalent).
Message authentication (HMAC)
com.codename1.security.Hmac implements HMAC (RFC 2104) on top of any of the hash algorithms above. Use HMAC whenever a message authentication code is needed — API request signing, session cookie tamper detection, JWT signing with the HS family, or TOTP token generation:
byte[] tag = Hmac.sha256(secret, message);

// Streaming
Hmac h = Hmac.create(Hash.SHA256, secret);
h.update(part1);
h.update(part2);
byte[] tag2 = h.doFinal();
When comparing authentication tags, use Hmac.constantTimeEquals(a, b) instead of Arrays.equals(a, b) — the latter short-circuits on the first mismatch and is vulnerable to timing attacks.
Secure random numbers
com.codename1.security.SecureRandom exposes the platform’s cryptographically secure RNG (SecRandomCopyBytes on iOS, /dev/urandom on Linux/Android, etc.). Use it for keys, nonces, salts, password reset tokens, and any other security-sensitive value. Never use java.util.Random or Math.random() for these purposes:
byte[] iv  = SecureRandom.bytes(12);      // 12-byte AES-GCM nonce
int    pin = SecureRandom.intBelow(1_000_000);   // bias-free 6-digit code
long   id  = SecureRandom.longBelow(1L << 53);
Symmetric encryption (AES)
com.codename1.security.Cipher exposes AES through the platform’s native AES implementation. AES-GCM is the recommended default because it’s authenticated — a single tag-mismatch failure detects any tampering of the ciphertext or the associated data:
SecretKey key   = KeyGenerator.aes(256);
byte[]    nonce = SecureRandom.bytes(12);
byte[]    aad   = "v1".getBytes("UTF-8");

byte[] ciphertext = Cipher.aesEncrypt(Cipher.AES_GCM, key, nonce, aad, plaintext);
byte[] decrypted  = Cipher.aesDecrypt(Cipher.AES_GCM, key, nonce, aad, ciphertext);
The Cipher class exposes the standard JCE-style transformation strings as constants: Cipher.AES_GCM, Cipher.AES_CBC_PKCS5, Cipher.AES_CBC, and Cipher.AES_ECB_PKCS5. For GCM, the 16-byte authentication tag is appended to the ciphertext (matching the JCE convention). ECB is exposed only for interop with legacy systems — it leaks structure and should never be used for new designs.
Asymmetric encryption and digital signatures (RSA, ECDSA)
com.codename1.security.Cipher also covers RSA encryption, and com.codename1.security.Signature covers digital signatures (RSA and ECDSA). Keys are represented by com.codename1.security.PublicKey and com.codename1.security.PrivateKey, which wrap X.509 SubjectPublicKeyInfo and PKCS#8 DER blobs respectively — the same encodings used by OpenSSL:
// Generate a fresh RSA-2048 key pair (run on a background thread; key
// generation can take a noticeable amount of time)
KeyPair kp = KeyGenerator.rsa(2048);

// Encrypt a small payload (e.g. wrap an AES key)
byte[] sealed = Cipher.rsaEncrypt(Cipher.RSA_OAEP_SHA256, kp.getPublicKey(), payload);
byte[] opened = Cipher.rsaDecrypt(Cipher.RSA_OAEP_SHA256, kp.getPrivateKey(), sealed);

// Sign / verify
byte[] sig = Signature.sign(Signature.SHA256_WITH_RSA, kp.getPrivateKey(), data);
boolean ok = Signature.verify(Signature.SHA256_WITH_RSA, kp.getPublicKey(), data, sig);
To use a key that was generated outside the app, feed the DER bytes to the static factory methods:
PublicKey  pub  = PublicKey.rsa(x509SpkiBytes);          // openssl rsa -pubout -outform DER
PrivateKey priv = PrivateKey.rsa(pkcs8DerBytes);         // openssl pkcs8 -topk8 -nocrypt -outform DER
A key that arrives as a file is usually PEM rather than raw DER — base64 between -----BEGIN----- lines — so PublicKey.fromPem and PrivateKey.fromPem take that text, or the bytes of the file straight from Util.readInputStream, and work out the algorithm from the key itself.
fromPem also reads the containers that aren’t the one the platform wants: the older PKCS#1 RSA PRIVATE KEY and SEC1 EC PRIVATE KEY blocks, and the -----BEGIN CERTIFICATE----- file a server or payment gateway is more likely to hand out than a bare key, whose subject public key it uses. It doesn’t verify the certificate — neither its signature nor its dates — it only reads the key out of it, so a certificate you didn’t already trust is no more trustworthy for having been parsed here.
The Signature class exposes the JCE algorithm strings as constants: SHA256_WITH_RSA, SHA384_WITH_RSA, SHA512_WITH_RSA, SHA256_WITH_ECDSA, SHA384_WITH_ECDSA, and SHA512_WITH_ECDSA.
JSON Web Tokens
com.codename1.security.Jwt provides JWT (RFC 7519) signing and verification. The HS family (HMAC-SHA-2) is pure Java so it works on every platform; the RS family (RSA-PKCS#1 v1.5 with SHA-2) and the ES family (ECDSA with SHA-2) route through the platform’s native crypto:
Map<String, Object> claims = new LinkedHashMap<String, Object>();
claims.put("sub", "user-123");
claims.put("exp", System.currentTimeMillis() / 1000 + 3600);

// Sign with a shared secret (HS256)
String token = Jwt.signHs256(claims, "secret".getBytes("UTF-8"));

// Parse + verify
Jwt parsed = Jwt.parse(token);
if (!parsed.verifyHs256("secret".getBytes("UTF-8"))) {
    throw new SecurityException("bad signature");
}
String subject = (String) parsed.getClaim("sub");
For RSA-signed tokens (RS256/384/512) and ECDSA-signed tokens (ES256/384/512), pass the key to the dynamic overloads:
KeyPair kp   = KeyGenerator.rsa(2048);
String  rs   = Jwt.sign(claims, kp.getPrivateKey(), Jwt.RS256);
Jwt     read = Jwt.parse(rs);
boolean ok   = read.verify(kp.getPublicKey());
Jwt.parse(token) doesn’t verify the signature — you must call one of the verify* methods afterwards. Tokens with an alg header of none are rejected by verify unless you explicitly call setVerifyAllowNoneAlgorithm(true) on the parsed JWT. Accepting unsigned tokens is a critical security bug in almost every deployment, so leave it off unless you have decided that the transport is trusted.HOTP / TOTP one-time passwords
com.codename1.security.Otp implements counter-based HOTP (RFC 4226) and time-based TOTP (RFC 6238). The output is identical to standard authenticator apps (Google Authenticator, Microsoft Authenticator, 1Password, Authy, etc.) — you can use this class to generate codes inside your app, to validate codes sent by an authenticator on a sign-in flow, or for SMS-based two-factor flows.
Shared secrets are commonly distributed as Base32 strings (the format embedded in QR codes by authenticator apps). com.codename1.security.Base32 handles the encoding:
byte[] secret = Base32.decode("JBSWY3DPEHPK3PXP");

// Generate the current 6-digit TOTP code (30-second step, SHA-1)
String code = Otp.totp(secret);

// Verify the code the user typed in, allowing one step of clock skew on
// either side (so the previous, current, and next codes are all accepted)
boolean ok = Otp.verifyTotp(secret, userInput, 1);
For HOTP, supply the counter explicitly and increment it after every successful authentication:
String code = Otp.hotp(secret, counter, 6);
// advance only once the verifier has accepted it, or a lost code
// desynchronizes this client from a verifier with no look-ahead window
if (serverAccepted(code)) {
    counter++;
}
Walkthrough: Adding two-factor authentication to a sign-in flow
The typical TOTP-based two-factor authentication flow has two distinct phases. The first is enrolment, where the server provisions a shared secret to the user’s authenticator app; the second is verification, which happens on every subsequent sign-in.
The TOTP secret should be generated and stored on your server, not on the Codename One client. The client only ever sees the secret long enough to display the enrolment QR code, then forgets it. Verification on every subsequent sign-in is also a server-side concern (the client just sends the code the user types in). The code samples below put the cryptography on the client only to keep the example self-contained — in production, the server does the actual generation and verification.
Phase 1 — Enrollment. When the user opts into 2FA, generate a 20-byte random secret and show it to their authenticator app as a QR code that encodes a standard otpauth://totp/… URI:
// 1. Generate (or fetch from your server) a 20-byte secret -- 160 bits is the
//    de-facto standard for authenticator compatibility.
byte[] secret = SecureRandom.bytes(20);

// 2. Build the otpauth URI. The authenticator app stores the secret against
//    the "Acme Bank: [email protected]" label and tags it with the issuer
//    so it can show "Acme Bank" next to the rotating code.
String uri = Otp.otpauthUri("Acme Bank", "[email protected]", secret);

// 3. Render `uri` as a QR code and show it on screen for the user to scan.
//    See "Rendering the QR code" below.
The maximum-compatibility settings — 6 digits, 30 second step, SHA-1 — are the defaults of Otp.otpauthUri(issuer, accountName, secret). Pass digits / step / algorithm explicitly via the full overload only if you have a specific reason; some authenticator apps don’t recognize anything except the defaults.
Rendering the QR code. Codename One core doesn’t currently ship a QR-code generator. Pick whichever option fits your deployment:
Server-side render (simplest). Send
urito your backend over HTTPS and have it return a PNG. The Google Charts API endpointhttps://chart.googleapis.com/chart?cht=qr&chs=300x300&chl={url-encoded-uri}and the open-sourcehttps://api.qrserver.com/v1/create-qr-code/?data={url-encoded-uri}both work; the latter doesn’t require Google API setup. Render the resulting PNG withURLImageorEncodedImage.create(bytes).Use a QR cn1lib. Community cn1libs such as
QRMakerprovide native generation. Add as a normal cn1lib dependency.Display the secret as a typed value. If you can’t render a QR code, show the user the Base32-encoded secret (the value after
secret=inuri) and ask them to type it manually into their authenticator’s "set up by hand" flow. Less convenient but works on every platform.
Phase 2 — Verification. On every sign-in after enrolment, ask the user for the current six-digit code and verify it against the stored secret. Use [com.codename1.components.OtpField] for the input:
OtpField field = new OtpField(6);
field.addCompleteListener(new ActionListener() {
    public void actionPerformed(ActionEvent evt) {
        String userInput = field.getText();
        // tolerance=1 allows the previous, current, and next 30-second
        // windows to compensate for clock skew between the device and the
        // server. tolerance=0 is strict but unforgiving; tolerance=2 or 3
        // is more permissive but increases the brute-force attack surface.
        if (Otp.verifyTotp(secret, userInput, 1)) {
            // Where this check runs on your server, record the time
            // step this code belongs to and reject a second code from
            // the same step: verifyTotp is stateless, so a captured
            // code stays valid for the rest of the tolerance window.
            grantAccess();
        } else {
            field.clear();
            Dialog.show("Invalid code", "Try again", "OK", null);
        }
    }
});
form.add(field);
Server-side verification. When your backend does the verification, the corresponding Java looks the same — Otp.verifyTotp(storedSecret, codeFromClient, 1). Make sure you rate-limit verification attempts (for example, lock the account after 5 wrong codes within a minute) and log failures, since the 6-digit search space is small enough to be brute-forced without that. Record the time step that each accepted code belongs to and refuse a second code from the same step for that user. verifyTotp is stateless, so a code stays valid for the rest of the tolerance window once it’s been used, and rate limiting doesn’t help because a replayed code isn’t a wrong one. RFC 6238 requires this single-use check.
OTP input widget
com.codename1.components.OtpField is a segmented input — one box per character, that advances to the next box as the user types and steps back on backspace. This is the standard pattern for SMS confirmation and authenticator-app entry screens:
OtpField otp = new OtpField(6);                  // 6 digits, numeric
otp.addCompleteListener(new ActionListener() {
    public void actionPerformed(ActionEvent evt) {
        if (Otp.verifyTotp(secret, otp.getText(), 1)) {
            // accepted
        } else {
            otp.clear();
        }
    }
});
form.add(otp);
Style the boxes through the UIIDs OtpField (the container) and OtpDigit (each box). The component supports alphanumeric input via the two-argument constructor (new OtpField(8, false)), and pasting a full code into any one box distributes the characters across the remaining boxes automatically.
Algorithm identifier reference
The string constants exposed by these classes are listed below so you can pick them out at a glance.
| Class | Constant | Algorithm string |
|---|---|---|
|
|
|
|
|
|
|
|
|
|
|
|
|
|
|
|
|
|
|
|
|
|
|
|
|
|
|
|
| Same as the JWT |
RSA_OAEP_SHA256 uses SHA-256 for the label hash and for MGF1 alike. The JCE reading of that same transformation name leaves MGF1 on SHA-1, so a JVM backend that names the string and nothing else produces a BadPaddingException against ciphertext from a Codename One app, and the other way round. Codename One can’t follow the JCE here: Web Crypto and Apple’s SecKey both take one hash and apply it to both, so the split pairing can’t be expressed on the JavaScript or iOS ports at all. Have the other side name SHA-256 for the mask as well, which on a JVM means passing an OAEPParameterSpec of ("SHA-256", "MGF1", MGF1ParameterSpec.SHA256, PSource.PSpecified.DEFAULT) to Cipher.init rather than relying on the provider default. Dropping to RSA_PKCS1 also makes the two sides agree, and is the wrong fix: PKCS#1 v1.5 encryption padding is what OAEP exists to replace.Key sizes and recommended defaults
AES: 256 bits (
KeyGenerator.aes(256)) for new code. 128 bits is also acceptable and faster; pick 192 only if you have a specific reason.RSA: 2048 bits minimum (
KeyGenerator.rsa(2048)). Use 3072 or 4096 if you need a longer security margin — key generation gets slow above 2048 so run it on a background thread.HMAC: a key at least as long as the hash output (32 bytes for HMAC-SHA-256).
KeyGenerator.hmac(256)returns a key of the requested bit length.TOTP / HOTP: 160 bits (20 bytes) is the de-facto standard for authenticator-app compatibility.