macOS Desktop Build Options
Launch Codename One Settings from the Maven project root and open Hints to configure desktop.mac.* build hints such as entitlements and Info.plist entries:
mvn cn1:settings
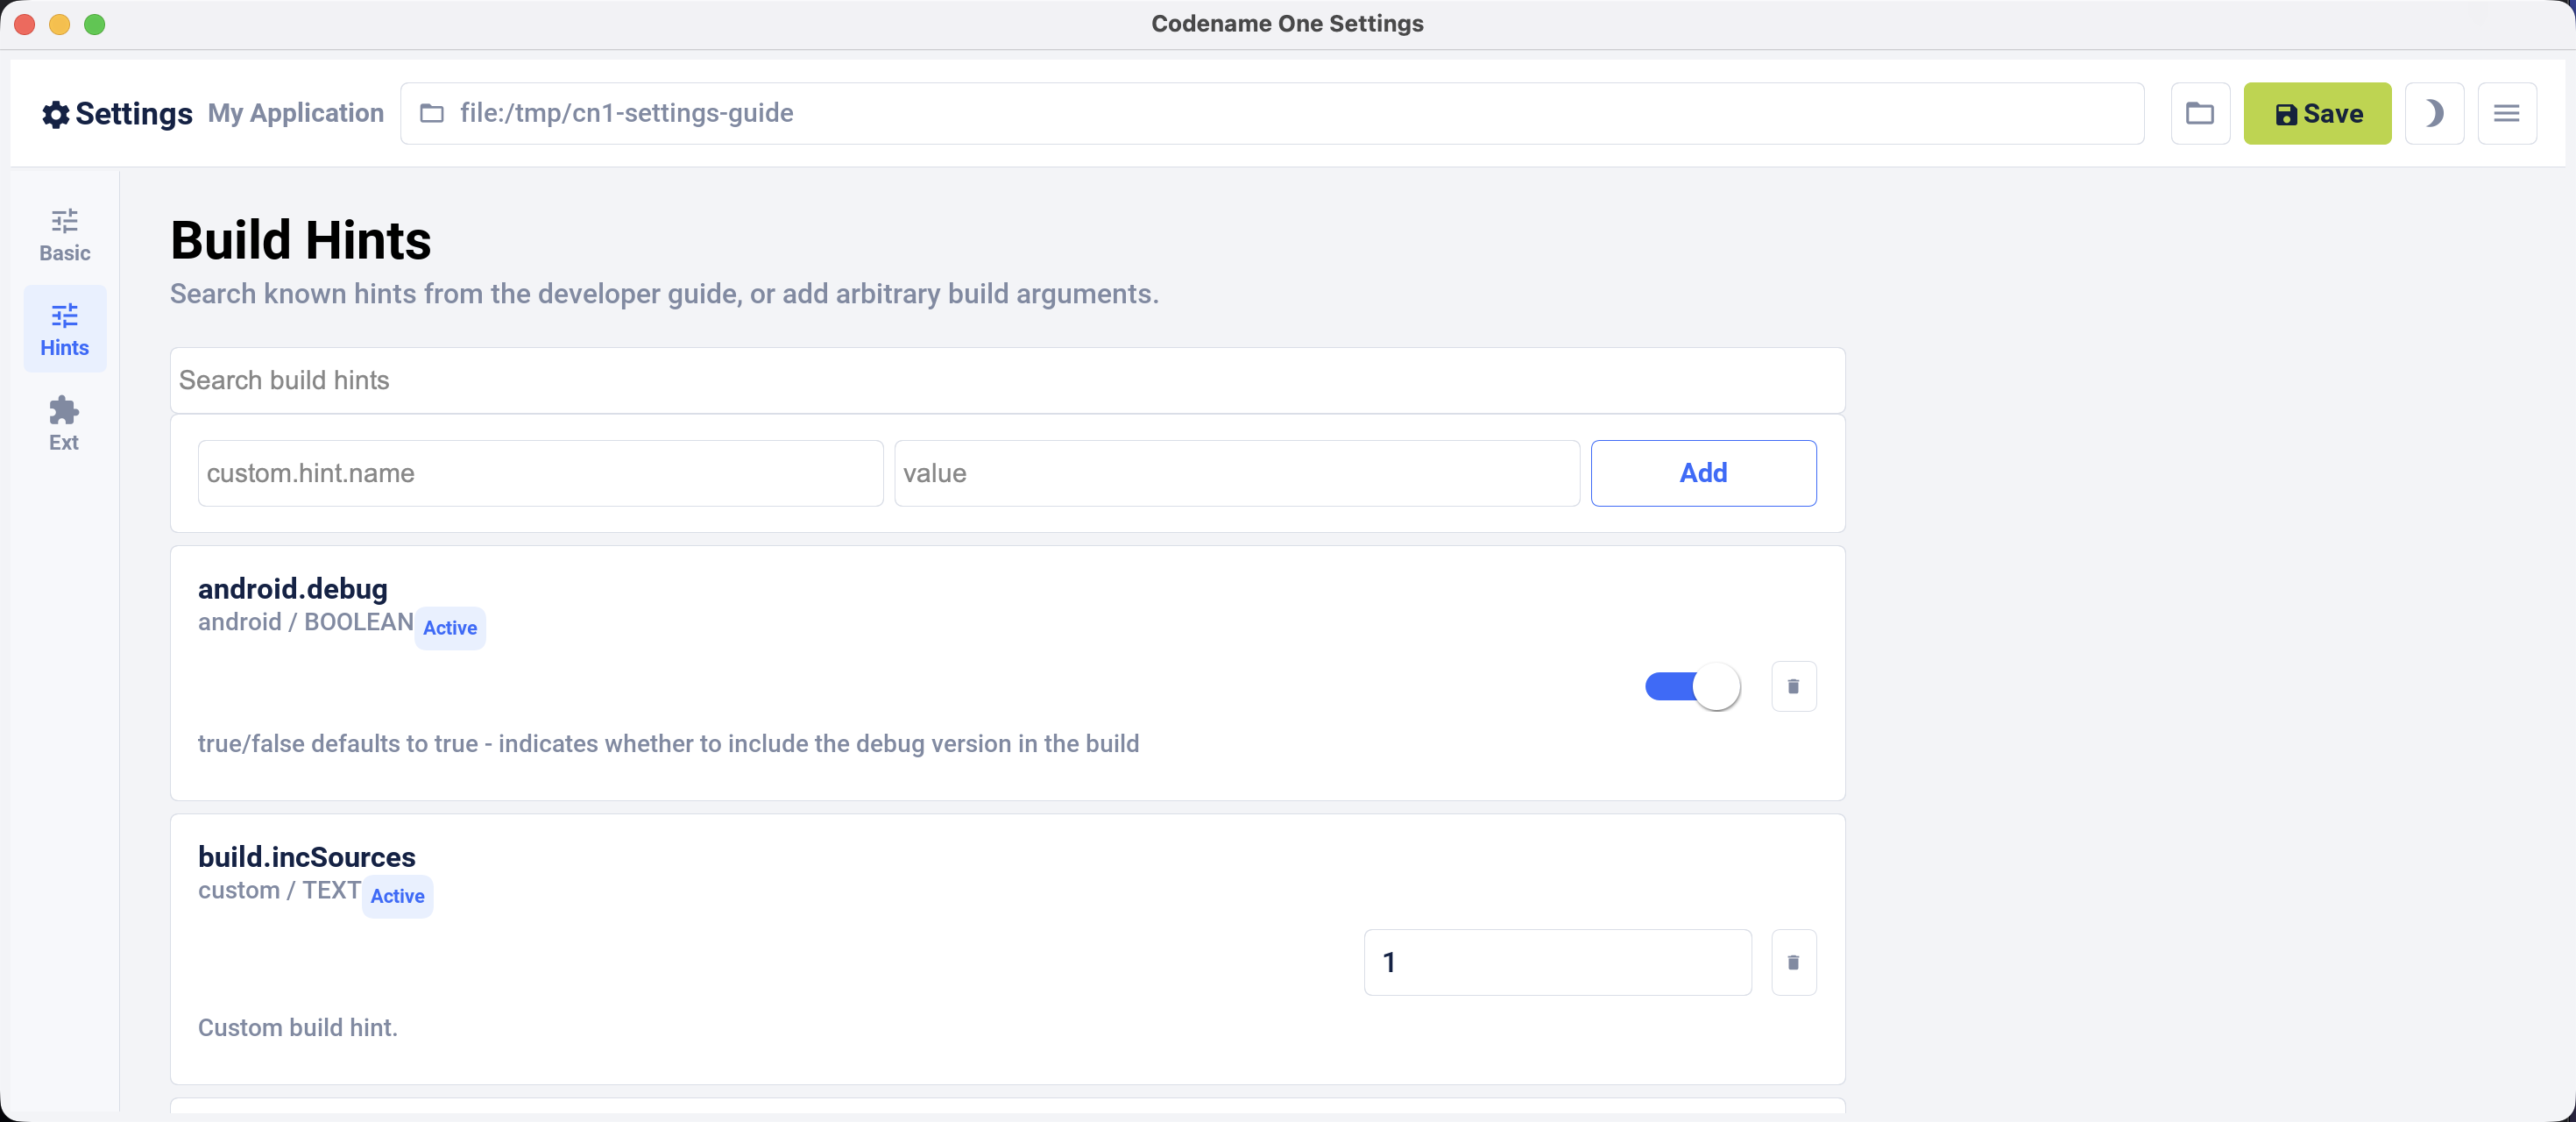
Desktop signing values that aren’t build hints are top-level entries in common/codenameone_settings.properties: codename1.desktop.mac.certificate contains the .p12 path and codename1.desktop.mac.certificatePassword contains its password. The Maven desktop macOS build reads these properties together with the desktop.mac.* hints.
Bundle Types
Three bundle types dictate what the build server produces for you when you build your project as a Desktop macOS App.
DMG - Produces a
.DMGdisk image with your app. This is the preferred format for distributing your app outside of the Mac App Store. If you provide a Developer ID Application certificate (see "Understanding Certificates" below), the app will be signed so that users won’t receive warnings about "Unidentified developer" when they install your app.Sandboxed DMG - Same as DMG bundle type except that your app is set up to use the app sandbox. This is typically used to test an app that’s being distributed via the App Store, since App Store apps must use the sandbox. If you select this bundle type, you’re required to provide a Mac App Distribution Certificate, and you should also specify entitlements required for your app to function correctly. For more information about the app sandbox, see Apple’s documentation on the subject.
Mac App Store Upload (PKG) - Produces a
.PKGfile that you can upload to the Mac App Store. This requires that you provide both a Mac App Distribution certificate, and a Mac App Installer certificate (see "Understanding Certificates" below). Both of these certificates should be embedded into a single.p12file (See "Exporting Certificates as p12" below).
Understanding Mac Certificates
mac.desktop-vm build hint is ignored if you include a certificate with your app. This limitation should be fixed soon.For the purposes of Mac application distribution, there are 3 types of certificates that you will be interested in. The type(s) of certificate required will depend on the type of bundle you generate. The certificate types are:
Developer ID Application Certificate (Mac applications)
This type of certificate is used to sign an app to be distributed outside of the Mac App Store as a DMG image. This corresponds to the "DMG" bundle type. You can identify this kind of certificate because its identity will be of the form "Developer ID Application: YOUR COMPANY NAME (SOMECODE)." For example, Developer ID Application: Acme Widgets Corp. (XYSD5YF).
Mac App Distribution Certificate (Mac App Store)
This type of certificate is used to sign the.app bundle for an app that’s to be distributed in the Mac App Store. This certificate is required for both the "Sandboxed DMG," and "Mac App Store Upload (PKG)" bundle types. You can identify this kind of certificate because its identity will be of the form "3rd Party Mac Developer Application: YOUR COMPANY NAME (SOMECODE)." For example, 3rd Party Mac Developer Application: Acme Widgets Corp. (XYSD5YF).
Mac App Installer Certificate (Mac App Store)
This type of certificate is used to sign the.pkg installer for an app that’s being submitted to the Mac App Store. This certificate is required for the "Mac App Store Upload (PKG)" bundle type. You can identify this kind of certificate because its identity will be of the form "3rd Party Mac Developer Installer: YOUR COMPANY NAME (SOMECODE)." For example, 3rd Party Mac Developer Installer: Acme Widgets Corp. (XYXD5YF).
Obtaining Certificates
If you have an Apple developer account, you can manage your certificates here.
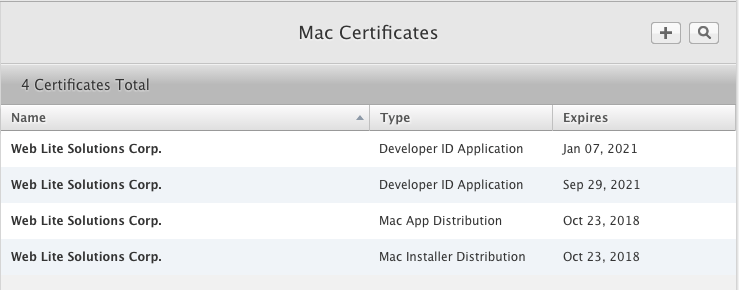
The screenshot above shows an account that already has the three kinds of certificates you will require:
Developer ID Application - Used for the DMG bundle type.
Mac App Distribution - Used for the Sandboxed DMG and Mac App Store Upload (PKG) bundle types.
Mac App Installer - Used for the Mac App Store Upload (PKG) bundle type.
If your account doesn’t yet have a certificate of the required type, you should begin by pressing the "+" button in the upper right. This will bring you to a page asking "What type of Certificate do you need?" Two options on this page will interest you:
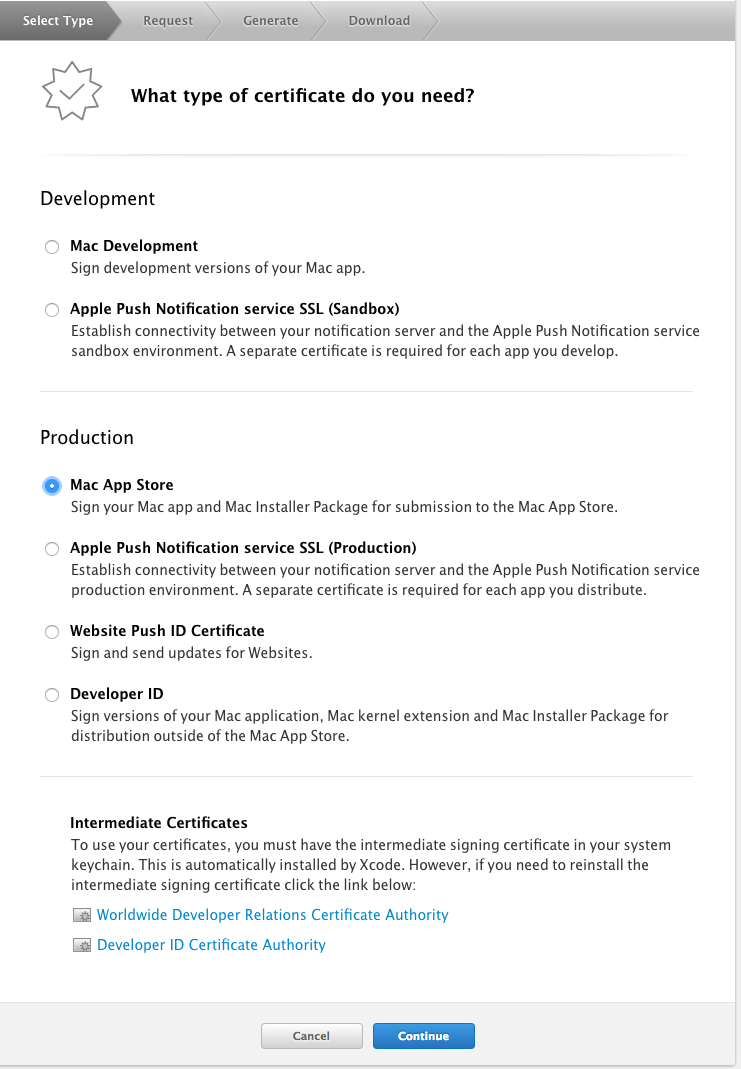
Production > Mac App Store - For both the Mac App Distribution and Mac App Installer certificates.
Production > Developer ID - For the Developer ID Application certificate.
Select the option corresponding to the certificate you wish to generate. In either case, you’ll be taken to a form to select whether you want an "Installer" certificate or an "Application" certificate. Select the appropriate type.
You will then be prompted to upload a Certificate Signing Request (CSR) file, and it will provide instructions on how to do this via the Keychain app.
After generating the certificates, you should download them to your Mac, and import them into your keychain. You should be able to accomplish this by simply double-clicking the downloaded ".cer" file, and following the prompts.
Exporting Certificates as P12
Notice that Mac apps may require three different kinds of certificates, yet codename1.desktop.mac.certificate accepts a single P12 file. This isn’t a mistake. P12 files may contain more than one certificate, and you’re expected to include all the certificates that the build server may require inside a single P12. The build server automatically extracts the certificates it needs according to the bundle type.
When building the "DMG" bundle type, the build server will look for a "Developer ID Application Certificate" inside the P12. If one is found, it will be used to sign the app bundle.
The "Sandboxed DMG" target will look for a "Mac App Distribution Certificate" certificate in the P12.
The "Mac App Store Upload (PKG)" target will require both a "Mac App Distribution Certificate" and a "Mac App Installer Certificate" to be included in the P12.
The easiest way to produce a P12 that includes all 3 kinds of certificates is to export them from the Keychain Access app (Requires a Mac). Select all 3 certificates at once (using CMD-click), then right-click and select "Export 3 Items…"
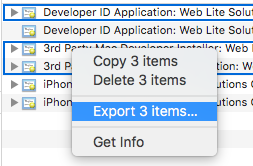
You will then be prompted to select a location to save the .p12 file, as well as selecting a password for the file.
Entitlements
When distributing apps in the Mac App Store, or when using the "Sandboxed DMG" bundle type, your app is run inside a sandboxed environment, meaning that it doesn’t have access to the outside world. It’s provided its own "sandboxed" container for file system access, and it doesn’t get any network access. If your app requires access to the "outside world," request the required entitlements with desktop.mac.entitlement. entries in the *Hints view.
For more information about the app sandbox, and a full list of entitlements, see Apple’s documentation on the subject.
desktop.mac.entitlement.XXXX where XXX is the entitlement you wish to set. For example, desktop.mac.entitlement.com.apple.security.network.client=trueCustom Info.plist Entries
You can add custom entries to the Info.plist file using the following build hints:
- desktop.mac.plist.KEYNAME
Injects the entry with key
KEYNAMEinto the Info.plist file. For example,desktop.mac.plist.LSApplicationCategoryType=public.app-category.business
Native macOS Build (AppKit)
The "macOS Desktop" section above covers the JavaSE bundled-JRE wrapper. The native macOS build is a separate, ahead-of-time compiled target: ParparVM translates your bytecode to C and the result is built into a real AppKit application. Its Xcode project targets the macOS SDK, links AppKit and Metal, and carries no UIKit at all. The output is a single signed .app bundle suitable for Mac App Store or Developer ID distribution.
This target is a good fit when:
You need native-speed startup and rendering on the Mac, not a wrapped JVM.
You want a single
.appbundle without a JRE inside it.You want the Mac conventions your users expect: a real title bar, a real menu bar, and real windows.
Java source is shared with your other targets; no Mac-specific code is required.
A few device capabilities have no macOS counterpart and are inert rather than
emulated: motion sensors, orientation locking, SMS, and background task
scheduling. Display reports each of them as unsupported, so an application
that checks before using one behaves correctly without a Mac-specific branch.
Accessibility is partly wired. Codename One builds a portable semantics tree for
its lightweight components — see Accessibility Semantics — and this port
maps announceForAccessibility() onto an AppKit announcement, so live messages
reach VoiceOver. What it doesn’t do yet is publish that tree through
NSAccessibility, so VoiceOver can’t navigate the interface element by element.
The tree itself is shared and already consumed by the other ports, so what’s
missing here is this port’s bridge to it rather than the semantics.
Each additional window your application opens through the Window API is a real NSWindow, with its own GPU surface rather than a raster copied from somewhere else. See Desktop Windows.
Local Build
To generate an Xcode project locally that you can open and run on the Mac:
mvn -B -Dcodename1.platform=ios -Dcodename1.buildTarget=mac-source package
The output is written to:
target/<finalName>-mac-source/<MainClass>.xcodeproj
Open the project in Xcode, select the My Mac destination, and press Run. The resulting .app is identical in shape to one produced by the cloud build server.
Cloud Build
To produce a release-ready signed Mac app on the Codename One build server:
mvn -B -Dcodename1.platform=ios -Dcodename1.buildTarget=mac-os-x-native package
Mac distribution requires its own certificates and provisioning profile — Apple issues separate Mac App Distribution (3rd Party Mac Developer Application) and Developer ID Application certificates that aren’t interchangeable with the iPhone Distribution certificate used for iOS App Store builds. Configure them via the parallel codename1.mac.* hints:
| Hint | Purpose |
|---|---|
| Mac bundle identifier (the App Store Connect record is distinct from the iOS one). |
| Path to the |
| Password to unlock the P12. |
| Path to the Mac |
The Apple Developer Team ID itself can stay shared with your iOS build (a single Apple Developer account) — macos.teamId falls back to ios.release.teamId when not set. The server returns a signed .app bundle.
IDE Shortcuts
The IntelliJ workspace template ships two macOS run configurations alongside the iOS ones:
Mac Native Project (Local Builds folder) — equivalent to running
mvn package -Dcodename1.buildTarget=mac-source. Use this to generate the Xcode project for hands-on debugging.Mac Native Build (Build Server folder) — equivalent to
mvn package -Dcodename1.buildTarget=mac-os-x-native. Use this for cloud builds.
Distribution
The native macOS build supports both Mac App Store and Developer ID distribution. The generated Xcode project includes two ExportOptions-*-Mac.plist files in dist/:
ExportOptions-AppStore-Mac.plist— App Store distribution (sandboxed, hardened runtime off).ExportOptions-DeveloperID-Mac.plist— Developer ID distribution (hardened runtime on, sandbox off).
After archiving in Xcode, run:
xcodebuild -exportArchive \
  -archivePath build/<MainClass>.xcarchive \
  -exportOptionsPlist dist/ExportOptions-AppStore-Mac.plist \
  -exportPath build/export
Entitlements
The native macOS build emits a <MainClass>.entitlements plist (or <MainClass>-AppStore.entitlements + <MainClass>-DeveloperID.entitlements when both channels are configured). The defaults are sensible: App Sandbox on for the App Store channel, hardened runtime on for the Developer ID channel, network client access enabled, user-selected file access enabled. The signing-certificate identity defaults to Apple Distribution for the App Store channel and Developer ID Application for the Developer ID channel.
Supported Distribution Channels
| Channel | Notes |
|---|---|
App Store | Sandboxed, hardened runtime off. Signed with Apple Distribution; uploaded via App Store Connect. |
Developer ID | Hardened runtime on, sandbox off. Signed with Developer ID Application; notarized before distribution. |
If You Need the Previous Mac Behavior
Projects that depend on the Mac Catalyst build this target replaced can still build it: set macNative.enabled=true and build the iOS target, which is what Catalyst has always been. See Working with Mac Catalyst.